BUILT-IN OVEN [en] INSTRUCTION MANUAL C28MT23H0
en Table of contents [ en] I NSTRUCTI ON MANUAL 8 Intended use . . . . . . . . . . . . . . . . . . . . . . . . . . . . . 4 ( Important safety information . . . . . . . . . . . . . . . 5 General information . . . . . . . . . . . . . . . . . . . . . . . . . . . 5 Microwave . . . . . . . . . . . . . . . . . . . . . . . . . . . . . . . . . . 6 Cleaning function . . . . . . . . . . . . . . . . . . . . . . . . . . . . . 7 ] Causes of damage . . . . . . . . . . . . . . . . . . . . . . . .
en Intended use J Tested for you in our cooking studio. . . . . . . . 33 Silicone moulds . . . . . . . . . . . . . . . . . . . . . . . . . . . . . 33 Cakes and small baked items . . . . . . . . . . . . . . . . . . 33 Bread and rolls. . . . . . . . . . . . . . . . . . . . . . . . . . . . . . 37 Pizza, quiche and savoury cakes . . . . . . . . . . . . . . . . 39 Bakes and soufflés. . . . . . . . . . . . . . . . . . . . . . . . . . . 40 Poultry . . . . . . . . . . . . . . . . . . . . . . . . . . . . . . . . .
Important safety information (Important safety information I mpor t ant saf et y i nf or mat i on General information : Warning – Risk of fire! Combustible items stored in the cooking compartment may catch fire. Never store combustible items in the cooking compartment. Never open the appliance door if there is smoke inside. Switch off the appliance and unplug it from the mains or switch off the circuit breaker in the fuse box. Risk of fire! ■ Loose food remnants, fat and meat juices may catch fire.
en Important safety information Microwave : Warning – Risk of fire! Using the appliance for anything other than its intended purpose is dangerous and may cause damage. The following is not permitted: drying out food or clothing, heating slippers, grain or cereal pillows, sponges, damp cleaning cloths or similar. For example, heated slippers and grain or cereal pillows may catch fire, even several hours after they have been heated.The appliance must only be used for the preparation of food and drinks.
Important safety information ■ If using the appliance in microwave mode only, placing cookware and containers made of metal or featuring metal detailing inside the appliance may cause sparks when the appliance is operating. This may damage the appliance. Never use metal containers when using the appliance in microwave mode only. : Warning – Risk of electric shock! The appliance is a high-voltage appliance. Never remove the casing.
en Causes of damage ]Causes of damage Causes of damge General information Caution! ■ Accessories, foil, greaseproof paper or ovenware on the cooking compartment floor: do not place accessories on the cooking compartment floor. Do not cover the cooking compartment floor with any sort of foil or greaseproof paper. Do not place ovenware on the cooking compartment floor if a temperature of over 50 ºC has been set. This will cause heat to accumulate.
Environmental protection 7Environmental protection ■ en Open the appliance door as infrequently as possible when the appliance is in use. Your new appliance is particularly energy-efficient. Here you can find tips on how to save even more energy when using the appliance, and how to dispose of your appliance properly. Envi r onment al pr ot ect i on Saving energy ■ ■ Only preheat the appliance if this is specified in the recipe or in the tables in the operating instructions.
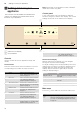
en Getting to know your appliance Note: Depending on the appliance model, individual details and colours may differ. *Getting to know your appliance Control panel In this section, we will explain the indicators and controls. You will also find out about the various functions of your appliance. In the control panel, set your appliance's different functions using the FullTouch TFT display. The current settings are shown on the FullTouch TFT display.
Getting to know your appliance • ¡ £ ± Microwave You can use the microwave to cook, heat up or defrost your dishes more quickly.~ "Microwave" on page 18 Microwave combination You can also use this to switch on a type of heating on the microwave.~ "Microwave" on page 18 Baking and roasting assistant Recommended settings for baking and roasting ~ "Baking and roasting assistant" on page 32 Microwave programmes You can use these to prepare food using the microwave.
en Accessories ‘ Top/bottom heating eco 50–275 °C ž Hot air eco 30-275 °C -------- For gently cooking selected types of food. Heat is emitted from above and below. This heating function is most effective between 150 and 250 °C. This type of heating is used to measure the energy consumption in the conventional mode. For gently cooking selected types of food on one level without preheating.
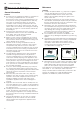
Accessories Inserting accessories The cooking compartment has three shelf positions. The shelf positions are counted from the bottom up. en When inserting the wire rack, ensure that the lug ‚ is at the rear and is facing downwards. The word "microwave" must be at the front and the curvature must be facing downwards ¾. D D When using positions 2 and 3, always insert the accessory between the two guide rods for a shelf position.
en Before using for the first time Glass pan Steaming set for ovens Decorative strip Cleaning the cooking compartment To eliminate the new-appliance smell, heat up the cooking compartment without anything in it and with the oven door closed. -------- 1. Remove the accessories from the cooking compartment. KBefore using for the first time Before you can use your new appliance, you must make some settings. You must also clean the cooking compartment and accessories.
Operating the appliance ■ ■ After the appliance has completed an operation, you will hear the cooling fan continuing to run until the cooking compartment is cooled as much as possible. Switch off your appliance when you do not need to use it. If no settings are made for a long time, the appliance switches off automatically. Setting and starting the appliance operation Example: ‚ Hot air at 170 °C 1. Touch the # touch button to switch on the appliance. You go directly to the ¢ Types of heating menu.
en Time-setting options 4. Once the set temperature has been reached, the "Rapid heating" function switches off automatically. The ° symbol disappears from the display. Place the food in the cooking compartment. OTime-setting options Ti me- set i ng opt i ons Your appliance has different time-setting options. Time-setting option Timer . + Cooking time * Ready at Use The timer functions like an egg timer. The appliance does not switch on and off automatically.
Childproof lock AChildproof lock Your appliance is equipped with a childproof lock so that children cannot switch it on accidentally or change any settings. Your appliance has two different locks. Chi l dpr o f l ock Lock Automatic childproof lock Activate/deactivate Via the MyProfile menu ~ "Basic settings" on page 17 One-time childproof lock Via the 0 touch button Note: As soon as you activate the childproof lock, the control panel is locked. The 0 and # touch buttons are not included.
en Microwave Childproof lock* Only key lock Door lock and key lock Automatic continuation When you close the door. Does not continue. Automatic childproof lock Deactivated Activated Operation after switch-on Main menu Types of heating Microwave Microwave combined operation Baking/roasting assistant Microwave programmes Night-time dimming Switched off Switched on (display dimmed between 10 p.m. and 5.59 a.m.
Microwave Accessories included Only the wire rack provided is suitable when using the microwave only. If you use the universal pan or the baking tray, this may create sparks, which may damage the cooking compartment. When using the appliance in combination with the microwave or "Dishes" mode, you can use the universal pan, baking tray or any other accessories that have been included with the appliance. When using the microwave, it is best to insert accessories at level 1, unless otherwise specified.
Sabbath mode en You will then need to open the appliance door to allow the steam to escape from the cooking compartment. Caution! Enamel damage: Do not start any operations when there is water on the cooking compartment floor. Before operation, wipe away the water from the cooking compartment floor. 1. Allow the appliance to cool down. 2. Remove the worst of the food remnants from the 3. 4. 5. 6. 7. 8. 9.
Home Connect Once the Sabbath mode duration has elapsed, a signal sounds. The appliance stops heating. Use the # touch button to switch off the appliance. Cancelling Sabbath mode Touch the # touch button to cancel Sabbath mode. oHome Connect This appliance is Wi-Fi-capable and can be remotely controlled using a mobile device. If the appliance is not connected to the home network, the appliance functions in the same way as an oven with no network connection and can still be operated via the display.
Cleaning agent en Remote diagnostics If a fault occurs, the after-sales service can use remote diagnostics to access your appliance. Contact the after-sales service, making sure that your appliance is connected to the Home Connect server and checking that the remote diagnostics service is available in your country.
Cleaning function Door panels Door handle Hot soapy water: Clean with a dish cloth and then dry with a soft cloth. Do not use a glass scraper or a stainless steel scouring pad. Hot soapy water: Clean with a dish cloth and then dry with a soft cloth. If descaler comes into contact with the door handle, wipe it off immediately. Otherwise, any stains will not be able to be removed.
en Cleaning function The dirtier the cooking compartment and the longer the dirt has been there, the higher the cleaning setting should be. A cleaning cycle requires only approx. 2.5 – 4.7 kilowatt hours. Note: For your safety, the cooking compartment door locks automatically. It cannot be opened again until the H symbol for the locking mechanism goes out in the status bar. The interior lighting remains off during cleaning.
Cleaning function Notes ■ During cleaning, the frame on the inside of the appliance door may discolour. This is normal and does not affect performance. The discolouration can only be removed using a stainless-steel cleaning agent. ■ Very bad soiling may cause white deposits to remain on the enamel surfaces. This is residue from the food and is harmless. It does not affect performance. You can remove these residues using lemon juice if required. en 2.
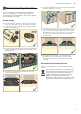
en Rails pRails With good care and cleaning, your appliance will retain its appearance and remain fully functional for a long time to come. This will tell you how to remove the shelves and clean them. Rai l s Detaching and refitting the rails Inserting the holders If the holders fall out when you remove the rails, these must be re-inserted. 1. The holders at the front differ from those at the rear (fig. !). 2.
Appliance door 3. Then fold it forwards and insert it (fig. #). 4. And push it downwards (fig. $). en Removing and fitting the door panels To facilitate cleaning, you can remove the glass panels from the appliance door. Removing the door panels from the appliance 1. Open the appliance door slightly. 2. Press on the right and left side of the cover (fig. !). 3. Remove the cover (fig. "). 1 2 5. Completely reinsert the pull-outs.
en Appliance door : Warning – Risk of serious damage to health! If the screws are loosened, the safety of the appliance can no longer be guaranteed. Microwave energy may escape. Never loosen the screws. Do not unscrew the four black screws (fig. &). Risk of injury! ■ Scratched glass in the appliance door may develop into a crack. Do not use a glass scraper, sharp or abrasive cleaning aids or detergents. ■ The hinges on the appliance door move when opening and closing the door, and you may be trapped.
Trouble shooting en 3Trouble shooting mains or switch off the circuit breaker in the fuse box. Contact the after-sales service. Tr oubl e sho t i ng If a fault occurs, there is often a simple explanation. Before calling the after-sales service, please refer to the fault table and attempt to correct the fault yourself. : Warning – Risk of injury! Tip: If a meal does not turn out exactly as you wanted, refer to the "Tested for you in our cooking studio" section.
en Customer service Maximum operating time exceeded Your appliance ends the operation automatically when no cooking time is set and the setting has not been changed for a long time. The actual cooking time until the operation is stopped automatically varies according to the selected settings. The appliance display indicates that the operation will end automatically. Afterwards, the operation is stopped. To use the appliance again, switch it off beforehand.
Programmes PProgrammes You can prepare food very easily using the various programmes. You select a programme and enter the weight of your food. The program then applies the most suitable settings. To achieve good results, the cooking compartment must not be too hot for the type of food you have selected. If it is, a message will appear on the display. Allow the cooking compartment to cool down and start again.
en Baking and roasting assistant Switching off the appliance Touch the # touch button to switch off the appliance. nBaking and roasting assistant The baking and roasting assistant helps you to prepare meals with ease. The appliance applies the most suitable settings. To achieve good results, the cooking compartment must not be too hot for the type of food you have selected. If it is, a message will appear on the display. Allow the cooking compartment to cool down and start again.
Tested for you in our cooking studio en JTested for you in our cooking studio settings tables will be reduced. The cake will not brown as much underneath. Baking in combination with a microwave is only possible on one level. Here, you can find a selection of dishes and the ideal settings for them. We will show you which type of heating and temperature are best suited to your dish. You will get information on suitable cooking accessories and the height at which they should be placed in the oven.
en Tested for you in our cooking studio Note: Baking times cannot be reduced by using higher temperatures. Cakes or small baked items would only be cooked on the outside, and would not be fully baked in the middle. The setting values apply to food that is placed into a cold cooking compartment; by doing this, you can make energy savings of up to 20 per cent.If you preheat the oven, you can reduce the indicated baking times by several minutes.
Tested for you in our cooking studio en Dish Accessories/cookware Shelf posi- Heating tion function Temperature in °C Shortcrust tart with moist topping Universal pan 1 150-170 Shortcrust tart with moist topping Universal pan 1 160-180 - 60-80 Swiss flan Universal pan 1 190-210 - 45-55 Swiss flan Universal pan 1 180-200 - 60-70 Yeast cake with dry topping Baking tray 1 160-180 - 15-25 Yeast cake with dry topping Baking tray 1 150-170 - 20-35 Yeast cake with dry toppin
en Tested for you in our cooking studio Dish Accessories/cookware Shelf posi- Heating tion function Temperature in °C Macaroons Baking tray 2 90-110 MW power in Cooking watts time in mins. 20-40 Macaroons, 2 levels Universal pan + baking tray 3+1 90-110 - ‚ ‚ 20-40 * Preheat ** Preheat for 5 mins., do not use quick heat function Tips on baking You want to find out whether the cake Push a cocktail stick into the highest point on the cake.
Tested for you in our cooking studio Bread and rolls Your appliance offers you a range of heating types for baking bread and rolls. You can find the ideal settings for many dishes in the settings tables. Also refer to the notes in the section on allowing dough to rise. Only use original accessories supplied with your appliance. These have been tailored to the cooking compartment and the operating modes of your appliance. Shelf positions Use the indicated shelf positions.
en Tested for you in our cooking studio Types of heating used: ■ ‚ Hot air ■ ƒ Top/bottom heating ■ ■ ■ ‡ Circo-roasting ˆ Full-surface grill ‰ Centre-area grill Dish Accessories Shelf posi- Heating tion function Temperature in °C Cooking time in mins. Bread White bread, 750 g Universal pan or cake tin 1 180-200* 30-40 White bread, 750 g Universal pan or cake tin 1 ƒ ‚ Multigrain bread, 1.5 kg Universal pan or cake tin 1 ƒ Multigrain bread, 1.
Tested for you in our cooking studio Pizza, quiche and savoury cakes Your appliance offers you a range of heating types for preparing pizza, quiche and savoury cakes. You can find the ideal settings for many dishes in the settings tables. Also refer to the notes in the section on allowing dough to rise. Only use original accessories supplied with your appliance. These have been tailored to the cooking compartment and the operating modes of your appliance.
en Tested for you in our cooking studio Types of heating used: ■ ‚ Hot air ■ ■ ƒ Top/bottom heating „ Circotherm intensive Dish Accessories Shelf posi- Type of tion heating Temperature in °C MW power in Cooking watts time in mins.
Tested for you in our cooking studio You can also prepare soufflés in a water bath in the universal pan. To do so, slide the universal pan in at level 1. By preparing several dishes at the same time, you can make energy savings of up to 45 per cent. Position baking tins/dishes next to one another in the cooking compartment. Accessories Ensure that you always use suitable accessories and that they are placed in the oven the right way around.
en Tested for you in our cooking studio Poultry Your appliance offers you a range of heating types for preparing poultry. You can find the ideal settings for certain dishes in the settings tables. Roasting on the wire rack Roasting on the wire rack is particularly well suited for larger poultry or for multiple pieces at the same time. Slide the wire rack in at the indicated shelf position with the imprint "Microwave" facing the appliance door and the outer rail facing downwards.
Tested for you in our cooking studio ■ ■ ■ If using duck breast, score the skin. Do not turn duck breasts. When you turn poultry, ensure that the breast side or the skin side is underneath at first. Poultry will turn out particularly crispy and brown if you baste it towards the end of the roasting time with butter, salted water or orange juice. Remove unused accessories from the cooking compartment. This will achieve the best possible en cooking results and energy savings of up to 20 per cent.
en Tested for you in our cooking studio Meat Your appliance offers you many heating types for preparing meat. You can find the ideal settings for many dishes in the settings tables. Roasting and braising Baste lean meat with fat as required or cover it with strips of bacon. Score the rind crosswise. If you turn the joint when cooking, ensure that the rind is underneath at first. When the joint is ready, turn off the oven and allow it to rest for another 10 minutes in the cooking compartment.
Tested for you in our cooking studio Use tongs to turn the pieces of food you are grilling. If you pierce the meat with a fork, the juices will run out and it will become dry. Do not add salt until after the meat has been grilled. Salt draws water from the meat. Notes ■ The grill element switches itself continuously on and off; this is normal. The set temperature determines how frequently this occurs. ■ Smoke may be produced when grilling.
en Tested for you in our cooking studio Dish Accessories/cookware Shelf posi- Type of tion heating Temperature in °C Steak, 3 cm thick, medium Wire rack 2 290 Burger, 3-4 cm thick**** Wire rack 2 ˆ ˆ MW power in Cooking watts time in mins. 15-20 290 - 20-30 Veal Joint of veal, 1.5 kg Cookware, uncovered 1 160-170 - 100-120 Joint of veal, 1.5 kg Cookware, covered 1 200-210 90 70-80 Knuckle of veal, 1.5 kg Cookware, uncovered 1 200-210 - 100-110 Knuckle of veal, 1.
Tested for you in our cooking studio Fish Your appliance offers you a range of heating types for preparing fish. You can find the ideal settings for many dishes in the settings tables. The whole fish does not have to be turned. Place the whole fish into the cooking compartment in swimming position with the dorsal fin facing upwards. Placing half a potato or a small oven-proof container in the stomach cavity of the fish will provide stability.
en Tested for you in our cooking studio Types of heating used: ■ ‡ Circo-roasting ■ „ Circotherm intensive ■ ■ ˆ Full-surface grill • Microwave Dish Accessories/cookware Shelf posi- Type of tion heating Temperature in °C MW power in Cooking watts time in mins. Fish Fish, grilled, whole 300 g, e.g. trout Cookware, uncovered 1 170-190 - 20-30 Fish, grilled, whole 300 g, e.g. trout Wire rack 2 250 90 15-20 Fish, braised, whole 300 g, e.g.
Tested for you in our cooking studio Stir or turn the food two to three times during this time. After heating up the food, leave it to rest for two to three minutes to compensate for the temperature difference. The food transfers heat to the cookware. It can become very hot when only using a microwave for cooking. Shelf positions Use the indicated shelf positions. Cooking on one level Adhere to the specifications in the table. Cooking on two levels Use Hot air.
en Tested for you in our cooking studio Dish Accessories/cookware Shelf posi- Type of tion heating Temperature in °C Potato pockets, filled (turn during cooking) Croquettes Universal pan 2 „ 190-210 MW power in Cooking watts time in mins.
Tested for you in our cooking studio Stir two to three times during the cooking time. en Remove the popcorn bag after 1^ minutes and shake it to ensure that the popcorn doesn't burn. Wipe the cooking compartment clean after preparation. Microwave popcorn Use flat, heat-resistant glass cookware, e.g. the lid of an ovenproof dish. Do not use porcelain or heavily curved plates. Place the popcorn bag onto the cookware with the labelled side facing downwards. Use the settings indicated in the table.
en Tested for you in our cooking studio Recommended setting values Here, you can find specifications for various dishes. The temperature and baking time depend on the consistency and amount of the dough. Settings ranges are indicated for this reason. Try with the lower values first. A lower temperature results in more even browning. You can increase the temperature next time if necessary. Note: Baking times can not be reduced by using higher temperatures.
Tested for you in our cooking studio Acrylamide in foodstuffs Acrylamide is mainly produced in grain and potato products prepared at high temperatures, such as potato en crisps, chips, sliced bread, bread rolls, bread or fine baked goods (biscuits, gingerbread, spiced biscuit). Tips for keeping acrylamide to a minimum General ■ Keep cooking times as short as possible. ■ Cook food until it is golden brown, but not too dark. ■ Large, thick pieces of food contain less acrylamide.
en Tested for you in our cooking studio Dish Cookware Shelf posi- Heating tion function Searing time Temperain mins ture in °C Fillet of pork, whole Cookware, uncovered 1 Š 4-6 85* Cooking time in mins 45-70 Cookware, uncovered 1 Š 6-8 100* 150-190 Cookware, uncovered 1 4-6 85* 90-120 Sirloin, 5-6 cm thick Cookware, uncovered 1 6-8 85* 120-180 Beef medallions/rump steak, 4 cm thick Cookware, uncovered 1 Š Š Š 4 85* 40-60 Veal Joint of veal, 4-5 cm thick, 1.
Tested for you in our cooking studio Type of heating used: ■ en ‚ Hot air Dish Accessories Shelf posi- Type of tion heating Temperature in °C Pomes (apple rings, 3 mm thick, 200 g per wire rack) Stone fruit (plums) Wire rack 2 ‚ 80 Cooking time in hours 4-7 Wire rack 2 80 8-10 Root vegetables (carrots), grated, blanched Wire rack 2 80 4-7 Sliced mushrooms Wire rack 2 60 6-8 Herbs, washed 1-2 wire racks - ‚ ‚ ‚ ‚ 60 2-6 Wipe the rims of the jars, as they must be clean.
en Tested for you in our cooking studio Dish Cookware Vegetables, e.g. cucumbers 1-litre preserving jars Shelf posi- Type of tion heating 1 ‚ Stone fruit, e.g. cherries, damsons 1-litre preserving jars 1 ‚ Pomes, e.g. apples, strawberries 1 ‚ 1-litre preserving jars Allowing the dough to prove at dough proving setting Yeast dough will prove considerably more quickly using the "Dough proving" heating type than at room temperature and does not dry out.
Tested for you in our cooking studio Leave the defrosted food to rest for another 10 to 30 minutes in the appliance whilst it is switched off, so that the temperature balances out. en Tip: If you have quantities other than those indicated in the settings table, this basic rule will help: double the quantity equates to roughly double the cooking time. Type of heating used: ■ • Microwave Dish Accessories/cookware Shelf posi- Type of tion heating Temperature MW power in in °C watts Cooking time in mins.
en Tested for you in our cooking studio Dish Miscellaneous Defrosting butter, 125 g Accessories/cookware Shelf posi- Type of tion heating Temperature MW power in in °C watts Cooking time in mins. Cookware, uncovered - 7-9 1 • 90 * Turn halfway through cooking time Heating food in a microwave Using the microwave, you can heat food, or defrost and heat it in a single step. Take ready-to-eat meals out of the packaging.
Tested for you in our cooking studio en Dish Cookware Shelf posi- Type of tion heating Temperature MW power in Cooking in °C watts time in mins. Vegetables, frozen loose, 250 g Cookware, covered 1 - 600 8-12 Creamed spinach, frozen block, 450 g Cookware, covered 1 • • - 600 11-16 Dishes, chilled Plated meal, 1 portion Cookware, covered 1 - 600 4-8 Soup, stew, 400 ml Cookware, covered 1 - 600 5-7 Side dishes, e.g. pasta, dumplings, potatoes, rice Bakes, 400 g, e.g.
en Tested for you in our cooking studio Dish Accessories/cookware Shelf posi- Type of tion heating Temperature in °C Small cakes Baking tray 1 160* Cooking time in mins.
6
6
*9001430761* 9001430761 981130 en