BUILT-IN OVEN [en] INSTRUCTION MANUAL C27CS22H0B
en Table of contents [ en] I NSTRUCTI ON MANUAL 8 Intended use . . . . . . . . . . . . . . . . . . . . . . . . . . . . . 4 ( Important safety information . . . . . . . . . . . . . . . 5 General information . . . . . . . . . . . . . . . . . . . . . . . . . . . 5 Halogen lamp. . . . . . . . . . . . . . . . . . . . . . . . . . . . . . . . 5 Cleaning function . . . . . . . . . . . . . . . . . . . . . . . . . . . . . 6 ] Causes of damage . . . . . . . . . . . . . . . . . . . . . . . . 7 General information .
en Intended use J Tested for you in our cooking studio. . . . . . . . 31 Silicone moulds . . . . . . . . . . . . . . . . . . . . . . . . . . . . . 31 Baking . . . . . . . . . . . . . . . . . . . . . . . . . . . . . . . . . . . . 31 Roasting and braising . . . . . . . . . . . . . . . . . . . . . . . . 33 Grilling . . . . . . . . . . . . . . . . . . . . . . . . . . . . . . . . . . . . 36 Convenience products . . . . . . . . . . . . . . . . . . . . . . . . 39 Yogurt . . . . . . . . . . . . . . . . . . . . .
Important safety information (Important safety information I mpor t ant saf et y i nf or mat i on General information : Warning – Risk of fire! Combustible items stored in the cooking compartment may catch fire. Never store combustible items in the cooking compartment. Never open the appliance door if there is smoke inside. Switch off the appliance and unplug it from the mains or switch off the circuit breaker in the fuse box. Risk of fire! ■ Loose food remnants, fat and meat juices may catch fire.
en Important safety information : Warning – Risk of electric shock! When replacing the cooking compartment bulb, the bulb socket contacts are live. Before replacing the bulb, unplug the appliance from the mains or switch off the circuit breaker in the fuse box. Cleaning function : Warning – Risk of fire! Loose food residues, grease and meat juices may catch fire during the cleaning function. Before starting the cleaning function, remove coarse dirt from the cooking compartment and from the accessories.
Causes of damage en ]Causes of damage 7Environmental protection General information Your new appliance is particularly energy-efficient. Here you can find tips on how to save even more energy when using the appliance, and how to dispose of your appliance properly. Causes of damge Caution! ■ Accessories, foil, greaseproof paper or ovenware on the cooking compartment floor: do not place accessories on the cooking compartment floor.
en ■ ■ ■ Environmental protection Open the appliance door as infrequently as possible when the appliance is in use. It is best to bake several cakes one after the other. The cooking compartment stays warm. This reduces the baking time for the second cake. You can place two cake tins next to each other in the cooking compartment. For longer cooking times, you can switch the appliance off 10 minutes before the end of the cooking time and use the residual heat to finish cooking.
Getting to know your appliance en *Getting to know your appliance Note: Depending on the appliance model, individual details and colours may differ. In this section, we will explain the indicators and controls. You will also find out about the various functions of your appliance. You can set your appliance's various functions on the control panel. The current settings are shown in the display.
en Getting to know your appliance Main menu 4 Touch the 0 touch button to access the main menu.
Accessories ž CircoTherm eco 40–200 °C -------- For gently cooking selected types of food on one level without preheating. The fan distributes the heat from the ring-shaped heating element in the back panel around the cooking compartment. This heating function is most effective between 125 and 200 °C. This type of heating is used to measure both the energy consumption in air recirculation mode and the energy-efficiency class.
en Accessories Locking function The accessories can be pulled out approximately halfway until they lock in place. The locking function prevents the accessories from tilting when they are pulled out. The accessories must be inserted into the cooking compartment correctly for the tilt protection to work properly. When inserting the wire rack, ensure that the lug ‚ is at the rear and is facing downwards. The open side must be facing the appliance door and the curvature must be facing downwards ¾.
Before using for the first time KBefore using for the first time Before you can use your new appliance, you must make some settings. You must also clean the cooking compartment and accessories. Bef or e usi ng f or t he f i r st t i me en Cleaning the cooking compartment To eliminate the new-appliance smell, heat up the cooking compartment without anything in it and with the oven door closed. 1. Remove the accessories from the cooking compartment. 2.
en Operating the appliance 1Operating the appliance 4. Use the ( or ) button to select the temperature. &LUFR7KHUP You have already learnt about the controls and how they work. Now we will explain how to set your appliance. You will learn about what happens when you switch the appliance on and off, and how to select the operating mode. Oper at i ng t he ap l i ance Switching the appliance on and off To switch the appliance on or off, touch the # touch button.
Operating the appliance Changing or cancelling the appliance operation Changing the appliance operation 1. Use the # button to stop the operation. 2. Use the & or % button to navigate to the line for the setting that should be changed. 3. Use the ( or ) button to change the setting. 4. Use the # touch button to start the changed operation. Notes The cooling fan may continue to run while an operation is interrupted. ■ After a temperature change, the paused running time continues to count.
Time-setting options en OTime-setting options Ti me- set i ng opt i ons Your appliance has different time-setting options. Time-setting option Timer . + Cooking time * Ready at Use The timer functions like an egg timer. The appliance does not switch on and off automatically. Once the set cooking time has elapsed, the appliance switches off automatically. The appliance switches on automatically, and once the set cooking time has elapsed and the end time has passed, it switches off automatically.
Childproof lock AChildproof lock Your appliance is equipped with a childproof lock so that children cannot switch it on accidentally or change any settings. Your appliance has two different locks. Chi l dpr o f l ock Lock Automatic childproof lock Activate/deactivate Via the MyProfile menu ~ "Basic settings" on page 18 One-time childproof lock Via the 0 touch button en One-time childproof lock The control panel is locked so that the appliance cannot be switched on.
en Basic settings QBasic settings There are various settings available to you in order to help use your appliance effectively and simply. If necessary, you can change these settings in MyProfile 4. Basi c set i ngs Changing MyProfile 1. 2. 3. 4. 5. 6. 7. 8. 9. Touch the # touch button. Touch the 0 touch button. Use the ( or ) button to select "MyProfile 4". Use the & button to navigate to the next line. Use the ( or ) button to select the setting. Use the & button to navigate to the selection.
Baking and roasting assistant nBaking and roasting assistant The baking and roasting assistant helps you to prepare meals with ease. The appliance applies the most suitable settings. To achieve good results, the cooking compartment must not be too hot for the type of food you have selected. If it is, a message will appear on the display. Allow the cooking compartment to cool down and start again.
en Sabbath mode FSabbath mode You can set a time of up to 74 hours using Sabbath mode. The food in the cooking compartment remains warm, without you having to switch the appliance on or off. Sab at h mode Starting Sabbath mode Before you can use Sabbath mode, you must activate it under "Favourites" in the basic settings. Once the Sabbath mode has been activated, you can select it under the menu for the types of heating. The appliance heats up with top/bottom heating.
Home Connect Activating remote start Home Connect settings 1. Touch the You can adjust Home Connect to suit your requirements at any time. # touch button to switch on the appliance. 2. Touch the 0 touch button. The main menu appears. 3. Use the ( or ) button to select "Remote start" F. 4. Press the & button to activate remote start. F appears in the display.
en Cleaning agent DCleaning agent With good care and cleaning, your appliance will retain its appearance and remain fully functioning for a long time to come. We will explain here how you should correctly care for and clean your appliance. Door panels Cl eani ng agent Door handle Suitable cleaning agents To ensure that the different surfaces are not damaged by using the wrong cleaning agent, observe the information in the table.
Cleaning function Notes ■ Slight differences in colour on the front of the appliance are caused by the use of different materials, such as glass, plastic and metal. ■ Shadows on the door panels, which look like streaks, are caused by reflections made by the interior lighting. ■ Enamel is baked on at very high temperatures.This can cause some slight colour variation. This is normal and does not affect operation. The edges of thin trays cannot be completely enamelled. As a result, these edges can be rough.
Cleaning function en ■ Risk of fire! ■ The appliance will become very hot on the outside during the cleaning function. Never hang combustible objects, e.g. tea towels, on the door handle. Do not place anything against the front of the appliance. Keep children away from the appliance. If the door seal is damaged, a large amount of heat will be generated around the door. Do not scrub or remove the seal. Never operate the appliance if the seal is damaged or missing.
Cleaning function en Once the cleaning function has ended Subsequent cleaning 1. Allow the cooking compartment to cool down. 2. Wipe off any ash that has been left behind in the 1. Open the appliance door and remove the remaining cooking compartment and around the appliance door with a damp cloth. 3. If you have left an accessory inside the cooking compartment to be cleaned, remove it and wipe it down with a damp cloth. 4. Lift the accessory support up at the front and remove it.
en Rails qAppliance door pRails With good care and cleaning, your appliance will retain its appearance and remain fully functional for a long time to come. This will tell you how to remove the shelves and clean them. With good care and cleaning, your appliance will retain its appearance and remain fully functional for a long time to come. This will tell you how to remove the appliance door and clean it.
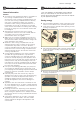
Appliance door Fitting the appliance door Reattach the appliance door in the opposite sequence to removal. 4. Open the appliance door again slightly. Put the 1. When attaching the appliance door, ensure that both hinges are inserted straight into the opening (figure !). Place both hinges at the bottom on the outer panel and use this as a guide. Ensure that the hinges are inserted into the correct opening. You must be able to insert them easily and without resistance.
Appliance door en 6. Push both retainers on the intermediate panel upwards, but do not remove it (figure %). Hold the panel with one hand. Remove the panel. Clean the panels with glass cleaner and a soft cloth. : Warning Risk of injury! ■ Scratched glass in the appliance door may develop into a crack. Do not use a glass scraper, sharp or abrasive cleaning aids or detergents. ■ The hinges on the appliance door move when opening and closing the door, and you may be trapped.
Trouble shooting 3Trouble shooting If a fault occurs, there is often a simple explanation. Before calling the after-sales service, please refer to the fault table and attempt to correct the fault yourself. Tr oubl e sho t i ng Tip: If a meal does not turn out exactly as you wanted, refer to the "Tested for you in our cooking studio" section.Here, you will find plenty of cooking tips and notes. : Warning – Risk of injury! Incorrect repairs are dangerous. Do not attempt to repair the appliance yourself.
en Customer service Replacing the bulb in the top of the cooking compartment If the cooking compartment light bulb fails, it must be replaced. Heat-resistant, 40 watt, 230 V halogen bulbs are available from the after-sales service or specialist retailers. When handling the halogen bulb, use a dry cloth. This will increase the service life of the bulb. Only use these bulbs. : Warning – Risk of electric shock! When replacing the cooking compartment bulb, the bulb socket contacts are live.
Tested for you in our cooking studio JTested for you in our cooking studio Here, you can find a selection of dishes and the ideal settings for them. We will show you which type of heating and temperature are best suited to your dish. You will get information on suitable cooking accessories and the height at which they should be placed in the oven. You will also get tips about cookware and preparation methods.
en Tested for you in our cooking studio possible cooking results and energy savings of up to 20 per cent. ■ ■ ■ Types of heating used: ■ ‚ CircoTherm ƒ Top/bottom heating „ Circotherm intensive … Bread baking Dish Accessories/cookware Shelf position Type of heating Temperature in °C Cooking time in mins.
Tested for you in our cooking studio Dish Accessories/cookware Small cakes, 2 levels 2x 12-cup-tins Shelf position 3+1 Puff pastry slices, 2 levels 2 baking trays 3+1 Jam tarts, 2 levels 2x 12-cup-tins 3+1 Meringues, 2 levels 2 baking trays 3+1 Jacket potatoes, 2 levels universal pan + baking tray 3+1 Pizza, homemade, 2 levels universal pan + baking tray 3+1 Type of heating ‚ ‚ ‚ ‚ ‚ ‚ en Temperature in °C 140-160* Cooking time in mins.
en Tested for you in our cooking studio When the joint is ready, turn off the oven and allow it to rest for another 10 minutes in the cooking compartment. This allows the meat juices to be better distributed. Wrap the joint in aluminium foil if necessary. The recommended resting time is not included in the cooking time indicated. Roasting on the wire rack On the wire rack, poultry and meat will become very crispy on all sides.
Tested for you in our cooking studio en Type of heating used: ■ ‚ CircoTherm Dish Accessories/cookware Shelf posi- Type of tion heating Temperature in °C Time in min.
en Tested for you in our cooking studio Tips on roasting and braising The cooking compartment becomes very dirty. The roast is too dark and the crackling is burned in places, and/or the roast is too dry. The crackling is too thin. The roast looks good but the juices are burnt. The roast looks good but the juices are too clear and watery. The meat gets burned during braising. Prepare your food in an enclosed roasting dish with higher temperature or use the grill tray.
Tested for you in our cooking studio compartment remains considerably cleaner. Ensure that the lid fits well and closes properly. Place the cookware onto the wire rack. The distance between the meat and the lid must be at least 3 cm. The meat may rise. Very hot steam may escape when opening the lid after cooking. Lift the lid at the rear, so that the hot steam can escape away from you. If necessary, braise the meat first by searing it. Add water, wine, vinegar or a similar liquid to the braising liquid.
en Tested for you in our cooking studio Dish Accessories Type of heating wire rack Shelf position 2 ˆ Temperature in °C 290* Steaks, height 2-3 cm Chops, height 2-3 cm wire rack 2 ˆ 290 Leg (bone-in) wire rack 1 170-180 Shoulder (bone-in) wire rack 1 170-190 25+15 Shoulder (boned and rolled) wire rack 1 170-180 20+15 Rack of lamb wire rack 1 ‡ ‡ ‡ ‡ 1st side 8-10 2nd side 4-6 1st side 6-8 2nd side 6-8 25+30 190-200 15+25 Pork Steaks, height 2 cm wire rack 3 ˆ 250 Chop
Tested for you in our cooking studio Convenience products Here, you can find the ideal settings for preparing chilled and frozen food. Only use original accessories supplied with your appliance. These have been tailored to the cooking compartment and the operating modes of your appliance. Tips ■ The cooking result greatly depends on the quality of the food. Pre-browning and unevenness may already be present on the packaged product. ■ Do not use frozen products that are heavily frosted.
Tested for you in our cooking studio en Dish Accessories/cookware Croquettes* baking tray Shelf position 1 Hash browns* universal pan 2 Potatoe wedges baking tray 1 Baked goods, frozen, prebaked Rolls, baguettes universal pan 2 Rolls, baguettes, 2 levels grid + universal pan 3+1 Fried food, frozen Fish fingers* baking tray 1 Chicken nuggets universal pan 2 Food, chilled Lasagna, 500 g ovenproof dish on wire rack 1 Lasagna, 1,5 kg ovenproof dish on universal pan 1 Food, frozen L
Tested for you in our cooking studio Wire rack Insert the wire rack with the open side facing the appliance door and the curved lip pointing downwards. Always place ovenware, tins and dishes on the wire rack. Universal pan or baking tray Slide the universal pan or the baking tray in carefully as far as the limit stop with the bevelled edge facing the appliance door. Baking tins and cookware Dark- coloured metal baking tins are most suitable. These allow you to make energy savings of up to 35 per cent.
en Tested for you in our cooking studio Acrylamide in foodstuffs Acrylamide is mainly produced in grain and potato products prepared at high temperatures, such as potato crisps, chips, sliced bread, bread rolls, bread or fine baked goods (biscuits, gingerbread, spiced biscuit). Tips for keeping acrylamide to a minimum General ■ Keep cooking times as short as possible. ■ Cook food until it is golden brown, but not too dark. ■ Large, thick pieces of food contain less acrylamide.
Tested for you in our cooking studio en Dish Cookware Shelf posi- Heating tion function Searing time Temperain mins ture in °C Fillet of pork, whole Cookware, uncovered 1 Š 4-6 85* Cooking time in mins 45-70 Cookware, uncovered 1 Š 6-8 100* 150-190 Cookware, uncovered 1 4-6 85* 90-120 Sirloin, 5-6 cm thick Cookware, uncovered 1 6-8 85* 120-180 Beef medallions/rump steak, 4 cm thick Cookware, uncovered 1 Š Š Š 4 85* 40-60 Veal Joint of veal, 4-5 cm thick, 1.
en Tested for you in our cooking studio Type of heating used: ■ ‚ CircoTherm Fruit, vegetables and herbs Accessories Shelf posi- Type of tion heating Temperature in °C Pomes (apple rings, 3 mm thick, 200 g per wire rack) Stone fruit (plums) Wire rack 2 ‚ 80 Cooking time in hours 4-7 Wire rack 2 80 8-10 Root vegetables (carrots), grated, blanched Wire rack 2 80 4-7 Sliced mushrooms Wire rack 2 60 6-8 Herbs, washed 1-2 wire racks - ‚ ‚ ‚ ‚ 60 2-6 Preserving You can preserve fru
Tested for you in our cooking studio Preserving Cookware Vegetables, e.g. cucumbers 1-litre preserving jars Shelf posi- Type of tion heating 1 ‚ Stone fruit, e.g. cherries, damsons 1-litre preserving jars 1 ‚ Pomes, e.g. apples, strawberries 1 ‚ 1-litre preserving jars Allowing the dough to prove at dough proving setting Yeast dough will prove considerably more quickly using the "Dough proving" heating type than at room temperature and does not dry out.
en Tested for you in our cooking studio Leave the defrosted food to rest for another 10 to 30 minutes in the appliance whilst it is switched off, so that the temperature balances out. Type of heating used: ■ “ Defrost setting Dish Accessories Shelf posi- Type of tion heating Temperature in °C Cooking time in mins.
Tested for you in our cooking studio Grilling Also slide in the universal pan. The liquid will be caught and the cooking compartment stays cleaner. en Type of heating used: ■ ˆ Full-surface grill Dish Accessories Shelf posi- Type of tion heating Temperature in °C Cooking time in mins.
*9001397477* 9001397477 990128 en