
Assembly & Installation Instructions
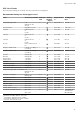
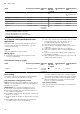

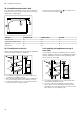
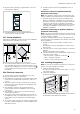
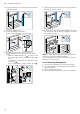
Table Of Contents
- Oven
- en
- Table of contents
- 1 Safety
- 2 Preventing material damage
- 3 Environmental protection and saving energy
- 4 Familiarising yourself with your appliance
- 5 Accessories
- 6 Before using for the first time
- 7 Basic operation
- 7.1 Switching on the appliance
- 7.2 Switching off the appliance
- 7.3 Residual heat indicator
- 7.4 Setting the type of heating and temperature
- 7.5 Changing the temperature
- 7.6 Changing the type of heating
- 7.7 Pausing operation
- 7.8 Cancelling operation
- 7.9 Viewing the current temperature
- 7.10 Displaying information
- 8 Time-setting options
- 9 Baking and roasting assistant
- 10 Childproof lock
- 11 Rapid heat-up
- 12 Sabbath mode
- 13 Basic settings
- 14 Home Connect
- 15 Cleaning and servicing
- 16 Cleaning functions
- 17 Rails
- 18 Appliance door
- 19 Troubleshooting
- 20 Disposal
- 21 Customer Service
- 22 Declaration of Conformity
- 23 How it works
- 24 Installation instructions
- 24.1 General installation instructions
- 24.2 Appliance dimensions
- 24.3 Installation below a worktop
- 24.4 Installation underneath a hob
- 24.5 Installation in a tall unit
- 24.6 Installing two appliances on top of each other
- 24.7 Corner installation
- 24.8 Electrical connection
- 24.9 Installing the appliance
- 24.10 Removing the appliance

en Installation instructions
36
24.4 Installation underneath a hob
If the appliance is installed under a hob, the following
minimum dimensions must be adhered to (including
substructure, if applicable).
The minimum worktop thickness a is based on the
required minimum clearance .
Hob type a raised in mm a flush in mm b in mm
Induction hob 42 43 5
Full-surface induction hob 52 53 5
Gas hob 32 43 5
Electric hob 32 35 2
24.5 Installation in a tall unit
Observe the installation dimensions and the installation
instructions when installing in a tall unit.
¡ To ventilate the appliance, the intermediate floors
must have a ventilation cut-out.
¡ If the tall unit has another back panel in addition to
the element back panels, this must be removed.
¡ Only fit the appliance up to a height which allows
accessories to be easily removed.
24.6 Installing two appliances on top of
each other
Your appliance can also be installed above or below
another appliance. Observe the installation dimensions
and the installation instructions when installing appli-
ances on top of each other.
¡ To ventilate the appliances, the intermediate floor
must have a ventilation cut-out.
¡ To ensure sufficient ventilation of the two appli-
ances, there must be a ventilation opening of at
least 200cm² in the base area. To do this, trim the
base panel or fit a ventilation grille.