
Assembly & Installation Instructions
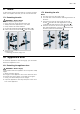

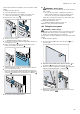
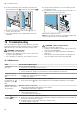
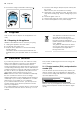
Table Of Contents
- Oven
- en
- Table of contents
- 1 Safety
- 2 Preventing material damage
- 3 Environmental protection and saving energy
- 4 Familiarising yourself with your appliance
- 5 Accessories
- 6 Before using for the first time
- 7 Basic operation
- 7.1 Switching on the appliance
- 7.2 Switching off the appliance
- 7.3 Residual heat indicator
- 7.4 Setting the type of heating and temperature
- 7.5 Changing the temperature
- 7.6 Changing the type of heating
- 7.7 Pausing operation
- 7.8 Cancelling operation
- 7.9 Viewing the current temperature
- 7.10 Displaying information
- 8 Time-setting options
- 9 Baking and roasting assistant
- 10 Childproof lock
- 11 Rapid heat-up
- 12 Sabbath mode
- 13 Basic settings
- 14 Home Connect
- 15 Cleaning and servicing
- 16 Cleaning functions
- 17 Rails
- 18 Appliance door
- 19 Troubleshooting
- 20 Disposal
- 21 Customer Service
- 22 Declaration of Conformity
- 23 How it works
- 24 Installation instructions
- 24.1 General installation instructions
- 24.2 Appliance dimensions
- 24.3 Installation below a worktop
- 24.4 Installation underneath a hob
- 24.5 Installation in a tall unit
- 24.6 Installing two appliances on top of each other
- 24.7 Corner installation
- 24.8 Electrical connection
- 24.9 Installing the appliance
- 24.10 Removing the appliance

en Disposal
28
3.
Pull out the halogen bulb without turning it .
4.
Insert the new halogen lamp and press it firmly into
the socket.
Make sure the pins are positioned correctly.
5.
Depending on the appliance model, the glass cover
may have a sealing ring. Put the sealing ring in posi-
tion.
6.
Screw the glass cover on.
7.
Take the tea towel out of the cooking compartment.
8.
Connect the appliance to the power supply.
20 Disposal
Find out here how to dispose of old appliances cor-
rectly.
20.1 Disposing of old appliance
Valuable raw materials can be reused by recycling.
1.
Unplug the appliance from the mains.
2.
Cut through the power cord.
3.
Dispose of the appliance in an environmentally
friendly manner.
Information about current disposal methods are
available from your specialist dealer or local author-
ity.
This appliance is labelled in accord-
ance with European Directive
2012/19/EU concerning used elec-
trical and electronic appliances
(waste electrical and electronic equip-
ment - WEEE).
The guideline determines the frame-
work for the return and recycling of
used appliances as applicable
throughout the EU.
21 Customer Service
If you have any queries on use, are unable to rectify
faults on the appliance yourself or if your appliance
needs to be repaired, contact Customer Service.
Function-relevant genuine spare parts according to the
corresponding Ecodesign Order can be obtained from
Customer Service for a period of at least 10 years from
the date on which your appliance was placed on the
market within the European Economic Area.
Note:Under the terms of the manufacturer's warranty
the use of Customer Service is free of charge.
Detailed information on the warranty period and terms
of warranty in your country is available from our after-
sales service, your retailer or on our website.
If you contact Customer Service, you will require the
product number (E-Nr.) and the production number
(FD) of your appliance.
The contact details for Customer Service can be found
in the enclosed Customer Service directory or on our
website.
This product contains light sources from energy effi-
ciency class G.
21.1 Product number (E-Nr.) and production
number (FD)
You can find the product number (E-Nr.) and the pro-
duction number (FD) on the appliance's rating plate.
You will see the rating plate with these numbers if you
open the appliance door.
Make a note of your appliance's details and the Cus-
tomer Service telephone number to find them again
quickly.