
Installation Instruction

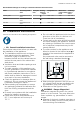
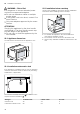

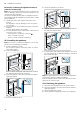
Table Of Contents
- Oven
- en
- Table of contents
- 1 Safety
- 2 Preventing material damage
- 3 Environmental protection and saving energy
- 4 Familiarising yourself with your appliance
- 5 Accessories
- 6 Before using for the first time
- 7 Basic operation
- 7.1 Switching on the appliance
- 7.2 Switching off the appliance
- 7.3 Residual heat indicator
- 7.4 Setting the type of heating and temperature
- 7.5 Changing the temperature
- 7.6 Changing the type of heating
- 7.7 Pausing operation
- 7.8 Cancelling operation
- 7.9 Viewing the current temperature
- 7.10 Displaying information
- 8 Time-setting options
- 9 Microwave
- 10 Microwave programmes
- 11 Baking and roasting assistant
- 12 Childproof lock
- 13 Rapid heating
- 14 Sabbath mode
- 15 Basic settings
- 16 Home Connect
- 17 Cleaning and servicing
- 18 Cleaning functions
- 19 Rails
- 20 Appliance door
- 21 Troubleshooting
- 22 Disposal
- 23 Customer Service
- 24 How it works
- 24.1 General cooking tips
- 24.2 Baking tips
- 24.3 Roasting, braising and grilling tips
- 24.4 Microwave cooking
- 24.5 Cooking frozen products
- 24.6 Cooking ready meals
- 24.7 List of foods
- 24.8 Special cooking methods and other applications
- 24.9 Test dishes
- 25 Installation instructions

en Installation instructions
42
Electrically connecting an appliance without a
protective contact plug
Note:Only a licensed professional may connect the ap-
pliance. Damage caused by incorrect connection is not
covered under the warranty.
An all-pole isolating switch must be integrated into the
permanent electrical installation according to the install-
ation regulations.
1.
Identify the phase and neutral conductors in the
socket.
The appliance may be damaged if it is not connec-
ted correctly.
2.
Connect the hob in accordance with the connection
diagram.
See the rating plate for the voltage.
3.
Connect the wires of the mains power cable accord-
ing to the colour coding:
‒ Green/yellow = Protective conductor
‒ Blue = Neutral conductor
‒ Brown = Phase (external conductor)
25.8 Installing the appliance
Note:Do not use a cordless screwdriver to secure the
panels. This may damage the panels.
1.
Push the appliance in fully.
Do not kink or trap the connecting cable, or route it
over sharp edges.
2.
Centre the appliance.
There must be an air gap of at least 4mm between
the appliance and adjacent unit fronts.
3.
Open the appliance door and unscrew the left and
right-hand panels.
4.
Close the appliance door.
5.
Screw the appliance into place.
6.
Refit the panels and screw them in place, first at the
top and then at the bottom.
7.
If required, the gap between the appliance door and
the side panels can be adjusted using the screws at
the top left and right.
Note:The gap between the worktop and the appliance
must not be closed by additional battens.
Thermal insulation strips must not be fitted to the side
panels of the surround unit.
25.9 Removing the appliance
1.
Disconnect the appliance from the power supply.
2.
Open the appliance door and unscrew the left and
right-hand panels.
3.
Undo the fastening screws.
4.
Lift the appliance slightly and pull it out completely.