
Installation Instruction
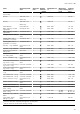
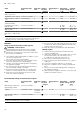

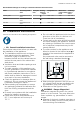
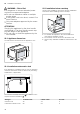
Table Of Contents
- Oven
- en
- Table of contents
- 1 Safety
- 2 Preventing material damage
- 3 Environmental protection and saving energy
- 4 Familiarising yourself with your appliance
- 5 Accessories
- 6 Before using for the first time
- 7 Basic operation
- 7.1 Switching on the appliance
- 7.2 Switching off the appliance
- 7.3 Residual heat indicator
- 7.4 Setting the type of heating and temperature
- 7.5 Changing the temperature
- 7.6 Changing the type of heating
- 7.7 Pausing operation
- 7.8 Cancelling operation
- 7.9 Viewing the current temperature
- 7.10 Displaying information
- 8 Time-setting options
- 9 Microwave
- 10 Microwave programmes
- 11 Baking and roasting assistant
- 12 Childproof lock
- 13 Rapid heating
- 14 Sabbath mode
- 15 Basic settings
- 16 Home Connect
- 17 Cleaning and servicing
- 18 Cleaning functions
- 19 Rails
- 20 Appliance door
- 21 Troubleshooting
- 22 Disposal
- 23 Customer Service
- 24 How it works
- 24.1 General cooking tips
- 24.2 Baking tips
- 24.3 Roasting, braising and grilling tips
- 24.4 Microwave cooking
- 24.5 Cooking frozen products
- 24.6 Cooking ready meals
- 24.7 List of foods
- 24.8 Special cooking methods and other applications
- 24.9 Test dishes
- 25 Installation instructions

en Installation instructions
40
WARNING‒Risk of fire!
It is dangerous to use an extended power
cord and non-approved adapters.
▶
Do not use extension cables or multiple
socket strips.
▶
If the power cord is too short, contact Cus-
tomer Service.
▶
Only use adapters approved by the manu-
facturer.
ATTENTION!
Carrying the appliance by the door handle
could break it. The door handle cannot sup-
port the weight of the appliance.
▶
Do not carry or hold the appliance by the
door handle.
25.2 Appliance dimensions
You will find the dimensions of the appliance here
25.3 Installation below a worktop
Observe the installation dimensions and the installation
instructions when installing below a worktop.
¡ To ventilate the appliance, the intermediate floor
must have a ventilation cut-out.
¡ The worktop must be secured to the built-in unit.
¡ Observe any available installation instructions for the
hob.
25.4 Installation underneath a hob
If the appliance is installed under a hob, the following
minimum dimensions must be adhered to (including
substructure, if applicable).
The minimum worktop thickness a is based on the
required minimum clearance .
Hob type a raised in mm a flush in mm b in mm
Induction hob 42 43 5
Full-surface induction hob 52 53 5