
Installation Instruction
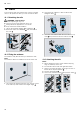
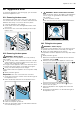
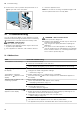

Table Of Contents
- Oven
- en
- Table of contents
- 1 Safety
- 2 Preventing material damage
- 3 Environmental protection and saving energy
- 4 Familiarising yourself with your appliance
- 5 Accessories
- 6 Before using for the first time
- 7 Basic operation
- 7.1 Switching on the appliance
- 7.2 Switching off the appliance
- 7.3 Residual heat indicator
- 7.4 Setting the type of heating and temperature
- 7.5 Changing the temperature
- 7.6 Changing the type of heating
- 7.7 Pausing operation
- 7.8 Cancelling operation
- 7.9 Viewing the current temperature
- 7.10 Displaying information
- 8 Time-setting options
- 9 Microwave
- 10 Microwave programmes
- 11 Baking and roasting assistant
- 12 Childproof lock
- 13 Rapid heating
- 14 Sabbath mode
- 15 Basic settings
- 16 Home Connect
- 17 Cleaning and servicing
- 18 Cleaning functions
- 19 Rails
- 20 Appliance door
- 21 Troubleshooting
- 22 Disposal
- 23 Customer Service
- 24 How it works
- 24.1 General cooking tips
- 24.2 Baking tips
- 24.3 Roasting, braising and grilling tips
- 24.4 Microwave cooking
- 24.5 Cooking frozen products
- 24.6 Cooking ready meals
- 24.7 List of foods
- 24.8 Special cooking methods and other applications
- 24.9 Test dishes
- 25 Installation instructions

Appliance door en
27
20 Appliance door
To clean the appliance door thoroughly, you can disas-
semble the appliance door.
20.1 Removing the door cover
The stainless steel inlay in the door cover may discol-
our. Remove the door cover in order to clean it and the
stainless steel inlay, or to remove the door panes.
1.
Open the appliance door slightly.
2.
Press down on the left- and right-hand sides of the
door cover.
3.
Remove the door cover and carefully close the ap-
pliance door.
20.2 Removing the door panes
WARNING‒Risk of injury!
Scratched glass in the appliance door may develop
into a crack.
▶
Do not use any harsh or abrasive cleaners or sharp
metal scrapers to clean the glass on the oven door,
as they may scratch the surface.
The hinges on the appliance door move when the door
is opened and closed, which could trap your fingers.
▶
Keep your hands away from the hinges.
Components inside the appliance door may have sharp
edges.
▶
Wear protective gloves.
Requirement:The door cover has been removed.
1.
Undo and remove the screws on the left and right of
the appliance door.
2.
Place a folded-up tea towel in the appliance door.
3.
Close the appliance door.
4.
Pull the front pane up and out.
5.
Place the front pane down on a flat surface with the
door handle facing down.
6.
WARNING‒Risk of serious harm to health!
If the screws are undone, the safety of the appliance
can no longer be guaranteed. Microwave energy
may escape.
▶
Never undo the screws.
Never unscrew the four black screws on the frame.
20.3 Fitting the door panes
WARNING‒Risk of injury!
The hinges on the appliance door move when the door
is opened and closed, which could trap your fingers.
▶
Keep your hands away from the hinges.
Components inside the appliance door may have sharp
edges.
▶
Wear protective gloves.
1.
Attach the front pane downwards into the left- and
right-hand retainers .
2.
Push the front pane to the appliance until the left-
and right-hand hook is opposite the support .
3.
Push the front pane in at the bottom until you
hear it click into place.
4.
Open the appliance door slightly and remove the
tea towel.
5.
Screw both screws back in on the left and right of
the appliance door.