
Installation Instruction
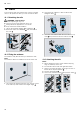
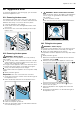
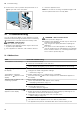

Table Of Contents
- Oven
- en
- Table of contents
- 1 Safety
- 2 Preventing material damage
- 3 Environmental protection and saving energy
- 4 Familiarising yourself with your appliance
- 5 Accessories
- 6 Before using for the first time
- 7 Basic operation
- 7.1 Switching on the appliance
- 7.2 Switching off the appliance
- 7.3 Residual heat indicator
- 7.4 Setting the type of heating and temperature
- 7.5 Changing the temperature
- 7.6 Changing the type of heating
- 7.7 Pausing operation
- 7.8 Cancelling operation
- 7.9 Viewing the current temperature
- 7.10 Displaying information
- 8 Time-setting options
- 9 Microwave
- 10 Microwave programmes
- 11 Baking and roasting assistant
- 12 Childproof lock
- 13 Rapid heating
- 14 Sabbath mode
- 15 Basic settings
- 16 Home Connect
- 17 Cleaning and servicing
- 18 Cleaning functions
- 19 Rails
- 20 Appliance door
- 21 Troubleshooting
- 22 Disposal
- 23 Customer Service
- 24 How it works
- 24.1 General cooking tips
- 24.2 Baking tips
- 24.3 Roasting, braising and grilling tips
- 24.4 Microwave cooking
- 24.5 Cooking frozen products
- 24.6 Cooking ready meals
- 24.7 List of foods
- 24.8 Special cooking methods and other applications
- 24.9 Test dishes
- 25 Installation instructions

en Rails
26
19 Rails
To thoroughly clean the rails and the cooking compart-
ment, or to replace the rails, you can remove the rails.
19.1 Detaching the rails
WARNING‒Risk of burns!
The shelf supports get very hot
▶
Never touch the shelf supports when hot.
▶
Always allow the appliance to cool down.
▶
Keep children at a safe distance.
1.
Lift the rail forwards slightly and detach it .
2.
Swivel the entire rail outwards and unhook it at
the rear .
19.2 Fitting the retainers
The retainers may fall out when you detach the rails.
Note:
The retainers at the front differ from those at the rear.
1.
Hook the front retainers with the hook into the round
hole at the top and set them at a slight angle .
2.
Hook the front retainers in at the bottom and
straighten them .
3.
Hook the rear retainers with the hook into the top
hole and push them into the bottom hole .
19.3 Attaching the rails
Notes
¡ When hanging the rails, ensure that the sloping
edge is at the top of the rail.
¡ The rails fit both the left- and right-hand sides.
1.
Set the rear rail at an angle, hooking it into the re-
tainers at the top and bottom .
2.
Pull the rail forwards .
3.
Hook in the rail at the front and press it down .