
Installation Instruction
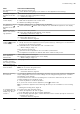
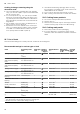

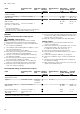
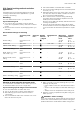
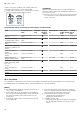
Table Of Contents
- Oven
- en
- Table of contents
- 1 Safety
- 2 Preventing material damage
- 3 Environmental protection and saving energy
- 4 Familiarising yourself with your appliance
- 5 Accessories
- 6 Before using for the first time
- 7 Basic operation
- 7.1 Switching on the appliance
- 7.2 Switching off the appliance
- 7.3 Residual heat indicator
- 7.4 Setting the type of heating and temperature
- 7.5 Changing the temperature
- 7.6 Changing the type of heating
- 7.7 Pausing operation
- 7.8 Cancelling operation
- 7.9 Viewing the current temperature
- 7.10 Displaying information
- 8 Time-setting options
- 9 Microwave
- 10 Microwave programmes
- 11 Childproof lock
- 12 Rapid heating
- 13 Basic settings
- 14 Cleaning and servicing
- 15 Rails
- 16 Appliance door
- 17 Troubleshooting
- 18 Disposal
- 19 Customer Service
- 20 How it works
- 20.1 General cooking tips
- 20.2 Baking tips
- 20.3 Roasting, braising and grilling tips
- 20.4 Microwave cooking
- 20.5 Cooking frozen products
- 20.6 Cooking ready meals
- 20.7 List of foods
- 20.8 Special cooking methods and other applications
- 20.9 Test dishes
- 21 Installation instructions

en How it works
26
Cooking, braising or steaming using the
microwave mode
¡ Use microwave-safe cookware with a lid. Alternat-
ively, you can use a plate or special microwaveable
film to cover the dish.
¡ For cereal products, e.g. rice, use deep cookware
with a lid. Cereal products foam a lot during cook-
ing. Add liquid in accordance with the instructions
and information provided in the recommended set-
tings tables.
¡ Do not wash or dry food. Add 1-3 tablespoons of
water or lemon juice to the food.
¡ Spread the food out so that as much of it as pos-
sible is in contact with the bottom of the cookware.
Food that is in contact with the bottom will cook
more quickly than food that is piled up.
¡ Use salt and seasoning sparingly. When cooking
food using the microwave mode, most of the food's
natural flavour will be retained.
¡ Turn or stir the food 2-3times during cooking.
¡ After cooking, leave the food to rest for 2-3minutes.
20.5 Cooking frozen products
¡ Do not use heavily frosted frozen products.
¡ Remove any ice.
¡ Some frozen products may be unevenly pre-baked.
Uneven browning may remain even after baking.
20.6 Cooking ready meals
¡ Take ready meals out of the packaging.
¡ If you are warming or cooking the ready meal in
cookware, make sure that the cookware is heat-res-
istant.
20.7 List of foods
Recommended settings for a variety of foods, sorted into food categories.
Recommended settings for various types of food
Food Accessory/cook-
ware
Shelf pos-
ition
Heating
function
→Page8
Temperature in
°C
Microwave
power setting
in W
Cooking
time in
mins
Sponge cake, simple Ring-shaped tin
or
Loaf tin
1 160–180 90 30–40
Fruit tart or cheesecake
with shortcrust pastry
base
Springform cake
tin, diameter 26 cm
1 160–170 - 65–85
Fruit tart or cheesecake
with shortcrust pastry
base
Springform cake
tin, diameter 26 cm
1 160–180 90 45–55
Sponge cake, 6 eggs Springform cake
tin, diameter28cm
1 150–170
1
- 30–50
Sponge cake, 6 eggs Springform cake
tin, diameter28cm
1 150–160 - 50–60
Shortcrust tart with moist
topping
Universal pan 1 150–170 - 65–85
Yeast cake with moist
topping
Universal pan 1 160–180 - 50–60
Muffins Muffin tray 2 160–180
1
- 15–25
Small yeast cakes Baking tray 1 150–160 - 30–40
Biscuits Baking tray 2 140–160 - 15–30
Biscuits, 2 levels Universal pan
+
Baking tray
3+1 130–150 - 20–35
Bread, without a tin, 750
g
Universal pan
or
Loaf tin
1 1. 210–220
1
2. 180–190
- 1. 10–15
2. 25–35
1
Preheat the appliance.
2
Turn the dish 2/3 of the way through the cooking time.
3
Stir the food one or two times during cooking.