
Assembly & Installation Instructions
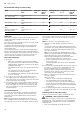
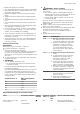
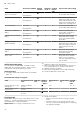
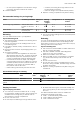

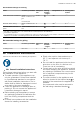
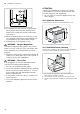
Table Of Contents
- Oven
- en
- Table of contents
- 1 Safety
- 2 Preventing material damage
- 3 Environmental protection and saving energy
- 4 Familiarising yourself with your appliance
- 5 Accessories
- 6 Before using for the first time
- 7 Basic operation
- 7.1 Switching on the appliance
- 7.2 Switching off the appliance
- 7.3 Residual heat indicator
- 7.4 Setting the type of heating and temperature
- 7.5 Changing the temperature
- 7.6 Changing the type of heating
- 7.7 Pausing operation
- 7.8 Cancelling operation
- 7.9 Viewing the current temperature
- 7.10 Displaying information
- 8 Steam
- 9 Time-setting options
- 10 Baking and roasting assistant
- 11 Steam programs
- 12 Childproof lock
- 13 Rapid heat-up
- 14 Sabbath mode
- 15 Basic settings
- 16 Home Connect
- 17 Cleaning and servicing
- 18 Cleaning function
- 19 Rails
- 20 Appliance door
- 21 Troubleshooting
- 22 Disposal
- 23 Customer Service
- 24 Declaration of Conformity
- 25 How it works
- 25.1 General cooking tips
- 25.2 Baking tips
- 25.3 Roasting, braising and grilling tips
- 25.4 Steaming
- 25.5 Cooking frozen products
- 25.6 Cooking ready meals
- 25.7 List of foods
- 25.8 Special cooking methods and other applications
- 25.9 Test dishes
- 26 Installation instructions
- 26.1 General installation instructions
- 26.2 Appliance dimensions
- 26.3 Installation below a worktop
- 26.4 Installation underneath a hob
- 26.5 Installation in a tall unit
- 26.6 Installing two appliances on top of each other
- 26.7 Corner installation
- 26.8 Electrical connection
- 26.9 Installing the appliance
- 26.10 Removing the appliance

en How it works
44
Food Accessory/cookware Heating
function
Temperat-
ure in °C
Cooking
time in
mins
Tips for sous-vide cooking
Fillet of beef, piece, me-
dium, 3–4cm thick
Wire rack
+
Universal pan
62 90 Vacuum-seal along with
some butter and rosemary
Duck breast, 350g each Wire rack
+
Universal pan
62 70 Cut into the layer of fat,
season the meat side with
a little salt and pepper, and
vacuum-seal it along with a
small piece of orange peel
Cod, 140g each Wire rack
+
Universal pan
58 25 Vacuum-seal along with
some butter and a little salt
Mushrooms, quartered,
500g
Wire rack
+
Universal pan
85 20–25 Vacuum-seal along with
some butter, rosemary, a
little garlic and salt
Carrots, in 0.5cm slices,
600g
Wire rack
+
Universal pan
90 70–80 Recipe tip: Vacuum-seal
along with some orange
juice, curry powder/paste
and butter.
Potatoes, peeled,
quartered, 800g
Wire rack
+
Universal pan
95 35–45 Recipe tip: Vacuum-seal
along with some butter and
salt. Can easily be used for
making dishes such as
salad.
Pineapple, in 1.5cm slices,
400g
Wire rack
+
Universal pan
85 70–80 Recipe tip: Vacuum-seal
along with some butter,
honey and vanilla.
Apples, peeled, in 0.5cm
slices, x 2-4
Wire rack
+
Universal pan
85 15–25 Recipe tip: Vacuum-seal
along with some caramel
sauce. The cooking time
may vary depending on the
type of apple.
Sterilisation and hygiene
You can sterilise heat-resistant cookware or baby
bottles that are in perfect condition. The process is
equivalent to normal sterilisation by boiling.
Sterilising bottles
1.
Clean the bottles with a bottle brush immediately
after use.
2.
Wash the bottles in the dishwasher.
3.
Place the bottles into the steaming tray (size XL) in
such a way that they do not touch one another.
4.
Start the "Sterilise" program.
5.
Wipe down the appliance interior after sterilising.
6.
Dry the bottles with a clean cloth.
Recommended settings for hygiene
Food Accessories/cook-
ware
Shelf pos-
ition
Heating
function
→Page7
Temperature in
°C
Steam intens-
ity
Cooking
time in
mins
Prepare jam jars or pre-
serving jars
Steam containers,
XL size
1 100 - 10 - 15
Additional jam jar pro-
cessing step
Steam containers,
XL size
1 100 - 15 - 20
Sterilise clean cookware Steam containers,
XL size
1 100 - 15 - 20
Proving dough
Always allow dough to prove in two steps: Once in their
entirety (1.-dough fermentation) and a second time
when shaped (2.–final fermentation).
Requirement:The cooking compartment is cold.
1.
Dough fermentation:
‒ Slide the wire rack into the cooking compart-
ment.
‒ Place the dough in a bowl onto the wire rack.
‒ Use the recommended settings when configuring
the appliance settings.