
Assembly & Installation Instructions
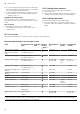
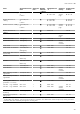
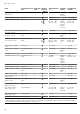
Table Of Contents
- Oven
- en
- Table of contents
- 1 Safety
- 2 Preventing material damage
- 3 Environmental protection and saving energy
- 4 Familiarising yourself with your appliance
- 5 Accessories
- 6 Before using for the first time
- 7 Basic operation
- 7.1 Switching on the appliance
- 7.2 Switching off the appliance
- 7.3 Residual heat indicator
- 7.4 Setting the type of heating and temperature
- 7.5 Changing the temperature
- 7.6 Changing the type of heating
- 7.7 Pausing operation
- 7.8 Cancelling operation
- 7.9 Viewing the current temperature
- 7.10 Displaying information
- 8 Steam
- 9 Time-setting options
- 10 Baking and roasting assistant
- 11 Steam programs
- 12 Childproof lock
- 13 Rapid heat-up
- 14 Sabbath mode
- 15 Basic settings
- 16 Home Connect
- 17 Cleaning and servicing
- 18 Cleaning function
- 19 Rails
- 20 Appliance door
- 21 Troubleshooting
- 22 Disposal
- 23 Customer Service
- 24 Declaration of Conformity
- 25 How it works
- 25.1 General cooking tips
- 25.2 Baking tips
- 25.3 Roasting, braising and grilling tips
- 25.4 Steaming
- 25.5 Cooking frozen products
- 25.6 Cooking ready meals
- 25.7 List of foods
- 25.8 Special cooking methods and other applications
- 25.9 Test dishes
- 26 Installation instructions
- 26.1 General installation instructions
- 26.2 Appliance dimensions
- 26.3 Installation below a worktop
- 26.4 Installation underneath a hob
- 26.5 Installation in a tall unit
- 26.6 Installing two appliances on top of each other
- 26.7 Corner installation
- 26.8 Electrical connection
- 26.9 Installing the appliance
- 26.10 Removing the appliance

en How it works
38
¡ If you are using several pieces which are the same
weight, the appliance's heating-up time is increased.
The cooking time remains the same.
¡ In the main part of the instruction manual, you can
find information on how to set the steam function.
→"Steam", Page14
Vegetables on several levels
You can easily cook more than one type of food or
even whole menus, e.g. broccoli and potatoes, on two
levels.
Rice or cereals
¡ Add water or liquid in the indicated ratio.
For example, this means 1:1.5 for 100g of rice,
150ml liquid.
25.5 Cooking frozen products
¡ Do not use heavily frosted frozen products.
¡ Remove any ice.
¡ Some frozen products may be unevenly pre-baked.
Uneven browning may remain even after baking.
25.6 Cooking ready meals
¡ Take ready meals out of the packaging.
¡ If you are warming or cooking the ready meal in
cookware, make sure that the cookware is heat-res-
istant.
25.7 List of foods
Recommended settings for a variety of foods, sorted into food categories.
Recommended settings for various types of food
Food Accessories/cook-
ware
Shelf pos-
ition
Heating
function
→Page7
Temperature in
°C
Steam in-
tensity
Cooking time
in mins
Sponge cake, delicate Loaf tin 1 150–170 - 60–80
Fruit tart or cheesecake
with shortcrust pastry
base
Springform cake
tin, diameter 26 cm
1 170–180 - 60–80
Sponge cake, 6 eggs Springform cake
tin, diameter28cm
1 150–170
1
- 30–50
Sponge cake, 6 eggs Springform cake
tin, diameter28cm
1 1. 150–160
2. 150–160
Added
steam,
low
-
1. 10
2. 25–35
Sponge cake, 6 eggs Springform cake
tin, diameter28cm
1 150–160 - 50–60
Shortcrust tart with moist
topping
Universal pan 1 160–180 - 60–80
Yeast cake with moist
topping
Universal pan 1 180–200 - 30–45
Muffins Muffin tray 1 170–190 - 15–30
Small yeast cakes Baking tray 1 160–170 - 30–40
Small yeast cakes Baking tray 1 160–180 Added
steam,
medium
25–35
Biscuits Baking tray 2 140–160 - 15–30
Biscuits, 2 levels Universal pan
+
Baking tray
3+1 130–150 - 20–35
Bread, without a tin, 750
g
Universal pan
or
Loaf tin
1 1. 210–220
1
2. 180–190
- 1. 10–15
2. 25–35
1
Preheat the appliance.
2
At the start, pour approx. 100 ml of liquid into the cookware. The water tank must be topped up during operation.
3
Turn the dish 2/3 of the way through the cooking time.