
Assembly & Installation Instructions
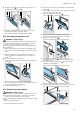
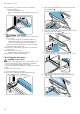
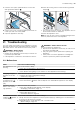
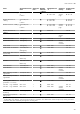
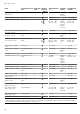
Table Of Contents
- Oven
- en
- Table of contents
- 1 Safety
- 2 Preventing material damage
- 3 Environmental protection and saving energy
- 4 Familiarising yourself with your appliance
- 5 Accessories
- 6 Before using for the first time
- 7 Basic operation
- 7.1 Switching on the appliance
- 7.2 Switching off the appliance
- 7.3 Residual heat indicator
- 7.4 Setting the type of heating and temperature
- 7.5 Changing the temperature
- 7.6 Changing the type of heating
- 7.7 Pausing operation
- 7.8 Cancelling operation
- 7.9 Viewing the current temperature
- 7.10 Displaying information
- 8 Steam
- 9 Time-setting options
- 10 Baking and roasting assistant
- 11 Steam programs
- 12 Childproof lock
- 13 Rapid heat-up
- 14 Sabbath mode
- 15 Basic settings
- 16 Home Connect
- 17 Cleaning and servicing
- 18 Cleaning function
- 19 Rails
- 20 Appliance door
- 21 Troubleshooting
- 22 Disposal
- 23 Customer Service
- 24 Declaration of Conformity
- 25 How it works
- 25.1 General cooking tips
- 25.2 Baking tips
- 25.3 Roasting, braising and grilling tips
- 25.4 Steaming
- 25.5 Cooking frozen products
- 25.6 Cooking ready meals
- 25.7 List of foods
- 25.8 Special cooking methods and other applications
- 25.9 Test dishes
- 26 Installation instructions
- 26.1 General installation instructions
- 26.2 Appliance dimensions
- 26.3 Installation below a worktop
- 26.4 Installation underneath a hob
- 26.5 Installation in a tall unit
- 26.6 Installing two appliances on top of each other
- 26.7 Corner installation
- 26.8 Electrical connection
- 26.9 Installing the appliance
- 26.10 Removing the appliance

Troubleshooting en
33
7.
Push the inner pane upwards until it is in the left-
and right-hand retainers .
8.
Put the door cover in position and push down on
it until you hear it click into place.
9.
Open the appliance door fully.
10.
Close the locking levers on the left- and right-hand
hinges .
a The locking levers are closed. The appliance door is
secured and cannot be detached.
11.
Close the appliance door.
Note:Do not use the cooking compartment again until
the door panes have been correctly fitted.
21 Troubleshooting
You can rectify minor faults on your appliance yourself.
Read the troubleshooting information before contacting
after-sales service. This will avoid unnecessary costs.
WARNING‒Risk of injury!
Improper repairs are dangerous.
▶ Repairs to the appliance should only be carried out
by trained specialist staff.
▶ If the appliance is defective, call Customer Service.
WARNING‒Risk of electric shock!
Incorrect repairs are dangerous.
▶ Repairs to the appliance should only be carried out
by trained specialist staff.
▶ Only use genuine spare parts when repairing the
appliance.
▶ If the power cord of this appliance is damaged, it
must be replaced by trained specialist staff.
21.1 Malfunctions
Fault Cause and troubleshooting
The appliance is not
working.
The circuit breaker is faulty.
▶
Check the circuit breaker in the fuse box.
There has been a power cut.
▶
Check whether the lighting in your kitchen or other appliances are working.
"Language English"
appears on the dis-
play.
There has been a power cut.
▶
Configure the initial configuration settings.
→"Initial use", Page12
The appliance cannot
be switched on;
appears on the dis-
play.
Automatic childproof lock or childproof lock is activated
▶
Press and hold the button until "Childproof lock deactivated" appears on the display.
Appliance will not
start or cuts out dur-
ing operation.
Different causes are possible.
▶
Check any notifications that appear on the display.
→"Displaying information", Page13
Malfunction
▶
Call the after-sales service.
→"Customer Service", Page35
The appliance is not
heating; appears
on the display.
Demo mode is activated in the basic settings.
1.
Briefly disconnect the appliance from the power supply by switching the circuit breaker in
the fuse box off and then on again.
2.
Deactivate Demo mode within the next 3 minutes in the
→"Basic settings", Page22.