
Assembly & Installation Instructions

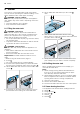
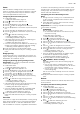
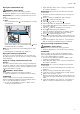

Table Of Contents
- Oven
- en
- Table of contents
- 1 Safety
- 2 Preventing material damage
- 3 Environmental protection and saving energy
- 4 Familiarising yourself with your appliance
- 5 Accessories
- 6 Before using for the first time
- 7 Basic operation
- 7.1 Switching on the appliance
- 7.2 Switching off the appliance
- 7.3 Residual heat indicator
- 7.4 Setting the type of heating and temperature
- 7.5 Changing the temperature
- 7.6 Changing the type of heating
- 7.7 Pausing operation
- 7.8 Cancelling operation
- 7.9 Viewing the current temperature
- 7.10 Displaying information
- 8 Steam
- 9 Time-setting options
- 10 Baking and roasting assistant
- 11 Steam programs
- 12 Childproof lock
- 13 Rapid heat-up
- 14 Sabbath mode
- 15 Basic settings
- 16 Home Connect
- 17 Cleaning and servicing
- 18 Cleaning function
- 19 Rails
- 20 Appliance door
- 21 Troubleshooting
- 22 Disposal
- 23 Customer Service
- 24 Declaration of Conformity
- 25 How it works
- 25.1 General cooking tips
- 25.2 Baking tips
- 25.3 Roasting, braising and grilling tips
- 25.4 Steaming
- 25.5 Cooking frozen products
- 25.6 Cooking ready meals
- 25.7 List of foods
- 25.8 Special cooking methods and other applications
- 25.9 Test dishes
- 26 Installation instructions
- 26.1 General installation instructions
- 26.2 Appliance dimensions
- 26.3 Installation below a worktop
- 26.4 Installation underneath a hob
- 26.5 Installation in a tall unit
- 26.6 Installing two appliances on top of each other
- 26.7 Corner installation
- 26.8 Electrical connection
- 26.9 Installing the appliance
- 26.10 Removing the appliance

Steam en
17
Drying the condensation tray
WARNING‒Risk of burns!
The appliance becomes hot during operation.
▶ Allow the appliance to cool down before cleaning.
Requirement:The cooking compartment has cooled
down.
1.
Open the appliance door.
2.
Note:
The condensation tray is underneath the cooking
compartment.
Soak up the water in the condensation tray with a
tea towel and wipe it carefully.
Note:You can remove the condensation tray in order
to clean it.
→"Removing the condensate tray", Page30
Drying the cooking compartment
To dry the cooking compartment, you can either use
the "Dry" function or you can dry the cooking compart-
ment manually.
Drying the cooking compartment with the Dry
function
The "Dry" function heats up the cooking compartment
so that the moisture in the cooking compartment evap-
orates. You will then need to open the appliance door
to allow the steam to escape.
WARNING‒Risk of burns!
The appliance becomes hot during operation.
▶ Allow the appliance to cool down before cleaning.
ATTENTION!
If there is water on the cooking compartment floor
when operating the appliance at temperatures above
120°C, this will damage the enamel.
▶ Do not use the appliance if there is water on the
cooking compartment floor.
▶ Wipe away any water on the cooking compartment
floor before operation.
Requirement:The cooking compartment must have
cooled down.
1.
Remove any food remnants from the cooking com-
partment.
2.
Dry the cooking compartment with a sponge.
3.
Press to switch the appliance on.
4.
Press .
5.
Use the or button to set "Dry" .
6.
Use the button to navigate to the next row.
a The duration will appear on the display. The duration
cannot be changed.
7.
Use the button to navigate to the next row.
8.
Press to start drying the appliance.
a Once the duration has elapsed, an audible signal
will sound and the appliance will stop heating.
9.
Press to switch the appliance off.
10.
Remove limescale marks with a cloth soaked in vin-
egar, then wipe with clean water and dry with a soft
cloth.
11.
Leave the appliance door open for 1-2minutes so
that the cooking compartment dries completely.
Drying the cooking compartment manually
WARNING‒Risk of burns!
The appliance becomes hot during operation.
▶ Allow the appliance to cool down before cleaning.
ATTENTION!
If there is water on the cooking compartment floor
when operating the appliance at temperatures above
120°C, this will damage the enamel.
▶ Do not use the appliance if there is water on the
cooking compartment floor.
▶ Wipe away any water on the cooking compartment
floor before operation.
Requirement:The cooking compartment must have
cooled down.
1.
Remove any food remnants from the cooking com-
partment.
2.
Dry the cooking compartment with a sponge.
3.
Leave the cooking compartment to dry with the ap-
pliance door open for 1hour.
4.
Remove limescale marks with a cloth soaked in vin-
egar, then wipe with clean water and dry with a soft
cloth.
5.
Leave the appliance door open for 1-2minutes so
that the cooking compartment dries completely.