
Installation Instruction

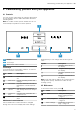
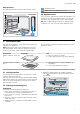
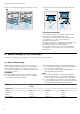
Table Of Contents
- Steamer
- en
- Table of contents
- 1 Safety
- 2 Avoiding material damage
- 3 Environmental protection and saving energy
- 4 Familiarising yourself with your appliance
- 5 Accessories
- 6 Before using for the first time
- 7 Basic operation
- 7.1 Switching on the appliance
- 7.2 Switching off the appliance
- 7.3 Residual heat indicator
- 7.4 Filling the water tank
- 7.5 Refilling the water tank
- 7.6 Setting the heating function and temperature
- 7.7 “Fill water tank” message
- 7.8 Heat-up indicator
- 7.9 Displaying the current temperature
- 7.10 Pausing operation
- 7.11 Changing settings during operation
- 7.12 Cancelling operation
- 7.13 After using the Steam function
- 8 Time-setting options
- 9 Steam programs
- 10 Childproof lock
- 11 Basic settings
- 12 Cleaning and servicing
- 13 Troubleshooting
- 14 Disposal
- 15 How it works
- 15.1 What is the best way to proceed?
- 15.2 Good to know
- 15.3 Vegetables
- 15.4 Side dishes and pulses
- 15.5 Poultry and meat
- 15.6 Fish
- 15.7 Soup garnishes, miscellaneous
- 15.8 Desserts, compote
- 15.9 Reheating
- 15.10 Defrosting
- 15.11 Extracting juice
- 15.12 Preserving
- 15.13 Sous-vide cooking
- 15.14 Dough proving
- 15.15 Frozen products
- 15.16 Test dishes
- 16 Customer Service
- 17 Installation instructions

Basic operation en
9
6.2 Initial configuration
When the appliance is connected to the power supply
for the first time or following a lengthy power failure, the
settings that you will need to configure before you can
use it will appear.
Note:You can change these settings at any time by
going to the basic settings.
→"Basic operation", Page9
Setting the language
1.
Use the button to navigate to the bottom row.
2.
Use the or button to select the required language.
3.
Use the button to return to the "Language" set-
ting.
4.
Use the button to select the next setting.
Setting the time
1.
Use the button to navigate to the next row.
2.
Use the or button to set the current time.
3.
Press .
4.
Use the button to select the next setting.
Setting the date
1.
Use the button to navigate to the next row.
2.
Use the or button to set the current day.
3.
Use the button to return to the "Day" setting.
4.
Use the button to select the next setting.
5.
Use the button to navigate to the next row.
6.
Use the or button to set the current month.
7.
Use the button to return to the "Month" setting.
8.
Use the button to select the next setting.
9.
Use the button to navigate to the next row.
10.
Use the or button to set the current year.
11.
Use the button to return to the "Year" setting.
12.
Use the button to select the next setting.
Setting the water hardness
1.
Use the button to navigate to the bottom row.
2.
Use the or button to set the water hardness
range.
3.
Use the button to return to the "Water hardness"
setting.
4.
Press .
a This saves the water hardness range.
a Initial configuration is now complete.
6.3 Calibrating the appliance
The boiling point of water depends on the air pressure.
During the calibration process, the appliance adjusts to
the pressure conditions in the location where it is in-
stalled. Large amounts of steam may be generated dur-
ing the calibration process.
Running the calibration process
Notes
¡ Do not open the appliance door while calibration is
in progress as this will abort the calibration process.
¡ If you move house, restore the appliance's basic
factory settings once it is installed so that it can ad-
apt to its new location. Repeat the procedures for
initial configuration and calibration.
¡ Your appliance will retain these calibration settings
even in the event of a power failure or disconnection
from the mains. Recalibration is not necessary.
Requirement:The cooking compartment is cold or at
room temperature.
1.
Remove the accessories and any leftover packaging
(e.g. polystyrene pellets) from the cooking compart-
ment.
2.
Wipe the smooth surfaces in the cooking compart-
ment with a soft, damp cloth.
3.
Press to switch on the appliance.
4.
Fill the water tank.
→"Filling the water tank", Page10
5.
Set the required heating function, temperature and
cooking time.
→"Setting the heating function and temperature",
Page11
Setting Value
Heating function Steam
Temperature 100°C
Cooking time 20minutes
6.
Press to switch the appliance off.
7.
Wait until the cooking compartment has cooled
down.
6.4 Cleaning the cooking compartment
Requirement:The cooking compartment is cold or at
room temperature.
1.
Clean the smooth surfaces with soapy water and a
dish cloth.
2.
Empty and dry the water tank.
3.
Dry the cooking compartment.
6.5 Cleaning the accessories
▶
Clean the accessories with soapy water and a dish
cloth or soft brush.
7 Basic operation
7.1 Switching on the appliance
▶
Press to switch the appliance on.
Notes
¡ In the basic settings, you can specify whether the
heating functions or the main menu should appear
when you switch on the appliance.
→"Basic settings", Page16