
Installation Instruction

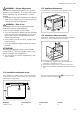

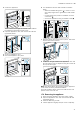

Table Of Contents
- Steamer
- en
- Table of contents
- 1 Safety
- 2 Avoiding material damage
- 3 Environmental protection and saving energy
- 4 Familiarising yourself with your appliance
- 5 Accessories
- 6 Before using for the first time
- 7 Basic operation
- 7.1 Switching on the appliance
- 7.2 Switching off the appliance
- 7.3 Residual heat indicator
- 7.4 Filling the water tank
- 7.5 Refilling the water tank
- 7.6 Setting the heating function and temperature
- 7.7 “Fill water tank” message
- 7.8 Heat-up indicator
- 7.9 Displaying the current temperature
- 7.10 Pausing operation
- 7.11 Changing settings during operation
- 7.12 Cancelling operation
- 7.13 After using the Steam function
- 8 Time-setting options
- 9 Steam programs
- 10 Childproof lock
- 11 Basic settings
- 12 Cleaning and servicing
- 13 Troubleshooting
- 14 Disposal
- 15 How it works
- 15.1 What is the best way to proceed?
- 15.2 Good to know
- 15.3 Vegetables
- 15.4 Side dishes and pulses
- 15.5 Poultry and meat
- 15.6 Fish
- 15.7 Soup garnishes, miscellaneous
- 15.8 Desserts, compote
- 15.9 Reheating
- 15.10 Defrosting
- 15.11 Extracting juice
- 15.12 Preserving
- 15.13 Sous-vide cooking
- 15.14 Dough proving
- 15.15 Frozen products
- 15.16 Test dishes
- 16 Customer Service
- 17 Installation instructions

Installation instructions en
41
2.
Centre the appliance.
There must be an air gap of at least 4mm between
the appliance and adjacent unit fronts.
3.
Open the appliance door and unscrew the left and
right-hand panels.
4.
Close the appliance door.
5.
Screw the appliance into place.
6.
For handleless kitchens with vertical bar handle
strips:
‒ Attach a suitable filling piece in order to cover
any sharp edges and to guarantee a safe install-
ation.
‒ Pre-drill aluminium profiles to establish a screw
connection .
‒ Secure the appliance using a suitable screw .
7.
Refit the panels and screw them in place, first at the
top and then at the bottom.
8.
If required, the gap between the appliance door and
the side panels can be adjusted using the screws at
the top left and right.
Note:The gap between the worktop and the appliance
must not be closed by additional battens.
Thermal insulation strips must not be fitted to the side
panels of the surround unit.
17.9 Removing the appliance
1.
Disconnect the appliance from the power supply.
2.
Open the appliance door and unscrew the left and
right-hand panels.
3.
Undo the fastening screws.
4.
Lift the appliance slightly and pull it out completely.