
Installation Instruction
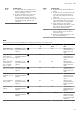

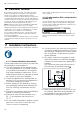
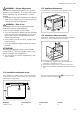

Table Of Contents
- Steamer
- en
- Table of contents
- 1 Safety
- 2 Avoiding material damage
- 3 Environmental protection and saving energy
- 4 Familiarising yourself with your appliance
- 5 Accessories
- 6 Before using for the first time
- 7 Basic operation
- 7.1 Switching on the appliance
- 7.2 Switching off the appliance
- 7.3 Residual heat indicator
- 7.4 Filling the water tank
- 7.5 Refilling the water tank
- 7.6 Setting the heating function and temperature
- 7.7 “Fill water tank” message
- 7.8 Heat-up indicator
- 7.9 Displaying the current temperature
- 7.10 Pausing operation
- 7.11 Changing settings during operation
- 7.12 Cancelling operation
- 7.13 After using the Steam function
- 8 Time-setting options
- 9 Steam programs
- 10 Childproof lock
- 11 Basic settings
- 12 Cleaning and servicing
- 13 Troubleshooting
- 14 Disposal
- 15 How it works
- 15.1 What is the best way to proceed?
- 15.2 Good to know
- 15.3 Vegetables
- 15.4 Side dishes and pulses
- 15.5 Poultry and meat
- 15.6 Fish
- 15.7 Soup garnishes, miscellaneous
- 15.8 Desserts, compote
- 15.9 Reheating
- 15.10 Defrosting
- 15.11 Extracting juice
- 15.12 Preserving
- 15.13 Sous-vide cooking
- 15.14 Dough proving
- 15.15 Frozen products
- 15.16 Test dishes
- 16 Customer Service
- 17 Installation instructions

Installation instructions en
39
WARNING‒Danger: Magnetism!
Permanent magnets are used in the control
panel or in the controls. They may affect elec-
tronic implants, e.g. pacemakers or insulin
pumps.
▶ Wearers of electronic implants must stay at
least 10 cm away from the control panel or
controls during the installation.
WARNING‒Risk of fire!
It is dangerous to use an extended power
cord and non-approved adapters.
▶ Do not use multiple socket strips.
▶ Only use extension cables that are certified,
have a minimum cross section of 1.5mm²
and comply with the applicable national
safety requirements.
▶ If the power cord is too short, contact cus-
tomer service.
▶ Only use adapters approved by the manu-
facturer.
ATTENTION!
Carrying the appliance by the door handle
could break it. The door handle cannot sup-
port the weight of the appliance.
▶ Do not carry or hold the appliance by the
door handle.
17.2 Appliance dimensions
You will find the dimensions of the appliance here
17.3 Installation below a worktop
Observe the installation dimensions and the installation
instructions when installing below a worktop.
¡ To ventilate the appliance, the intermediate floor
must have a ventilation cut-out.
¡ The worktop must be secured to the built-in unit.
¡ Observe any available installation instructions for the
hob.
17.4 Installation underneath a hob
If the appliance is installed under a hob, the following
minimum dimensions must be adhered to (including
substructure, if applicable).
The minimum worktop thickness a is based on the
required minimum clearance .
Hob type a raised in mm a flush in mm b in mm
Induction hob 42 43 5