
Installation Instruction
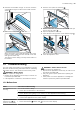


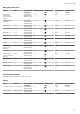
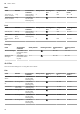
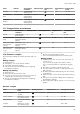
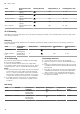
Table Of Contents
- Steamer
- en
- Table of contents
- 1 Safety
- 2 Avoiding material damage
- 3 Environmental protection and saving energy
- 4 Familiarising yourself with your appliance
- 5 Accessories
- 6 Before using for the first time
- 7 Basic operation
- 7.1 Switching on the appliance
- 7.2 Switching off the appliance
- 7.3 Residual heat indicator
- 7.4 Filling the water tank
- 7.5 Refilling the water tank
- 7.6 Setting the heating function and temperature
- 7.7 “Fill water tank” message
- 7.8 Heat-up indicator
- 7.9 Displaying the current temperature
- 7.10 Pausing operation
- 7.11 Changing settings during operation
- 7.12 Cancelling operation
- 7.13 After using the Steam function
- 8 Time-setting options
- 9 Steam programs
- 10 Childproof lock
- 11 Basic settings
- 12 Cleaning and servicing
- 13 Troubleshooting
- 14 Disposal
- 15 How it works
- 15.1 What is the best way to proceed?
- 15.2 Good to know
- 15.3 Vegetables
- 15.4 Side dishes and pulses
- 15.5 Poultry and meat
- 15.6 Fish
- 15.7 Soup garnishes, miscellaneous
- 15.8 Desserts, compote
- 15.9 Reheating
- 15.10 Defrosting
- 15.11 Extracting juice
- 15.12 Preserving
- 15.13 Sous-vide cooking
- 15.14 Dough proving
- 15.15 Frozen products
- 15.16 Test dishes
- 16 Customer Service
- 17 Installation instructions

en Disposal
24
13.3 Replacing the glass cover or seals
If the halogen bulb's glass cover or seals are dam-
aged, you must replace the damaged parts.
▶
Replace the glass cover or seals.
You can obtain a new glass cover or new seals
from our after-sales service.
→"Customer Service", Page38
13.4 Replacing the door seal
If the cooking compartment's outer door seal is defect-
ive, you must replace the door seal. Replacement seals
for your appliance can be obtained from our after-sales
service. Specify the E number and FD number of your
appliance.
1.
Open the appliance door.
2.
Remove the old door seal.
3.
Push the new door seal in on one side of the cook-
ing compartment and then work it in all the way
round.
The joint must be at the side.
4.
Check that the seal is correctly fitted, especially in
the corners.
14 Disposal
Find out here how to dispose of old appliances cor-
rectly.
14.1 Disposing of old appliance
Valuable raw materials can be reused by recycling.
1.
Unplug the appliance from the mains.
2.
Cut through the power cord.
3.
Dispose of the appliance in an environmentally
friendly manner.
Information about current disposal methods are
available from your specialist dealer or local author-
ity.
This appliance is labelled in accord-
ance with European Directive
2012/19/EU concerning used elec-
trical and electronic appliances
(waste electrical and electronic equip-
ment - WEEE).
The guideline determines the frame-
work for the return and recycling of
used appliances as applicable
throughout the EU.
15 How it works
Here, you can find the ideal settings for various dishes
as well as the best accessories and cookware. We
have tailored these recommendations to your appli-
ance.
15.1 What is the best way to proceed?
WARNING‒Risk of scalding!
Hot steam may escape when you open the appliance
door. Steam may not be visible, depending on the tem-
perature.
▶ When opening the door, do not stand too close to
the appliance.
▶ Open the appliance door carefully.
▶ Keep children at a safe distance.
Tip
If you are using the appliance for the first time, proceed
in accordance with the following basic information:
¡ →"Safety", Page2
¡ →"Saving energy", Page4
¡ →"Condensation", Page25
1.
Select a suitable food type from the food overview.
Tips
¡ Your appliance has programmed settings for a
selection of food types. If you want to be guided
by the appliance, use the programmed dishes
→Page13.
¡ If you do not find the exact food or application
that you want to cook or use, look for a similar
dish and use that as a reference.
2.
Remove any accessories from the cooking compart-
ment.
3.
Select suitable cookware and accessories.
Use the cookware and accessories listed in the re-
commended settings.
4.
Only preheat the appliance if the recipe or the re-
commended settings tell you to do so.
5.
Use the recommended settings when configuring
the appliance settings.
6.
When the dish is ready, press to switch the appli-
ance off.
15.2 Good to know
The tables below contain a selection of food that can
be cooked in your appliance with excellent results. You
can use these tables to find out which heating func-
tions, accessories, temperature and cooking time to se-
lect. Unless otherwise stated, the information given as-
sumes that the food will be placed in the appliance
when the appliance is cold.
Accessories
Use the accessories provided.