
Installation Instruction

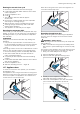
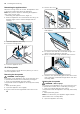
Table Of Contents
- Steamer
- en
- Table of contents
- 1 Safety
- 2 Avoiding material damage
- 3 Environmental protection and saving energy
- 4 Familiarising yourself with your appliance
- 5 Accessories
- 6 Before using for the first time
- 7 Basic operation
- 7.1 Switching on the appliance
- 7.2 Switching off the appliance
- 7.3 Residual heat indicator
- 7.4 Filling the water tank
- 7.5 Refilling the water tank
- 7.6 Setting the heating function and temperature
- 7.7 “Fill water tank” message
- 7.8 Heat-up indicator
- 7.9 Displaying the current temperature
- 7.10 Pausing operation
- 7.11 Changing settings during operation
- 7.12 Cancelling operation
- 7.13 After using the Steam function
- 8 Time-setting options
- 9 Steam programs
- 10 Childproof lock
- 11 Basic settings
- 12 Cleaning and servicing
- 13 Troubleshooting
- 14 Disposal
- 15 How it works
- 15.1 What is the best way to proceed?
- 15.2 Good to know
- 15.3 Vegetables
- 15.4 Side dishes and pulses
- 15.5 Poultry and meat
- 15.6 Fish
- 15.7 Soup garnishes, miscellaneous
- 15.8 Desserts, compote
- 15.9 Reheating
- 15.10 Defrosting
- 15.11 Extracting juice
- 15.12 Preserving
- 15.13 Sous-vide cooking
- 15.14 Dough proving
- 15.15 Frozen products
- 15.16 Test dishes
- 16 Customer Service
- 17 Installation instructions

Cleaning and servicing en
19
Running the second rinse cycle
1.
Remove the water tank and rinse thoroughly.
2.
Fill the water tank with water and then slide it back
into the appliance.
3.
Close the appliance door.
4.
Press .
a The appliance will rinse itself for approx.
20seconds.
5.
Remove the remaining water from the evaporator
dish using the cleaning sponge.
6.
Wipe down the cooking compartment using the
cleaning sponge and then dry with a soft cloth.
7.
Switch off the appliance.
a The appliance is now ready for use again.
Descaling the evaporator dish
If necessary, you can descale the evaporator dish sep-
arately. To do this, you can either use your appliance's
descaling function or you can descale the evaporator
dish manually.
ATTENTION!
Using non-recommended descaler may damage the
appliance
▶ Only use the liquid descaler recommended by us
for the descaling programme. The time the descaler
needs to be left to work depends on the product
used.
If descaling solution comes into contact with the control
panel or other delicate surfaces, it will damage them.
▶ Remove descaling solution immediately with water.
1.
Mix 100ml water with 20ml liquid descaler to
make a descaling solution.
2.
Completely fill the evaporator dish with descaling
solution.
3.
Fill the water tank with water and then slide it all the
way into the appliance.
4.
Close the appliance door.
5.
Start the descaling process. →Page18
12.7 Appliance door
To clean or remove the door panels, you can detach
the appliance door.
The appliance's door hinges each have a locking lever.
When the locking levers are closed, the appliance door
is secured in place. The appliance door cannot be re-
moved when it is secured like this.
When the locking levers are open, the hinges are se-
cured and cannot snap shut.
Detaching the appliance door
When the locking levers for detaching the appliance
door are open, the hinges are secured and cannot
snap shut.
WARNING‒Risk of injury!
When the hinges are not secured, they can snap shut
with great force.
▶ Make sure that the locking levers are always either
fully closed or (when detaching the oven door) fully
open.
The hinges on the appliance door move when the door
is opened and closed, which could trap your fingers.
▶ Keep your hands away from the hinges.
1.
Open the appliance door fully.
2.
Open the left- and right-hand locking levers.
3.
Partially close the appliance door such that it re-
mains ajar at an angle of approx. 30°.
4.
Take hold of the appliance door with both hands
(one on each side) and pull it up and out.