
Installation Instruction

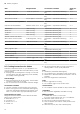
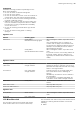
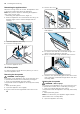
Table Of Contents
- Steamer
- en
- Table of contents
- 1 Safety
- 2 Avoiding material damage
- 3 Environmental protection and saving energy
- 4 Familiarising yourself with your appliance
- 5 Accessories
- 6 Before using for the first time
- 7 Basic operation
- 7.1 Switching on the appliance
- 7.2 Switching off the appliance
- 7.3 Residual heat indicator
- 7.4 Filling the water tank
- 7.5 Refilling the water tank
- 7.6 Setting the heating function and temperature
- 7.7 “Fill water tank” message
- 7.8 Heat-up indicator
- 7.9 Displaying the current temperature
- 7.10 Pausing operation
- 7.11 Changing settings during operation
- 7.12 Cancelling operation
- 7.13 After using the Steam function
- 8 Time-setting options
- 9 Steam programs
- 10 Childproof lock
- 11 Basic settings
- 12 Cleaning and servicing
- 13 Troubleshooting
- 14 Disposal
- 15 How it works
- 15.1 What is the best way to proceed?
- 15.2 Good to know
- 15.3 Vegetables
- 15.4 Side dishes and pulses
- 15.5 Poultry and meat
- 15.6 Fish
- 15.7 Soup garnishes, miscellaneous
- 15.8 Desserts, compote
- 15.9 Reheating
- 15.10 Defrosting
- 15.11 Extracting juice
- 15.12 Preserving
- 15.13 Sous-vide cooking
- 15.14 Dough proving
- 15.15 Frozen products
- 15.16 Test dishes
- 16 Customer Service
- 17 Installation instructions

en Cleaning and servicing
18
¡ Glass ceramics
¡ Stainless steel
¡ Aluminium
12.3 Cleaning sponge
Use the absorbent cleaning sponge only for cleaning
the cooking compartment and for removing residual
water from the evaporator dish.
Wash the cleaning sponge thoroughly before use.
You can wash the cleaning sponge in the washing ma-
chine using a hot wash program.
12.4 Drying the cooking compartment
WARNING‒Risk of scalding!
Hot steam may escape when you open the appliance
door. Steam may not be visible, depending on the tem-
perature.
▶ When opening the door, do not stand too close to
the appliance.
▶ Open the appliance door carefully.
▶ Keep children at a safe distance.
The water in the evaporator dish is still hot even after
the appliance has been switched off.
▶ Never empty the evaporator dish immediately after
switching off the appliance.
▶ Allow the appliance to cool down before cleaning.
1.
Leave the appliance door ajar until the appliance
has cooled down.
2.
Clean any food remnants from the cooking compart-
ment.
3.
Once it has cooled down, wipe down the cooking
compartment and the evaporator dish with the
cleaning sponge, and dry thoroughly with a soft
cloth.
4.
If condensation has formed on the front panels, dry
them.
12.5 Emptying the water tank
ATTENTION!
Drying the water tank in the hot cooking compartment
leads to damage to the water tank.
▶ Do not dry the water tank in the hot cooking com-
partment.
Cleaning the water tank in the dishwasher will damage
it.
▶ Do not clean the water tank in the dishwasher.
▶ Clean the water tank with a soft cloth and standard
washing-up liquid.
1.
Open the appliance door.
2.
Remove the water tank and empty out the remaining
water.
3.
Dry the seal in the tank lid and the tank recess in
the appliance.
4.
Slot the water tank back into the water tank recess.
5.
Close the appliance door.
12.6 Descaling
To ensure that your appliance continues to operate cor-
rectly, it must be descaled regularly. How often you
need to descale your appliance depends on the hard-
ness of the water used.
Notes
¡ Only use the liquid descaler recommended by us
for descaling (order number 311 680).
¡ If you interrupt the descaling process, you will be
prompted to resume the process when you switch
the appliance back on.
¡ When you have five or fewer uses remaining for
cooking with steam, your appliance will remind you
to descale it.
Step Duration
Descaling →Page18
Approx. 30min
First rinse cycle
→Page18
20s
Second rinse cycle
→Page19
20s
Starting the descaling process
ATTENTION!
If descaling solution comes into contact with the control
panel or other delicate surfaces, it will damage them.
▶ Remove descaling solution immediately with water.
Using non-recommended descaler may damage the
appliance
▶ Only use the liquid descaler recommended by us
for the descaling programme. The time the descaler
needs to be left to work depends on the product
used.
1.
Mix 300ml water with 60ml liquid descaler to
make a descaling solution.
2.
Remove the water tank and pour the descaling solu-
tion into it.
3.
Slide the water tank all the way into the appliance.
4.
Close the appliance door.
5.
Press .
6.
Press .
7.
To select "Descale" , press or .
8.
Navigate to the next row.
You cannot change the duration of the descaling
process.
9.
Navigate to the next row.
10.
Press to start the descaling process.
Running the first rinse cycle
1.
Remove the descaling solution from the evaporator
dish using the cleaning sponge provided and then
thoroughly rinse the cleaning sponge with water.
2.
Remove the water tank and rinse thoroughly.
3.
Fill the water tank with water and then slide it back
into the appliance.
4.
Close the appliance door.
5.
Press .
a The appliance will rinse itself for approx.
20seconds.
6.
Open the appliance door.
7.
Remove the remaining water from the evaporator
dish using the cleaning sponge.
8.
Proceed to the second rinse cycle. →Page19