BUILT-IN OVEN [en] INSTRUCTION MANUAL C17CR22G0
en Table of contents [ en] I NSTRUCTI ON MANUAL 8 Intended use . . . . . . . . . . . . . . . . . . . . . . . . . . . . . 4 ( Important safety information . . . . . . . . . . . . . . . 5 F Sabbath mode . . . . . . . . . . . . . . . . . . . . . . . . . . 16 General information . . . . . . . . . . . . . . . . . . . . . . . . . . . 5 Halogen lamp. . . . . . . . . . . . . . . . . . . . . . . . . . . . . . . . 5 D Cleaning agent . . . . . . . . . . . . . . . . . . . . . . . . . . 17 ] Causes of damage . . .
en Intended use Produktinfo Additional information on products, accessories, replacement parts and services can be found at www.neff-international.com and in the online shop www.neff-eshop.com 4 8Intended use Read these instructions carefully. Only then will you be able to operate your appliance safely and correctly. Retain the instruction manual and installation instructions for future use or for subsequent owners. This appliance is only intended to be fully fitted in a kitchen.
Important safety information (Important safety information I mpor t ant saf et y i nf or mat i on General information : Warning – Risk of fire! Combustible items stored in the cooking compartment may catch fire. Never store combustible items in the cooking compartment. Never open the appliance door if there is smoke inside. Switch off the appliance and unplug it from the mains or switch off the circuit breaker in the fuse box. Risk of fire! ■ Loose food remnants, fat and meat juices may catch fire.
en Causes of damage : Warning – Risk of electric shock! When replacing the cooking compartment bulb, the bulb socket contacts are live. Before replacing the bulb, unplug the appliance from the mains or switch off the circuit breaker in the fuse box. 6 ]Causes of damage Causes of damge General information Caution! ■ Accessories, foil, greaseproof paper or ovenware on the cooking compartment floor: do not place accessories on the cooking compartment floor.
Environmental protection 7Environmental protection ■ en Open the appliance door as infrequently as possible when the appliance is in use. Your new appliance is particularly energy-efficient. Here you can find tips on how to save even more energy when using the appliance, and how to dispose of your appliance properly. Envi r onment al pr ot ect i on Saving energy ■ ■ Only preheat the appliance if this is specified in the recipe or in the tables in the operating instructions.
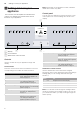
en Getting to know your appliance Note: Depending on the appliance model, individual details and colours may differ. *Getting to know your appliance Control panel In this section, we will explain the indicators and controls. You will also find out about the various functions of your appliance. You can set your appliance's various functions on the control panel. The current settings are shown in the display.
Getting to know your appliance Main menu " Touch the 0 touch button to access the main menu.
en Accessories Cooking compartment functions The features of the cooking compartment make your appliance easier to use. This, for example, enables the cooking compartment to be well lit and a cooling fan to prevent the appliance from overheating. Opening the appliance door If you open the appliance door while the appliance is in operation, this pauses the programme. The operation continues to run when you close the door.
Before using for the first time When inserting the wire rack, ensure that the lug ‚ is at the rear and is facing downwards. The open side must be facing the appliance door and the curvature must be facing downwards ¾. D D When inserting the baking tray or the universal pan, ensure that the lug ƒ is at the rear and is facing downwards. The sloping edge of the accessory „ must be facing towards the appliance door.
en Operating the appliance 5. Use 6. Use 7. Use 8. Use 9. Use 10. Use 11. Use 12. Use the & button to navigate to the next line. the ( or ) button to select the current month. the % button to return to "Month". the ) button to select the next setting. the & button to navigate to the next line. the ( or ) button to select the current year. the % button to return to "Year". the ) button to apply the settings. The initial use is complete.
Operating the appliance 2. Use the 3. Use the 4. Use the ( or ) button to select the type of heating. & button to navigate to the next line. ( or ) button to select the temperature. &LUFR7KHUP & Note: Depending on the operating mode, different settings are available. For each further setting, use the & button to navigate to the next line. Use the ( or ) button to select the setting. 5. Touch the # touch button to start the appliance operation. The heating bar and run time appear on the display.
en Time-setting options 2. Place the food on a single level in the cooking compartment. 3. Touch the # touch button to start the appliance operation. 4. Touch the ° touch button to activate the "PowerBoost" function. The ° symbol appears on the display. Once the set temperature has been reached, the "PowerBoost" function switches itself off automatically. The ° symbol disappears from the display. Note: When the appliance is switched on, use the % button to navigate to the Timer .
Childproof lock Checking, changing or deleting settings 1. Touch the 0 touch button. The time-setting options are shown on the display. 2. Use the & or % button to navigate through the lines. 3. If necessary, change the setting using the ( or ) button. Set "00:00" to delete a time function. The setting is applied automatically. AChildproof lock Your appliance is equipped with a childproof lock so that children cannot switch it on accidentally or change any settings.
en Sabbath mode Audible signal duration Short Medium Long Button tone Switched off (Exception: The button tone for the # touch button remains switched on) Switched on Display brightness Adjustable across 5 levels Clock display Digital Off Lighting On during operation Off during operation Childproof lock* Only key lock Door lock and key lock Automatic childproof lock Deactivated Activated Action after switching on Main menu Heating types Night-time dimming Switched off Switched on (display dimmed between
Cleaning agent DCleaning agent With good care and cleaning, your appliance will retain its appearance and remain fully functioning for a long time to come. We will explain here how you should correctly care for and clean your appliance. Door panels Cl eani ng agent Door handle Suitable cleaning agents To ensure that the different surfaces are not damaged by using the wrong cleaning agent, observe the information in the table.
en Cleaning function Surfaces in the cooking compartment The back wall in the cooking compartment is selfcleaning.You can tell this from the rough surface. The base, ceiling and side panel are enamelled and have smooth surfaces. Cleaning enamel surfaces Clean the smooth enamel surfaces with a dish cloth and hot soapy water or a vinegar solution. Then dry them with a soft cloth. Soften baked-on food remnants with a damp cloth and soapy water.
Rails End As soon as the cleaning aid has run through, a signal sounds and the appliance ends the operation automatically. As soon as you open the appliance door, the interior lighting is switched on so that you can rinse the cooking compartment more easily. The remaining water in the cooking compartment must be removed promptly. Do not leave the remaining water in the cooking compartment for a long time (e.g. overnight). The appliance must not be operated when the cooking compartment is still wet or damp.
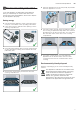
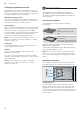
Appliance door en qAppliance door With good care and cleaning, your appliance will retain its appearance and remain fully functional for a long time to come. This will tell you how to clean the appliance door. Ap l i ance do r Detaching and refitting the appliance door For cleaning purposes or to remove the door panels, you can detach the appliance door. The appliance door hinges each have a locking lever. When the locking levers are closed (fig. !), the appliance door is secured in place.
Appliance door Fitting and removing the glass panels To facilitate cleaning, you can remove the glass panels from the appliance door. If required, for example if the appliance is installed higher up, you can remove the entire door and lay it on a flat surface. en 4. Take off the seal on both sides and remove it (fig. $). Locking the appliance door 1. Open the appliance door fully. 2. Open the two locking levers on the left and right (fig. !). 3. Close the appliance door as far as it goes (fig. ").
Appliance door en Fitting panels 5. Push in the inner glass panel. Before sliding the panel in, make sure that the glossy side of the panel is on the outside and the cut-outs on the left and right are at the top. The panel must be sitting correctly at the bottom in the retainer (fig. %). 1. Open the appliance door fully and refit the condensate trough. To do this, insert the trough from above and rotate it at the bottom (fig. !). 1 2.
Trouble shooting 3Trouble shooting If a fault occurs, there is often a simple explanation. Before calling the after-sales service, please refer to the fault table and attempt to correct the fault yourself. Tr oubl e sho t i ng Tip: If a meal does not turn out exactly as you wanted, refer to the "Tested for you in our cooking studio" section.Here, you will find plenty of cooking tips and notes. : Warning – Risk of injury! Incorrect repairs are dangerous. Do not attempt to repair the appliance yourself.
en Customer service Replacing the bulb in the top of the cooking compartment If the cooking compartment light bulb fails, it must be replaced. Heat-resistant, 25 watt, 230 V halogen bulbs are available from the after-sales service or specialist retailers. When handling the halogen bulb, use a dry cloth. This will increase the service life of the bulb. Only use these bulbs. : Warning – Risk of electric shock! When replacing the cooking compartment bulb, the bulb socket contacts are live.
Tested for you in our cooking studio en JTested for you in our cooking studio By preparing several dishes at the same time, you can make energy savings of up to 45 per cent. Position baking tins/dishes next to one another or offset and vertically stacked in the cooking compartment. Here, you can find a selection of dishes and the ideal settings for them. We will show you which type of heating and temperature are best suited to your dish.
en Tested for you in our cooking studio Types of heating used: ■ ‚ CircoTherm ■ ■ ƒ Top/bottom heating „ Circotherm intensive Dish Accessories/cookware Shelf posi- Heating tion function Temperature in °C Cooking time in mins.
Tested for you in our cooking studio en Dish Accessories/cookware Shelf posi- Heating tion function Temperature in °C Yeast cake with dry topping, 2 levels Universal pan + baking tray 3+1 160-170 Yeast cake with moist topping, 2 levels Universal pan + baking tray 3+1 150-160 45-60 Plaited loaf, savarin Baking tray 1 150-170 30-40 Plaited loaf, savarin Baking tray 1 150-160 35-45 Swiss roll Baking tray 1 190-210* 10-15 Stollen with 500 g flour Universal pan 1 160-170 50-60
en Tested for you in our cooking studio The cake has risen in the middle but is lower around the edge. The fruit juice overflows. Small baked items stick to one another during baking. The cake is too dry. The cake is generally too light in colour. The cake is too light on top, and too dark underneath. The cake is too dark on top, and too light underneath. Cakes baked in a tray or tin are too brown at the back. The whole cake is too dark. The cake is unevenly browned. You were baking on several levels.
Tested for you in our cooking studio Frozen products Do not use frozen products that are heavily frosted. Remove any ice on the food. Some frozen products may be unevenly pre-baked. Uneven browning may remain even after baking. Recommended setting values The table lists the optimal heating type for various kinds of bread and bread roll. The temperature and baking time depend on the amount and consistency of the dough/mixture. For this reason, the table specifies setting ranges.
en Tested for you in our cooking studio Dish Accessories Shelf posi- Heating tion function Temperature in °C Baguette, pre-baked, chilled Universal pan 2 200-220 Baguette, pre-baked, chilled Universal pan 2 ƒ … Cooking time in mins.
Tested for you in our cooking studio make energy savings of up to 20 per cent.If you preheat the oven, you can reduce the indicated baking times by several minutes. Preheating is necessary for selected food, and this is indicated in the table. Do not place your food or accessories into the cooking compartment until it has finished preheating. If you wish to follow one of your own recipes when baking, you should use the setting values listed for similar baked items in the table as reference.
en Tested for you in our cooking studio Bakes and soufflés Your appliance offers a range of heating types for preparing bakes and soufflés. You can find the ideal settings for many dishes in the settings tables. Only use original accessories supplied with your appliance. These have been tailored to the cooking compartment and the operating modes of your appliance. Shelf positions Always use the indicated shelf positions. You can prepare dishes on one level using a baking tin/ dish or the universal pan.
Tested for you in our cooking studio Poultry Your appliance offers you a range of heating types for preparing poultry. You can find the ideal settings for certain dishes in the settings tables. Roasting on the wire rack Roasting on the wire rack is particularly well suited for larger poultry or for multiple pieces at the same time. Slide the universal pan into the oven at the indicated shelf position with the wire rack attached. Ensure that the wire rack is correctly positioned on the universal pan.
en Tested for you in our cooking studio Types of heating used: ■ ƒ Top/bottom heating ■ ‡ Circo-roasting ■ ■ „ Circotherm intensive ˆ Full-surface grill Dish Accessories/cookware Shelf posi- Type of tion heating Temperature in °C Cooking time in mins.
Tested for you in our cooking studio Uncovered cookware Use a deep roasting tin/dish for roasting meat. Place the tin/dish onto the wire rack. If you do not have any suitable cookware, use the universal pan. Covered cookware When cooking with covered cookware, the cooking compartment remains considerably cleaner. Ensure that the lid fits well and closes properly. Place the cookware onto the wire rack. The distance between the meat and the lid must be at least 3 cm. The meat may rise.
en Tested for you in our cooking studio Dish Accessories/cookware Shelf posi- Type of tion heating Temperature in °C Pork medallions, 3 cm thick Wire rack 3 ˆ 290* Cooking time in mins. 8-12 Beef Fillet of beef, medium, 1 kg Wire rack 1 210-220 40-50 Pot-roasted beef, 1.5 kg Cookware, covered 1 200-220 130-140 Sirloin, medium, 1.
Tested for you in our cooking studio Fish Your appliance offers you a range of heating types for preparing fish. You can find the ideal settings for many dishes in the settings tables. The whole fish does not have to be turned. Place the whole fish into the cooking compartment in swimming position with the dorsal fin facing upwards. Placing half a potato or a small oven-proof container in the stomach cavity of the fish will provide stability.
en Tested for you in our cooking studio Types of heating used: ■ ‡ Circo-roasting ■ „ Circotherm intensive ■ ■ … Bread baking ˆ Full-surface grill Dish Accessories/cookware Shelf posi- Type of tion heating Temperature in °C Cooking time in mins. Fish Fish, grilled, whole 300 g, e.g. trout Wire rack 1 170-190 20-30 Fish, grilled, whole 1.5 kg, e.g.
Tested for you in our cooking studio Types of heating used: ■ ‚ CircoTherm ■ ƒ Top/bottom heating ■ ■ ■ en „ Circotherm intensive … Bread baking ˆ Full-surface grill Dish Accessories Shelf posi- Type of tion heating Temperature in °C Cooking time in mins.
en Tested for you in our cooking studio Wire rack Insert the wire rack with the open side facing the appliance door and the curved lip pointing downwards. Always place ovenware, tins and dishes on the wire rack. Universal pan or baking tray Slide the universal pan or the baking tray in carefully as far as the limit stop with the bevelled edge facing the appliance door. Baking tins and cookware Dark- coloured metal baking tins are most suitable. These allow you to make energy savings of up to 35 per cent.
Tested for you in our cooking studio en Dish Accessories/cookware Shelf posi- Type of tion heating Temperature in °C Cooking time in mins. Meat Joint of pork without rind, e.g. neck, 1.5 kg Cookware, uncovered 1 180-190 120-140 Pot-roasted beef, 1.5 kg Cookware, covered 1 200-220 140-160 Joint of veal, 1.5 kg Cookware, uncovered 1 ‘ ‘ ‘ 170-180 110-130 Fish Fish, braised, whole 300 g, e.g. trout Cookware, covered 1 190-210 25-35 Fish, braised, whole 1.5 kg, e.g.
en Tested for you in our cooking studio Type of heating used: Dish Š Low temperature cooking ■ Cookware Shelf posi- Heating tion function Searing time Temperain mins ture in °C Cooking time in mins 1 Š 6-8 95* 45-60 1 Š 4 120* 45-60 1 Š 6-8 120* 100-130 Cookware, uncovered 1 Š 6-8 85* 130-180 Cookware, uncovered 1 Š 4-6 85* 45-70 Cookware, uncovered 1 Š 6-8 100* 150-190 Cookware, uncovered 1 4-6 85* 90-120 Sirloin, 5-6 cm thick Cookware, uncovered 1 6-8 85*
Tested for you in our cooking studio Recommended setting values In the table, you can find settings for drying various foodstuffs. The temperature and cooking time are dependent on the type, moisture, ripeness and thickness of the food to be dried. The longer you leave the food to be dried, the better it will be preserved. The thinner the slices are, the quicker the drying process en will be and the more aromatic the dried food will remain. Setting ranges are indicated for this reason.
en Tested for you in our cooking studio Type of heating used: ‚ CircoTherm ■ Preserving Cookware Vegetables, e.g. carrots 1-litre preserving jars Shelf posi- Type of tion heating 1 ‚ Vegetables, e.g. cucumbers 1-litre preserving jars 1 ‚ Stone fruit, e.g. cherries, damsons 1-litre preserving jars 1 ‚ Pomes, e.g.
Tested for you in our cooking studio Defrosting Use heating type "CircoTherm" to defrost frozen fruit, vegetables and baked items. Poultry, meat and fish should ideally be defrosted in the refrigerator. Use the following shelf position for defrosting: ■ Baking tray: Level 1 Recommended setting values The times in the table are average values. They are dependent on the quality, freezing temperature (-18 °C) and composition of the food. Time ranges are indicated.
en Tested for you in our cooking studio Dish Accessories Shelf posi- Type of tion heating Temperature in °C Shortbread, 2 levels Universal pan + baking tray 3+1 140-150* Cooking time in mins.
*9001585404* 9001585404 000925 en