
Instructions for Use


en Trouble shooting
30
--------
:Warning – Risk of injury!
Incorrect repairs are dangerous. Do not attempt to
repair the appliance yourself. Repairs must only be
carried out by one of our trained after-sales engineers. If
the appliance is defective, call the after-sales service.
:Warning – Risk of electric shock!
Incorrect repairs are dangerous. Repairs may only be
carried out and damaged power cables replaced by
one of our trained after-sales technicians. If the
appliance is defective, unplug the appliance from the
mains or switch off the circuit breaker in the fuse box.
Contact the after-sales service.
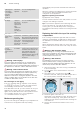
Error messages on the display
If an error message with "“" appears on the display,
e.g. “‹†-„ƒ, touch the v button. This will reset the
error message. Reset the time, if necessary.
If the fault was a one-off, you can continue to use your
appliance as normal. If the error message appears
again, call our after-sales service and quote the exact
error message and the E no. of your appliance.
~ "Customer service" on page 31
Maximum operating time
If you do not change the settings on your appliance for
several hours, the appliance will stop heating
automatically. This prevents unintentional continuous
operation.
When the maximum operating time is reached depends
on the various different settings that have been
configured on the appliance.
Maximum operating time reached
”‰ appears on the display.
Turn the function selector to the "Off" position. You can
configure new settings if required.
Tip: To prevent the appliance from switching off when
you do not want it to, e.g. with an extremely long
cooking time, you should always set a cooking time.
The appliance will heat up until the set cooking time has
elapsed.
Replacing the bulb in the top of the cooking
compartment
If the cooking compartment light bulb fails, it must be
replaced. Heat-resistant, 40 watt, 230 V halogen bulbs
are available from the after-sales service or specialist
retailers.
When handling the halogen bulb, use a dry cloth. This
will increase the service life of the bulb. Only use these
bulbs.
:Warning – Risk of electric shock!
When replacing the cooking compartment bulb, the
bulb socket contacts are live. Before replacing the bulb,
unplug the appliance from the mains or switch off the
circuit breaker in the fuse box.
:Warning – Risk of burns!
The appliance becomes very hot. Never touch the
interior surfaces of the cooking compartment or the
heating elements. Always allow the appliance to cool
down. Keep children at a safe distance.
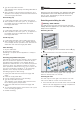
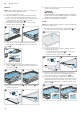
1. Place a tea towel in the cold cooking compartment
to prevent damage.
2. Turn the glass cover anti-clockwise to remove it
(figure !).
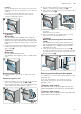
3. Pull out the bulb – do not turn it (figure ").
Insert the new bulb, making sure that the pins are in
the correct position. Push the bulb in firmly.
4. Screw the glass cover back on.
Depending on the appliance model, the glass cover
may have a sealing ring. If the glass cover has a
sealing ring, put it back in place before screwing the
cover back on.
5. Remove the tea towel and switch on the circuit
breaker.
The "descale"
symbol appears
in the display.
~ "Getting to
know your
appliance"
on page 9
Build-up of
limescale in
appliance.
Run the descaling programme in
full. ~ "Cleaning function"
on page 22
’‚Ÿ appears in
the display.
The power
supply has
been discon-
nected or the
appliance has
been
switched off
during the
descaling pro-
cess.
Run "Descaling interrupted" in
full. ~ "Cleaning function"
on page 22
“†‚-ƒƒ
appears in the
display.
There is too
much water in
the steam
system. The
water cannot
be pumped
back into the
water tank.
Empty the water tank then insert
it. Touch the v button. Reset the
time. Switch off the appliance and
switch it back on again. Run "Des-
caling interrupted" in full.
~ "Cleaning function"
on page 22
The appliance is
not heat-
ing."DEMO" is
shown on the dis-
play.
Demo mode
is activated.
Briefly disconnect the appliance
from the mains (switch off the cir-
cuit breaker in the fuse box) and
then deactivate demo mode
within approx. 5 minutes by
changing the basic setting ™‚„
to ‹. ~ "Basic settings"
on page 18
2
1