
Instructions for Use


Trouble shooting en
29
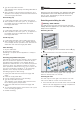
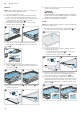
5. Push down on the intermediate panel around ƒ,
slide the holder „ in at an angle and push down until
it clicks into place (Fig. &).
The holder has been inserted (Fig. ').
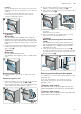
6. Insert the inner glass into the mounting rail … at an
angle towards the back (Fig. ().
7. Push the inner glass downwards until it clicks into
place (Fig. )).
3Trouble shooting
Tr oubl e shoot i ng
If a fault occurs, there is often a simple explanation.
Before calling the after-sales service, please refer to the
fault table and attempt to correct the fault yourself.
Rectifying faults yourself
You can often easily rectify technical faults with the
appliance yourself.
If a dish does not turn out exactly as you wanted, you
can find useful cooking tips and instructions at the end
of this instruction manual. ~ "Tested for you in our
cooking studio" on page 31
Fault Possible
cause
Notes/remedy
The appliance is
not working.
Defective cir-
cuit breaker.
Check the circuit breaker in the
fuse box.
Power failure Check whether the kitchen light
or other kitchen appliances are
working.
F
E
G
G
Steam-assisted
operation does
not start.
Water tank is
empty.
Fill the water tank.
Descaling
locks opera-
tions with
steam.
Carry out descaling.
Defective
steam sys-
tem.
Call after-sales service.
Cooked dishes
turn out too moist
or too dry when
cooking with
steam-assisted
applications
The wrong
steam inten-
sity was
selected
Select a higher or lower steam
intensity
Steam escapes
from the ventila-
tion slots during
cooking
Normal proce-
dure
Not possible
The "fill water
tank" symbol
lights up continu-
ously
No water in
the water
tank.
Fill the water tank.
The water
tank has not
been put in
fully.
Put the water tank in fully.
The sensor is
defective.
Call after-sales service.
The water
tank is leak-
ing.
Order a new water tank.
The time is flash-
ing on the display.
Power failure. Reset the time.
After switching on
an operating
mode, œ flashes
in the display.
The appliance
has not
cooled down
sufficiently.
Switch off the appliance, allow it
to cool down and switch the oper-
ating mode on again.
No settings can
be made on the
appliance. The
symbol 1 lights
up in the display.
The child-
proof lock is
activated.
Press and hold the v button until
the 1 symbol goes out in the
display. Settings can be made on
the appliance.
The childproof lock can be deacti-
vated in the basic settings.
~ "Basic settings" on page 18
The appliance
door cannot be
opened. The
symbol 1 lights
up in the display.
The appliance
door is locked
with the child-
proof lock.
Press and hold the v button until
the 1 symbol goes out in the
display. Settings can be made on
the appliance.
The childproof lock with door lock
can be switched off in the basic
settings. ~ "Basic settings"
on page 18
The appliance
door cannot be
opened. The
symbol 5 lights
up in the display.
The appliance
door is locked
due to the
cleaning func-
tion.
Wait until the cooking compart-
ment has cooled and the
5 symbol goes out.