BUILT-IN OVEN [en] INSTRUCTION MANUAL B6AVH7A.
en Table of contents [ en] I NSTRUCTI ON MANUAL 8 Intended use . . . . . . . . . . . . . . . . . . . . . . . . . . . . . 4 ( Important safety information . . . . . . . . . . . . . . . 5 A Childproof lock. . . . . . . . . . . . . . . . . . . . . . . . . . 18 General information Halogen lamp. . . . . Steam. . . . . . . . . . . Cleaning function . . .5 .5 .6 .6 Q Basic settings. . . . . . . . . . . . . . . . . . . . . . . . . . . 18 ] Causes of damage . . . . . . . . . . . . . . . . . . . . . . . .
en Intended use Preserving . . . Prove dough. . Defrosting. . . . Reheating . . . . Keeping warm Test dishes. . . . . . . . . . . . . . . . . . . . . . . . . . . . . . . . . . . . . . . . . . . . . . . . . . . . . . . . . . . . . . . . . . . . . . . . . . . . . . . . . . . . . . . . . . . . . . . . . . . . . . . . . . . . . . . . . . . . . . . . . . . . . . . . . . . . . . . . . . . . . . . . . . . . . . . . . . . . . . . . . . . . . . . . . . . . . . . . .
Important safety information (Important safety information I mpor t ant saf et y i nf or mat i on General information : Warning – Risk of fire! Combustible items stored in the cooking compartment may catch fire. Never store combustible items in the cooking compartment. Never open the appliance door if there is smoke inside. Switch off the appliance and unplug it from the mains or switch off the circuit breaker in the fuse box. Risk of fire! ■ Loose food remnants, fat and meat juices may catch fire.
en Important safety information : Warning – Risk of electric shock! When replacing the cooking compartment bulb, the bulb socket contacts are live. Before replacing the bulb, unplug the appliance from the mains or switch off the circuit breaker in the fuse box. : Warning – Risk of serious harm to health! Steam The appliance becomes very hot when the cleaning function is in progress. The non-stick coating on baking trays and tins is destroyed and noxious gases are released.
Causes of damage ]Causes of damage Causes of damge General information Caution! ■ Accessories, foil, greaseproof paper or ovenware on the cooking compartment floor: do not place accessories on the cooking compartment floor. Do not cover the cooking compartment floor with any sort of foil or greaseproof paper. Do not place ovenware on the cooking compartment floor if a temperature of over 50 ºC has been set. This will cause heat to accumulate.
en Environmental protection 7Environmental protection ■ Open the appliance door as infrequently as possible when the appliance is in use. Your new appliance is particularly energy-efficient. Here you can find tips on how to save even more energy when using the appliance, and how to dispose of your appliance properly. Envi r onment al pr ot ect i on Saving energy ■ ■ Only preheat the appliance if this is specified in the recipe or in the tables in the operating instructions.
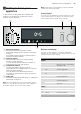
Getting to know your appliance en *Getting to know your appliance Note: Depending on the appliance model, individual details and colours may differ. In this section, we will explain the indicators and controls. You will also find out about the various functions of your appliance. You can set your appliance's various functions on the control panel. Below, you will see an overview of the control panel and the layout of the controls.
en Getting to know your appliance Display The cooking compartment temperature you set using the temperature selector will be shown on the display. In addition, you can read the settings for the time-setting options. The value that can be set at the present time or that is elapsing will be shown in large digits on the display. To use the individual time-setting options, touch the v button several times.
Accessories 2 Cleaning functions ~ "Cleaning function" on page 22 en EasyClean š can be used to clean the cooking compartment when it is slightly dirty. The self-cleaning function ˜ cleans the cooking compartment virtually by itself. Descaling , your appliance keeps it working properly. © Programs -------- For many types of food, the appliance has preprogrammed setting values that you can use.
en Accessories Notes ■ Make sure that you always insert the accessories into the cooking compartment the right way round. ■ Always insert the accessories fully into the cooking compartment so that they do not touch the appliance door. ■ Take any accessories that you will not be using out of the cooking compartment. ■ The shelves can be taken out of the cooking compartment for cleaning. ~ Page 25 Locking function The accessories can be pulled out approximately halfway until they lock in place.
Before using for the first time KBefore using for the first time Before you can use your new appliance, you must make some settings. You must also clean the cooking compartment and accessories. Bef or e usi ng f or t he f i r st t i me Setting ™‚‚ „ = hard ™‚‚ … = very hard Water hardness range mmol/l German (°dH) 2.5–3.8 14–21.3 Above 3.8 en French (°fH) 25–38 Above 21.
en Operating the appliance You have already learnt about the controls and how they work. Now we will explain how to apply settings on your appliance. Changing The heating function and temperature can be changed at any time using the relevant selector. If you change the heating function, the temperature will be changed to the corresponding default value. Switching the appliance on and off Temperature display Use the function selector to switch the appliance on or off.
Steam `Steam Cook food with steam assistance. St eam : Warning – Risk of scalding! When you open the appliance door, hot steam can escape. Steam may not be visible, depending on its temperature. When opening, do not stand too close to the appliance. Open the appliance door carefully. Keep children away. : Warning – Risk of scalding! The water tank may heat up while the appliance is in operation. Allow the water tank to cool down before emptying it.
en Steam 1. Press on the water tank (Fig. !). 2. Pull out the water tank (Fig. "). 1 2 After every steam operation : Warning – Risk of scalding! When you open the appliance door, hot steam can escape. Steam may not be visible, depending on its temperature. When opening, do not stand too close to the appliance. Open the appliance door carefully. Keep children away. : Warning – Risk of burns! The appliance becomes hot during operation. Allow the appliance to cool down before cleaning. 3.
Time-setting options OTime-setting options Ti me- set i ng opt i ons Your appliance has different time-setting options. en Note: When the set time has elapsed, a signal sounds. To end the timer, press the 0 button. Setting the cooking time Time-setting option Use The timer functions like an egg timer. It runs Q Timer independently of the appliance when it is heating and of other time-setting options, and does not affect the appliance.
en Childproof lock Setting the time You can only change the time when no other timesetting option is active and the function selector is at the "Off" position. 1. Press the 0 button repeatedly until the 0 symbol is selected. 2. Use the ( or ) button to change the time. The appliance applies the time after a few seconds. Note: You can go to the basic settings to specify whether or not the time should be shown in the display.
Programmes ™‹ ‰ ™‹ Š Cooling fan run-on time ‚ = short ƒ = medium* „ = long … = extra long Telescopic rails retrofitted?** ‹ = no* (for rails and single pull-out system) ‚ = yes (for double and triple pull-out systems) ™‚ ‹ Sabbath mode available? ™‚ ‚ Water hardness** ‹ = no* ‚ = yes ‹ = softened ‚ = soft (up to 1.3 mmol/l) ƒ = medium (1.3 - 2.5 mmol/ l) „ = hard (2.5 - 3.8 mmol/l) … = very hard* (above You can change the basic settings again at any time.
Programmes en Programme ˜… ˜† Food Wheat bread, multigrain wheat bread in a loaf tin White bread on a bak- ing tray ˜‡ Multi-grain rye bread - ˜ˆ Flatbread - ˜‰ Chicken, not stuffed Ready to cook, seasoned ˜Š Chicken pieces Ready to cook, seasoned ˜‚‹ Duck, unstuffed Ready to cook, seasoned ˜‚‚ Goose, unstuffed Ready to cook, seasoned ˜‚ƒ Fillet of beef, medium Ready to cook, seasoned ˜‚„ Fish, whole Ready to cook, seasoned ˜‚… Shoulder of pork Boned, seasoned ˜‚† Joint of pork,
Sabbath mode FSabbath mode ■ Sabbath mode lets you set a cooking time of over 70 hours. This enables you to keep dishes in the cooking compartment warm without having to switch the appliance on or off. en Special cleaners for cleaning the appliance while it is hot. Wash new sponge cloths thoroughly before use. Sab at h mode : Warning – Risk of burns! Starting Sabbath mode Before you can use Sabbath mode, you will need to activate it in the basic settings.
en Cleaning function Enamelled surfaces Glass cover for the interior lighting Door cover Rails Pull-out system Accessories Water tank Hot soapy water or a vinegar solution: Clean with a dish cloth and then dry with a soft cloth. Soften baked-on food remnants with a damp cloth and soapy water. Use stainless steel wire wool or oven cleaner to remove stubborn dirt. Caution! Never use oven cleaner in the cooking compartment when it is still warm. This may damage the enamel.
Cleaning function en Notes ■ For safety reasons, the appliance door locks automatically once a certain temperature is reached. You will not be able to open it again until the lock symbol n on the display has gone out. ■ The interior lighting will not come on while the appliance is being cleaned. Setting the self-cleaning Before setting the cleaning function, ensure that you have followed all instructions for preparation. The duration of each cleaning setting is preset and cannot be changed.
en ■ Cleaning function Do not open the appliance door while it is running. Doing this will interrupt the EasyClean š cleaning aid. 1. Remove any accessories from the cooking compartment. 2. Mix 0.4 litres water (not distilled water) with a drop of washing-up liquid and pour into the middle of the cooking compartment floor. 3. Use the function selector to set the cleaning functions 2. The 2 symbol and the cleaning functions will appear on the display.The first cleaning function is highlighted. 4.
Rails 5. Turn the temperature selector. "‹Ÿ" appears on the display. Descaling starts after a few seconds. 6. After operation of the descaling programme, "2/4" appears on the display. Remove the water tank and clean thoroughly with water. Second step (2/4) 1. Fill the water tank with 150 ml water and insert it. 2. After operation of the rinse cycle, "3_4" appears on the display. Remove the water tank and clean thoroughly with water. Third step (3/4) 1. Fill the water tank with 150 ml water and insert it.
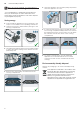
Appliance door en „, until the rail also rests against the cooking compartment wall here, and press it downwards … (figure "). Door lock closed (fig. #) Door lock open (fig. $) 2. Then insert the rail into the front socket 1 2 D F E G 2. Open the appliance door approx. 45° (fig. %). I qAppliance door With good care and cleaning, your appliance will retain its appearance and remain fully functional for a long time to come. This will tell you how to remove the appliance door and clean it.
Appliance door Caution! Risk of damaging the door hinges. Do not force the appliance door open or closed when it is in the lock position. If you have forced the appliance door open or closed when it was in the lock position, please contact our after-sales service. en 2. Ensure that the appliance door slides the short distance remaining to the bottom (fig. #). 3. Use a coin to release the locks on both sides of the appliance door (fig. $).
Appliance door en 8. Clean the door panels on both sides with glass Removal Note: Lay the glass panels you have removed on an even surface that is soft and clean. 1. Remove the appliance door. 2. Lay the appliance door with the front side facing down on an even surface that is soft and clean. 3. Push on the left- and right-hand side on the outside of the appliance door until the inner glass is released on both sides (Fig. !). 4.
Trouble shooting 5. Push down on the intermediate panel around ƒ, slide the holder „ in at an angle and push down until it clicks into place (Fig. &). The holder has been inserted (Fig. '). E F 6. Insert the inner glass into the mounting rail … at an angle towards the back (Fig. (). 7. Push the inner glass downwards until it clicks into place (Fig. )). G G 3Trouble shooting If a fault occurs, there is often a simple explanation.
en Trouble shooting The "descale" symbol appears in the display. ~ "Getting to know your appliance" on page 9 Build-up of limescale in appliance. ’‚Ÿ appears in The power the display. “†‚-ƒƒ appears in the display. The appliance is not heating."DEMO" is shown on the display. supply has been disconnected or the appliance has been switched off during the descaling process. There is too much water in the steam system. The water cannot be pumped back into the water tank. Demo mode is activated.
Customer service 4Customer service Our after-sales service is there for you if your appliance needs to be repaired. We will always find an appropriate solution, also in order to avoid after-sales personnel having to make unnecessary visits. Cust omer ser vi ce E number and FD number When calling us, please give the full product number (E no.) and the production number (FD no.) so that we can provide you with the correct advice.
en Tested for you in our cooking studio CircoTherm gentle heating function CircoTherm gentle is an intelligent heating function that allows you to gently cook meat, fish and baked items. The appliance optimally controls the supply of energy to the cooking compartment. The food is cooked in phases using residual heat. This means that it remains more succulent and browns less. Depending on the method of preparation and the type of food, it is possible to save energy.
Tested for you in our cooking studio en Some frozen products may be unevenly pre-baked. Uneven browning may remain even after baking. The setting values for bread dough apply to both dough placed on a baking tray and dough placed in a loaf tin. Bread and rolls Steam-assisted baking Certain types of baked item (e.g. yeast-risen pastries, bread and bread rolls) get a more crispy crust and a more glossy surface if baked with steam-assisted cooking. The baked item does not dry out as much.
en Tested for you in our cooking studio Small baked items Meal Accessories/cookware Shelf posi- Type of tion heating Temperature in °C Muffins Muffin tray 2 170-190 Steam inten- Cooking sity time in mins 20-40 Muffins, 2 levels Muffin trays 3+1 160-170* - 20-45 Small yeast cakes Baking tray 3 160-170 ™ 20-30 Small yeast cakes, 2 levels Universal pan + baking tray 3+1 150-170 - 25-40 Puff pastry Baking tray 3 200-220* ™ 15-25 Puff pastry, 2 levels Universal pan + baking tr
Tested for you in our cooking studio en Meal Accessories/cookware Shelf po- Type of Step sition heating Temperature in °C Reheated bread rolls and baguettes Wire rack 2 - 150-160* Steam in- Cooking tensity time in mins 10-20 Reheated frozen bread rolls and baguettes Wire rack 2 - 160-170* - 10-20 Toast with topping, 4 slices Wire rack 3 - 200-220 - 15-20 Toast with topping, 12 slices Wire rack 3 - 220-240 - 15-25 ¿ ¿ ƒ ƒ * Preheat Pizza, quiche and savoury cakes Dish Acces
en Tested for you in our cooking studio The baked item is unevenly browned. Select a slightly lower temperature. Protruding greaseproof paper can affect the air circulation. Always cut greaseproof paper to size. Ensure that the baking tin does not stand directly in front of the openings in the cooking compartment back wall. When baking small items, you should use similar sizes and thicknesses wherever possible. You were baking on several levels. Always select hot air when baking on several levels.
Tested for you in our cooking studio Uncovered cookware To cook poultry, meat and fish, it is best to use a deep roasting tin. Place the tin onto the wire rack. If you do not have any suitable cookware, use the universal pan. Covered cookware When cooking with covered cookware, the cooking compartment remains considerably cleaner. Ensure that the lid fits well and closes properly. Place the cookware onto the wire rack. Poultry, meat and fish can also become crispy in a covered roasting dish.
en Tested for you in our cooking studio You can tell when the fish is cooked because the dorsal fin can be removed easily. When stewing, add two to three tablespoons of liquid and a little lemon juice or vinegar into the cookware. Fish Fish cooked whole does not have to be turned. Place the whole fish into the cooking compartment in swimming position with the dorsal fin facing upwards. Placing half a potato or a small oven-proof container in the stomach cavity of the fish will provide stability.
Tested for you in our cooking studio Meal Accessories/cookShelf poware sition Saddle of lamb on the bone, medium, 1.
en Tested for you in our cooking studio compartment. The cooking compartment must be empty. 1. Heat 1 litre of milk (3.5 % fat) to 90 °C on the hob and then cool down to 40 °C. It is sufficient to heat UHT milk to 40 °C. 2. Stir in 150 g (chilled) yogurt. 3. Pour into cups or small jars and cover with cling film. 4. Place the cups or jars onto the cooking compartment floor and set as indicated in the table. 5. After preparation, leave the yogurt to cool in the refrigerator.
Tested for you in our cooking studio en Fruit, vegetables and herbs Accessories Heating function Temperature in °C Sliced mushrooms 1-2 wire racks 80 Herbs, prepared 1-2 wire racks ‚ ‚ Cooking time in hours 5-8 60 2-5 Preserving You can preserve fruit and vegetables using your appliance. : Warning – Risk of injury! If the food is preserved incorrectly, the preserving jars may burst. Follow the instructions for preserving. Jars Only use clean and undamaged preserving jars.
en Tested for you in our cooking studio Prove dough Your yeast dough will prove considerably more quickly using this heating function than at room temperature and will not dry out. Do not start the appliance if the cooking compartment is not completely cool. Always allow yeast dough to prove twice.Use the settings indicated in the settings tables for the first and second proving stages (dough fermentation stage and final fermentation stage).
Tested for you in our cooking studio the quality, temperature and composition of the food.Time ranges are indicated. Set the shortest time to begin with, and then extend the time if necessary. The values in the tables apply to food placed in the cooking compartment when the cooking compartment en is cold. Preheating is necessary for selected food, and this is indicated in the table. Remove any accessories that are not being used from the cooking compartment.
en Tested for you in our cooking studio Baking Meal Accessories/cookware Shelf posi- Type of tion heating Temperature in °C Piped cookies Baking tray 3 140-150* Piped cookies Baking tray 3 140-150* - 20-30 Viennese whirls, 2 levels Universal pan + baking tray 3+1 140-150* - 25-35 Viennese whirls, 3 levels Baking trays + universal pan 4+3+1 130-140* - 35-55 Small cakes Baking tray 3 150* - 25-35 Small cakes Baking tray 3 150* - 20-30 Small cakes, 2 levels Universal pa
6
6
*9001534577* 9001534577 000127 en