
Installation Instruction


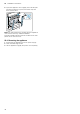
Table Of Contents
- Oven
- en
- Table of contents
- 1 Safety
- 2 Preventing material damage
- 3 Environmental protection and saving energy
- 4 Familiarising yourself with your appliance
- 5 Accessories
- 6 Before using for the first time
- 7 Basic operation
- 8 Steam
- 9 Time-setting options
- 10 Programme
- 11 Childproof lock
- 12 Rapid heating
- 13 Sabbath mode
- 14 Basic settings
- 15 Cleaning and servicing
- 16 Cleaning functions
- 17 Shelf supports
- 18 Appliance door
- 19 Troubleshooting
- 20 Disposal
- 21 Customer Service
- 22 How it works
- 23 Installation instructions

Troubleshooting en
31
Fault Cause and troubleshooting
lights up perman-
ently in the display.
The water tank is leaking.
▶
Order a new water tank.
The sensor is defective.
▶
Call the after-sales service.
→"Customer Service", Page32
lights up in the dis-
play.
Build-up of limescale in the appliance.
▶
Run the descaling programme in full.
→"Descaling", Page23
appears in the
display.
The power supply has been disconnected or the appliance has been switched off during the
descaling process.
▶
Run the interrupted descaling programme in full.
→"Descaling interrupted", Page24
During operation with
steam assistance,
steam escapes from
the ventilation slots.
Steam escapes for physical reasons.
▶
Wait until the cooking with steam assistance ends.
After the end of cooking with steam assistance, no more steam will escape after a short
time.
After using the steam
assistance, the cook-
ing result is too dry
or too moist.
Steam intensity set incorrectly.
▶
Set a higher or lower steam intensity.
19.2 Replacing the oven light bulb
If the light in the cooking compartment fails, change
the oven light bulb.
Note:Heat-resistant, 40-watt, 230 V halogen bulbs are
available from the after-sales service or specialist retail-
ers. Only use these bulbs. Hold the new halogen bulbs
only with a clean, dry towel. This increases the service
life of the bulb.
WARNING‒Risk of burns!
The appliance and its parts that can be touched be-
come hot during use.
▶
Caution should be exercised here in order to avoid
touching heating elements.
▶
Young children under 8 years of age must be kept
away from the appliance.
WARNING‒Risk of electric shock!
When changing the bulb, the bulb socket contacts are
live.
▶
Before replacing the bulb, ensure that the appliance
is switched off in order to prevent a potential electric
shock.
▶
Also unplug the appliance from the mains or switch
off the circuit breaker in the fuse box.
Requirements
¡ The appliance is disconnected from the power sup-
ply.
¡ The cooking compartment has cooled down.
¡ You have a new halogen bulb to replace the old one.
1.
Place a tea towel in the cooking compartment to
prevent damage.
2.
Turn the glass cover anti-clockwise to remove it .
3.
Pull out the halogen bulb without turning it .
4.
Insert the new halogen lamp and press it firmly into
the socket.
Make sure the pins are positioned correctly.
5.
Depending on the appliance model, the glass cover
may have a sealing ring. Put the sealing ring in posi-
tion.
6.
Screw the glass cover on.
7.
Take the tea towel out of the cooking compartment.
8.
Connect the appliance to the power supply.