
Installation Instruction
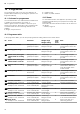
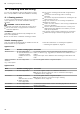
Table Of Contents
- Oven
- en
- Table of contents
- 1 Safety
- 2 Preventing material damage
- 3 Environmental protection and saving energy
- 4 Familiarising yourself with your appliance
- 5 Accessories
- 6 Before using for the first time
- 7 Basic operation
- 8 Steam
- 9 Time-setting options
- 10 Programme
- 11 Childproof lock
- 12 Rapid heating
- 13 Sabbath mode
- 14 Basic settings
- 15 Cleaning and servicing
- 16 Cleaning functions
- 17 Shelf supports
- 18 Appliance door
- 19 Troubleshooting
- 20 Disposal
- 21 Customer Service
- 22 How it works
- 23 Installation instructions

en Sabbath mode
18
1.
Set a suitable type of heating and a temperature of
at least 100°C.
2.
Press the button.
a appears in the display and the arrows are filled
from the bottom to the top.
a Rapid heating starts after a few seconds.
a Once rapid heating has ended, an audible signal
sounds and the symbol goes out in the display.
3.
Place the food in the cooking compartment.
13 Sabbath mode
You can set a time of over 70hours using Sabbath
mode. You can use Top/bottom heating to keep food
warm between 85°C and 140°C during this time
without having to switch the appliance on or off.
13.1 Starting Sabbath mode
Notes
¡ If you open the appliance door during operation, the
appliance does not interrupt the operation.
¡ Once it has started, you can no longer change or in-
terrupt Sabbath mode.
¡ You cannot delay the end time for Sabbath mode.
Requirement:Sabbath mode is activated in the basic
settings.
→"Basic settings", Page18
1.
Use the function selector to set the type of heating
.
a appears in the display.
2.
Use the temperature selector to set the temperature.
3.
Use the or button to set the time.
a After a few seconds, the appliance starts heating
and the cooking time counts down.
4.
Once the time has elapsed, the display shows the
time as zero. The appliance stops heating up and
responds again as usual outside of Sabbath mode.
‒ Switch off the appliance.
The appliance automatically switches off after ap-
prox.10to 20 minutes.
14 Basic settings
You can configure the appliance to meet your needs.
14.1 Overview of the basic settings
Here you can find an overview of the basic settings and factory settings. The basic settings depend on the features
of your appliance.
Display Basic setting Selection
Automatic childproof lock = no
1
= yes
Signal duration upon completion of a cook-
ing time or timer period
= 10 seconds
= 30 seconds
1
= 2 minutes
Waiting time until a setting is adopted = 3 seconds
1
= 6 seconds
= 10 seconds
Button tone when pressing a button = off
= on
1
Brightness of the display illumination = dark
= medium
1
= bright
Time display = hide the time
= display the time
1
Childproof lock can be adjusted = no
= yes
1
= yes, with locked door
Interior lighting during operation = no
= yes
1
1
Factory setting (may vary according to model)
2
Depending on the appliance specifications