
Installation Instruction
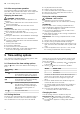
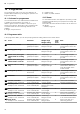
Table Of Contents
- Oven
- en
- Table of contents
- 1 Safety
- 2 Preventing material damage
- 3 Environmental protection and saving energy
- 4 Familiarising yourself with your appliance
- 5 Accessories
- 6 Before using for the first time
- 7 Basic operation
- 8 Steam
- 9 Time-setting options
- 10 Programme
- 11 Childproof lock
- 12 Rapid heating
- 13 Sabbath mode
- 14 Basic settings
- 15 Cleaning and servicing
- 16 Cleaning functions
- 17 Shelf supports
- 18 Appliance door
- 19 Troubleshooting
- 20 Disposal
- 21 Customer Service
- 22 How it works
- 23 Installation instructions

Steam en
13
3.
Set a temperature between 80and 240°C.
4.
Use the button to set the steam intensity.
Intensity Setting
Low
High
a The appliance starts to heat and produce steam
after a few seconds.
Cancelling steam-assisted cooking
▶
Press the button repeatedly until the steam in-
tensity goes out in the display.
a The appliance continues to operate but without
steam assistance.
→"After every steam operation", Page14
Ending steam-assisted cooking
1.
Switch off the appliance.
2.
Empty the water tank and dry the cooking compart-
ment.
→"After every steam operation", Page14
8.2 Reheating
With the "Reheating" type of heating, you can gently
reheat food that has already been cooked or crisp up
day-old baked goods. The appliance switches the
steam onautomatically.
Starting reheating
Requirement:The cooking compartment has cooled
down.
1.
Fill the water tank.
→"Filling the water tank", Page13
2.
Use the function selector to set the "Reheating"
type of heating.
3.
Use the temperature selector to set the temperature.
a The appliance starts to heat and produce steam
after a few seconds.
Ending reheating
1.
Switch off the appliance.
2.
Empty the water tank and dry the cooking compart-
ment.
→"After every steam operation", Page14
8.3 Filling the water tank
WARNING‒Risk of fire!
Due to the hot surfaces, vapours from flammable li-
quids may catch fire in the cooking compartment (ex-
plosion). The appliance door may spring open. Hot
steam and jets of flame may escape.
▶
Do not pour flammable liquids (e.g. alcoholic drinks)
into the water tank.
▶
Only fill the water tank with water or with the descal-
ing solution we have recommended.
WARNING‒Risk of burns!
The water tank may heat up while the appliance is in
operation.
▶
Wait until the water tank has cooled down from the
previous operation.
▶
Remove the water tank from the tank recess.
Requirement:The water hardness has now been set
correctly.
→"Setting the water hardness", Page19
1.
Press on the water tank and pull the water tank
out .
2.
Press on the water tank lid and unscrew it .
3.
Fill the water tank with water up to the mark .
4.
Press on the water tank lid and screw it on .
5.
Place the water tank back in the opening and press
it down until it clicks into place .
Refilling the water tank
If an audible signal sounds and "Fill water tank" ap-
pears in the display, refill the water tank.
Note:If you do not refill the water tank, operation of the
appliance continues without steam-assisted cooking.
1.
Remove and refill the water tank.
2.
Refit the filled water tank.