
Installation Instruction


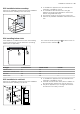
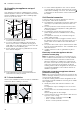
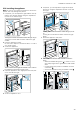
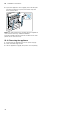
Table Of Contents
- Oven
- en
- Table of contents
- 1 Safety
- 2 Preventing material damage
- 3 Environmental protection and saving energy
- 4 Familiarising yourself with your appliance
- 5 Accessories
- 6 Before using for the first time
- 7 Basic operation
- 8 Steam
- 9 Time-setting options
- 10 Programme
- 11 Childproof lock
- 12 Rapid heating
- 13 Sabbath mode
- 14 Basic settings
- 15 Cleaning and servicing
- 16 Cleaning functions
- 17 Shelf supports
- 18 Appliance door
- 19 Troubleshooting
- 20 Disposal
- 21 Customer Service
- 22 How it works
- 23 Installation instructions
- 23.1 General installation instructions
- 23.2 Appliance dimensions
- 23.3 Installation below a worktop
- 23.4 Installing below a hob
- 23.5 Installation in a tall unit
- 23.6 Installing two appliances on top of each other
- 23.7 Corner installation
- 23.8 Electrical connection
- 23.9 Installing the appliance
- 23.10 Removing the appliance

How it works en
33
¡ Depending on the size and type of the food to be
roasted, add up to 1/2litre water to the universal
pan.
You can make a sauce from the juices that are
caught. This also means that less smoke is pro-
duced and the cooking compartment becomes less
dirty.
¡ Keep the appliance door closed when using the
grill.
Never grill with the appliance door open.
¡ Place the food to be grilled on the wire rack. In ad-
dition, slide the universal pan in at least one shelf
position lower, with the slanted edge facing the ap-
pliance door. This means that any dripping fat is
caught.
Roasting in cookware
When preparing food in cookware with a lid, the cook-
ing compartment remains cleaner.
Follow the manufacturer's instructions for your roasting
dishes. Glass cookware is best.
Cookware without lid
¡ Use a deep roasting dish.
¡ Place the cookware onto the wire rack.
¡ If you do not have any suitable cookware, use the
universal pan.
Cookware with lid
¡ Place the cookware onto the wire rack.
¡ Meat, poultry and fish can also become crispy in a
covered roasting dish. Use a roasting dish with a
glass lid. Set a higher temperature.
WARNING‒Risk of injury!
If hot glass cookware is placed on a wet or cold sur-
face, the glass may shatter.
▶ Place hot glass ovenware on a dry mat after cook-
ing.
WARNING‒Risk of scalding!
Very hot steam may escape when the lid is opened
after cooking. Steam may not be visible, depending on
the temperature.
▶ Lift the lid in such a way that the hot steam can es-
cape away from you.
▶ Keep children away from the appliance.
22.4 Food selection
Food Accessories/cook-
ware
Shelf pos-
itions
Heating
function
Temperature in
°C/grill setting
Steam intens-
ity
Cooking
time in
mins
Sponge cake, delicate Loaf tin 2 150-170 - 60-80
Sponge cake, on 2levels Loaf tin 3+1 140-150 - 70-85
Fruit tart or cheesecake
with shortcrust pastry
base
Springform cake
tin, diameter 26 cm
2 170-190 - 55-80
Sponge flan, 6 eggs Springform cake tin
Ø 28 cm
2 150-160 40-45
Swiss roll Baking tray 3 190-200
1
10-15
Shortcrust tart with moist
topping
Universal pan 2 160-180 - 55-95
Yeast cake with moist
topping
Universal pan 3 180-200 - 30-55
Muffins Muffin tray on wire
rack
2 170-190 - 20-40
Small yeast cakes Baking tray 3 160-170 20-30
Biscuits Baking tray 3 140-160 - 15-25
Biscuits, 2 or 3levels Universal pan
Baking tray
3+1
4+3+1
140-160 - 15-25
Bread, 1000g (in a loaf
tin or free-form)
Universal pan
Loaf tin
2 1. 210-220
2. 180-190
1.
2. 0
1. 10-15
2. 40-50
Pizza, fresh Baking tray 3 190-210 - 20-30
Pizza, fresh, thin-crust Round pizza tray 2 250-270
1
- 8-13
Quiche Tart dish or tin 2 190-210 - 25-35
Bake, savoury, cooked
ingredients
Ovenproof dish 2 150-170 40-45
1
Preheat the appliance.
2
Turn the dish between halfway and two-thirds through the cooking time.
3
At the start, add liquid to the cookware so that at least 2/3 of the joint is covered in liquid
4
Turn the dish 2/3 of the way through the cooking time.