
Installation Instruction
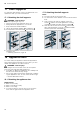
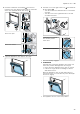
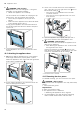
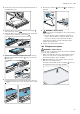
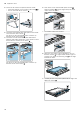
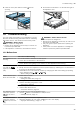
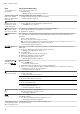
Table Of Contents
- Oven
- en
- Table of contents
- 1 Safety
- 2 Preventing material damage
- 3 Environmental protection and saving energy
- 4 Familiarising yourself with your appliance
- 5 Accessories
- 6 Before using for the first time
- 7 Basic operation
- 8 Steam
- 9 Time-setting options
- 10 Programme
- 11 Childproof lock
- 12 Rapid heating
- 13 Sabbath mode
- 14 Basic settings
- 15 Cleaning and servicing
- 16 Cleaning functions
- 17 Shelf supports
- 18 Appliance door
- 19 Troubleshooting
- 20 Disposal
- 21 Customer Service
- 22 How it works
- 23 Installation instructions
- 23.1 General installation instructions
- 23.2 Appliance dimensions
- 23.3 Installation below a worktop
- 23.4 Installing below a hob
- 23.5 Installation in a tall unit
- 23.6 Installing two appliances on top of each other
- 23.7 Corner installation
- 23.8 Electrical connection
- 23.9 Installing the appliance
- 23.10 Removing the appliance

en Troubleshooting
30
Fault Cause and troubleshooting
The time flashes in
the display.
There has been a power cut.
▶
Reset the time.
→"Setting the time on the clock", Page15
The time does not ap-
pear in the display
when the appliance is
switched off.
The basic setting has been changed.
▶
Change the basic setting for the time display.
→"Basic settings", Page18
lights up in the
display and no set-
tings can be made
on the appliance.
Childproof lock is activated.
▶
Use the button to deactivate the childproof lock.
→"Childproof lock", Page17
flashes in the dis-
play and the appli-
ance does not start.
The cooking compartment is too hot for the selected operation.
1.
Switch off the appliance and allow it to cool down.
2.
Restart the operation.
appears in the
display.
The maximum cooking time has been reached. To prevent an unwanted permanent opera-
tion, the appliance automatically stops heating after several hours if the settings are un-
changed.
▶
Switch off the appliance.
You can configure new settings if required.
Tip:To prevent the appliance from switching off when you do not want it to, e.g. for an
extremely long preparation time, set a cooking time.
→"Time-setting options", Page14
- appears in
the display.
There is too much water in the steam system. The water cannot be pumped back into the
water tank.
1.
Empty the water tank and insert the empty water tank.
→"Emptying the water tank", Page13
2.
Reset the time.
→"Setting the time on the clock", Page15
3.
Switch the appliance off and on again.
4.
Run "Descaling interrupted" in full.
→"Descaling interrupted", Page23
A message with
appears in the dis-
play, e.g. - .
Electronics fault
1.
Press the button.
‒ If required, reset the time.
a If the fault was a one-off, the error message disappears.
2.
If the error message appears again, call the after-sales service. Quote the exact error
message and the E no. of your appliance.
→"Customer Service", Page32
lights up perman-
ently in the display.
The water tank is empty.
▶
Fill the water tank.
→"Filling the water tank", Page12
The water tank has not been put in fully.
▶
Slide the water tank back in fully.
The water tank is leaking.
▶
Order a new water tank.
The sensor is defective.
▶
Call the after-sales service.
→"Customer Service", Page32
lights up in the dis-
play.
Build-up of limescale in the appliance.
▶
Run the descaling programme in full.
→"Descaling", Page23
appears in the
display.
The power supply has been disconnected or the appliance has been switched off during the
descaling process.
▶
Run the interrupted descaling programme in full.
→"Descaling interrupted", Page23
The appliance hums
during operation and
after it is switched off.
Functional test of the pump creates operating noise.
No action required.