
Installation Instruction
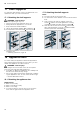
Table Of Contents
- Oven
- en
- Table of contents
- 1 Safety
- 2 Preventing material damage
- 3 Environmental protection and saving energy
- 4 Familiarising yourself with your appliance
- 5 Accessories
- 6 Before using for the first time
- 7 Basic operation
- 8 Steam
- 9 Time-setting options
- 10 Programme
- 11 Childproof lock
- 12 Rapid heating
- 13 Sabbath mode
- 14 Basic settings
- 15 Cleaning and servicing
- 16 Cleaning functions
- 17 Shelf supports
- 18 Appliance door
- 19 Troubleshooting
- 20 Disposal
- 21 Customer Service
- 22 How it works
- 23 Installation instructions
- 23.1 General installation instructions
- 23.2 Appliance dimensions
- 23.3 Installation below a worktop
- 23.4 Installing below a hob
- 23.5 Installation in a tall unit
- 23.6 Installing two appliances on top of each other
- 23.7 Corner installation
- 23.8 Electrical connection
- 23.9 Installing the appliance
- 23.10 Removing the appliance

Cleaning functions en
23
3.
Remove limescale with a cloth soaked in vinegar.
Then wipe with clean water and rub dry with a soft
cloth (including under the door seal).
4.
If you are unable to remove stubborn dirt, repeat the
cleaning aid after the cooking compartment has
cooled down.
5.
To switch off, turn the function selector to the zero
setting.
6.
Lower the appliance door and leave it open for ap-
prox. one hour to allow the surfaces in the cooking
compartment to dry thoroughly.
‒ To dry the cooking compartment quickly, heat up
the appliance for approx. fiveminutes at Circo-
Therm hot air and 50 °C while the door is
open.
16.3 Descaling
To ensure that your appliance continues to operate cor-
rectly, it must be descaled regularly.
The frequency with which the appliance must be de-
scaled depends on the hardness of the water used.
The symbol reminds you to run the descaling pro-
gramme.
There are four steps in the descaling programme. For
hygiene reasons, the descaling programme must be
run through completely so that the appliance can be
ready for operation again. Descaling takes around 90–
110minutes in total:
Display Step
First step: Descaling
Approx. 65 min
Second step: Rinse cycle
Approx. 9 min
Third step: Rinse cycle
Approx. 9 min
Fourth step: Rinse cycle
Approx. 9 min
First step ( )
ATTENTION!
The length of time for which the descaler is left to work
is based on the recommended, liquid descaler. Other
descalers may damage the appliance.
▶ Only use the liquid descaler recommended by us
for the descaling programme.
If descaling solution comes into contact with the control
panel or other delicate surfaces, it will damage them.
▶ Remove descaling solution immediately with water.
Note:Do not pour more than 150 ml of liquid into the
water tank throughout the descaling process.
1.
Mixing a descaling solution:
– 50ml liquid descaler
– 100ml water
2.
Pour the descaling solution into the water tank and
insert the water tank.
3.
Use the function selector to set the cleaning
functions .
a The symbol and the cleaning functions appear in
the display. The first cleaning function is highlighted.
4.
Press the or button repeatedly until the symbol
is highlighted.
a appears in the display.
5.
Turn the temperature selector.
a appears in the display. Descaling starts after a
few seconds.
a At the end of the descaling programme, ap-
pears in the display.
6.
Remove the water tank and clean thoroughly with
water.
Second step ( )
1.
Fill the water tank with 150ml water and insert it.
a At the end of the rinse cycle, appears in the
display.
2.
Remove the water tank and clean thoroughly with
water.
Third step ( )
1.
Fill the water tank with 150ml water and insert it.
a At the end of the rinse cycle, appears in the
display.
2.
Remove the water tank and clean thoroughly with
water.
Fourth step ( )
1.
Fill the water tank with 150ml water and insert it.
a At the end of the rinse cycle, : appears in the
display.
2.
Remove the water tank and clean thoroughly with
water.
3.
Dry the water tank and re-insert it.
a Descaling is complete and the appliance is ready
for use again.
Descaling interrupted
If descaling is interrupted (for example, due to a power
failure or because the appliance is switched off), the
symbol appears in the display after the appliance is
switched back on. You will be prompted to rinse three
times. The appliance cannot be used for other opera-
tions until the third rinse cycle comes to an end.
Note:If you set another operation, (Cleaning) ap-
pears in the display. Repeat the interrupted descaling
programme after rinsing.
1.
Empty the water tank and clean thoroughly with wa-
ter.
2.
Insert the empty water tank.
3.
Use the function selector to set descaling .
4.
Turn the temperature selector.
a appears in the display.
a After a few seconds, the appliance pumps the re-
maining liquid into the water tank.
5.
Empty the water tank and clean thoroughly with wa-
ter.
6.
To rinse the steam system, run the three rinse
cycles in the descaling programme.
→"Second step ( )", Page23
7.
Restart descaling.