
Installation Instruction
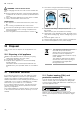
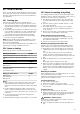
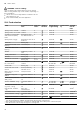
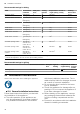
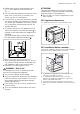
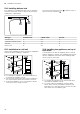
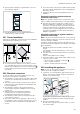
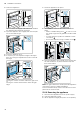
Table Of Contents
- Oven
- en
- Table of contents
- 1 Safety
- 2 Preventing material damage
- 3 Environmental protection and saving energy
- 4 Familiarising yourself with your appliance
- 5 Accessories
- 6 Before using for the first time
- 7 Basic operation
- 8 Steam
- 9 Time-setting options
- 10 Programme
- 11 Childproof lock
- 12 Rapid heating
- 13 Sabbath mode
- 14 Basic settings
- 15 Cleaning and servicing
- 16 Cleaning functions
- 17 Shelf supports
- 18 Appliance door
- 19 Troubleshooting
- 20 Disposal
- 21 Customer Service
- 22 How it works
- 23 Installation instructions
- 23.1 General installation instructions
- 23.2 Appliance dimensions
- 23.3 Installation below a worktop
- 23.4 Installing below a hob
- 23.5 Installation in a tall unit
- 23.6 Installing two appliances on top of each other
- 23.7 Corner installation
- 23.8 Electrical connection
- 23.9 Installing the appliance
- 23.10 Removing the appliance

Installation instructions en
37
¡ Fitted units must be heat-resistant up to
95°C, and adjacent unit fronts up to
70°C.
¡ Do not install the appliance behind a decor-
ative door or the door of a kitchen unit.
There is a risk of overheating.
¡ Cut-out work on the units should be carried
out before installing the appliance. Remove
any shavings. Otherwise, the correct opera-
tion of electrical components may be ad-
versely affected.
¡ The mains socket for the appliance must
either be located in the hatched area or
outside of the area where the appliance is
installed.
Any unsecured units must be secured to
the wall using a standard bracket .
¡ Wear protective gloves so that you do not
cut yourself. Parts that are accessible dur-
ing installation may have sharp edges.
¡ Dimensions of the figures in mm.
WARNING‒Risk of fire!
It is dangerous to use an extended power
cord and non-approved adapters.
▶
Do not use multiple socket strips.
▶
Only use extension cables that are certified,
have a minimum cross section of 1.5mm²
and comply with the applicable national
safety requirements.
▶
If the power cord is too short, contact cus-
tomer service.
▶
Only use adapters approved by the manu-
facturer.
ATTENTION!
Carrying the appliance by the door handle
could break it. The door handle cannot sup-
port the weight of the appliance.
▶
Do not carry or hold the appliance by the
door handle.
23.2 Appliance dimensions
You will find the dimensions of the appliance here
23.3 Installation below a worktop
Observe the installation dimensions and the installation
instructions when installing below a worktop.
¡ To ventilate the appliance, the intermediate floor
must have a ventilation cut-out.
¡ In combination with induction hobs, the gap
between the worktop and appliance must not be
sealed using additional strips.
¡ The worktop must be secured to the built-in unit.
¡ Observe any available installation instructions for the
hob.