
Installation Instruction
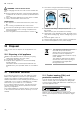
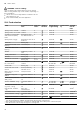
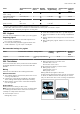
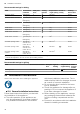
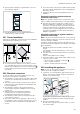
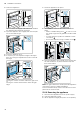
Table Of Contents
- Oven
- en
- Table of contents
- 1 Safety
- 2 Preventing material damage
- 3 Environmental protection and saving energy
- 4 Familiarising yourself with your appliance
- 5 Accessories
- 6 Before using for the first time
- 7 Basic operation
- 8 Steam
- 9 Time-setting options
- 10 Programme
- 11 Childproof lock
- 12 Rapid heating
- 13 Sabbath mode
- 14 Basic settings
- 15 Cleaning and servicing
- 16 Cleaning functions
- 17 Shelf supports
- 18 Appliance door
- 19 Troubleshooting
- 20 Disposal
- 21 Customer Service
- 22 How it works
- 23 Installation instructions
- 23.1 General installation instructions
- 23.2 Appliance dimensions
- 23.3 Installation below a worktop
- 23.4 Installing below a hob
- 23.5 Installation in a tall unit
- 23.6 Installing two appliances on top of each other
- 23.7 Corner installation
- 23.8 Electrical connection
- 23.9 Installing the appliance
- 23.10 Removing the appliance

en Installation instructions
36
Recommended settings for baking
Food Accessories/
cookware
Shelf posi-
tions
Heating
function
Temperature in
°C/grill setting
Steam in-
tensity
Cooking
time in mins
Viennese whirls Baking tray 3 140-150
1
- 25-35
Viennese whirls Baking tray 3 140-150
1
- 20-30
Viennese whirls, 2levels Universal pan
+
Baking tray
3 + 1 140-150
1
- 25-35
Viennese whirls, 3levels Universal pan
+
Baking tray
4 + 3 + 1 130-140
1
- 35-55
Small cakes Baking tray 3 150
1
- 25-35
Small cakes Baking tray 3 150
1
- 20-30
Small cakes, 2levels Universal pan
+
Baking tray
3 + 1 140
1
- 25-35
Small cakes, 3levels Universal pan
+
Baking tray
4 + 3 + 1 140
1
- 25-35
Hot water sponge cake Springform
cake tin, dia-
meter 26 cm
2 160-170
2
- 25-35
Hot water sponge cake Springform
cake tin, dia-
meter 26 cm
2 150-160 30-35
Hot water sponge cake,
2levels
Springform
cake tin, dia-
meter 26 cm
3 + 1 150-160
2
- 35-50
1
Preheat the appliance for five minutes. Do not use the rapid heating function.
2
Preheat the appliance. Do not use the rapid heating function.
Recommended settings for grilling
Food Accessories/cookware Shelf pos-
ition
Type of
heating
Temperature in
°C/grill setting
Cook-
ing time
in mins
Toasting bread Wire rack 4 / 5-6
23 Installation instructions
Observe this information when installing the appliance.
23.1 General installation instructions
Follow these instructions before you start with
the installation of the appliance.
¡ The safe operation of this appliance can
only be guaranteed if it has been installed
to a professional standard in accordance
with these installation instructions. The in-
staller shall be liable for damages incurred
as a result of incorrect installation.
¡ Do not use the door handle for the trans-
port or installation.
¡ Check the appliance for damage after un-
packing it. Do not connect the appliance if
it has been damaged in transit.
¡ Before starting up the appliance, remove
any packaging material and adhesive film
from the cooking compartment and the
door.
¡ Proceed in accordance with the installation
sheets for installing accessories.