
Installation Instruction
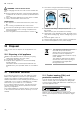
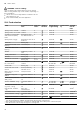
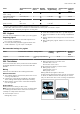
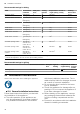
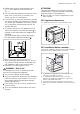
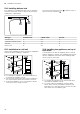
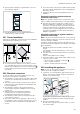
Table Of Contents
- Oven
- en
- Table of contents
- 1 Safety
- 2 Preventing material damage
- 3 Environmental protection and saving energy
- 4 Familiarising yourself with your appliance
- 5 Accessories
- 6 Before using for the first time
- 7 Basic operation
- 8 Steam
- 9 Time-setting options
- 10 Programme
- 11 Childproof lock
- 12 Rapid heating
- 13 Sabbath mode
- 14 Basic settings
- 15 Cleaning and servicing
- 16 Cleaning functions
- 17 Shelf supports
- 18 Appliance door
- 19 Troubleshooting
- 20 Disposal
- 21 Customer Service
- 22 How it works
- 23 Installation instructions
- 23.1 General installation instructions
- 23.2 Appliance dimensions
- 23.3 Installation below a worktop
- 23.4 Installing below a hob
- 23.5 Installation in a tall unit
- 23.6 Installing two appliances on top of each other
- 23.7 Corner installation
- 23.8 Electrical connection
- 23.9 Installing the appliance
- 23.10 Removing the appliance

Troubleshooting en
31
Fault Cause and troubleshooting
- appears in
the display.
There is too much water in the steam system. The water cannot be pumped back into the
water tank.
1.
Empty the water tank and insert the empty water tank.
→"Emptying the water tank", Page14
2.
Reset the time.
→"Setting the time on the clock", Page16
3.
Switch the appliance off and on again.
4.
Run "Descaling interrupted" in full.
→"Descaling interrupted", Page24
A message with ap-
pears in the display,
e.g. - .
Electronics fault
1.
Press the button.
‒ If required, reset the time.
a If the fault was a one-off, the error message disappears.
2.
If the error message appears again, call the after-sales service. Quote the exact error
message and the E no. of your appliance.
→"Customer Service", Page32
lights up perman-
ently in the display.
The water tank is empty.
▶
Fill the water tank.
→"Filling the water tank", Page13
The water tank has not been put in fully.
▶
Slide the water tank back in fully.
The water tank is leaking.
▶
Order a new water tank.
The sensor is defective.
▶
Call the after-sales service.
→"Customer Service", Page32
lights up in the dis-
play.
Build-up of limescale in the appliance.
▶
Run the descaling programme in full.
→"Descaling", Page24
appears in the
display.
The power supply has been disconnected or the appliance has been switched off during the
descaling process.
▶
Run the interrupted descaling programme in full.
→"Descaling interrupted", Page24
The appliance hums
during operation and
after it is switched off.
Functional test of the pump creates operating noise.
No action required.
During operation with
steam assistance,
steam escapes from
the ventilation slots.
Steam escapes for physical reasons.
▶
Wait until the cooking with steam assistance ends.
After the end of cooking with steam assistance, no more steam will escape after a short
time.
After using the steam
assistance, the cook-
ing result is too dry
or too moist.
Steam intensity set incorrectly.
▶
Set a higher or lower steam intensity.
19.2 Replacing the oven light bulb
If the light in the cooking compartment fails, change
the oven light bulb.
Note:Heat-resistant, 40-watt, 230 V halogen bulbs are
available from the after-sales service or specialist retail-
ers. Only use these bulbs. Hold the new halogen bulbs
only with a clean, dry towel. This increases the service
life of the bulb.
WARNING‒Risk of burns!
The appliance and its parts that can be touched be-
come hot during use.
▶
Caution should be exercised here in order to avoid
touching heating elements.
▶
Young children under 8 years of age must be kept
away from the appliance.