
Installation Instruction


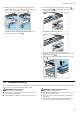
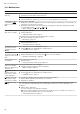
Table Of Contents
- Oven
- en
- Table of contents
- 1 Safety
- 2 Preventing material damage
- 3 Environmental protection and saving energy
- 4 Familiarising yourself with your appliance
- 5 Accessories
- 6 Before using for the first time
- 7 Basic operation
- 8 Steam
- 9 Time-setting options
- 10 Programme
- 11 Childproof lock
- 12 Rapid heating
- 13 Sabbath mode
- 14 Basic settings
- 15 Cleaning and servicing
- 16 Cleaning functions
- 17 Shelf supports
- 18 Appliance door
- 19 Troubleshooting
- 20 Disposal
- 21 Customer Service
- 22 How it works
- 23 Installation instructions
- 23.1 General installation instructions
- 23.2 Appliance dimensions
- 23.3 Installation below a worktop
- 23.4 Installing below a hob
- 23.5 Installation in a tall unit
- 23.6 Installing two appliances on top of each other
- 23.7 Corner installation
- 23.8 Electrical connection
- 23.9 Installing the appliance
- 23.10 Removing the appliance

Cleaning and servicing en
21
Appliance front
Surface Suitable cleaning agents Information
Stainless steel ¡ Hot soapy water
¡ Special stainless steel
cleaning products
suitable for hot sur-
faces
To prevent corrosion, remove any patches of limescale, grease,
starch or albumin (e.g. egg white) on stainless steel surfaces imme-
diately.
Apply a thin layer of the stainless steel cleaning product with a soft
cloth.
Plastic or painted
surfaces
E.g. control panel
¡ Hot soapy water Do not use glass cleaner or a glass scraper.
Appliance door
Area Suitable cleaning agents Information
Door panels ¡ Hot soapy water Do not use a glass scraper or a stainless steel wool.
Tip:Remove the door panels in order to clean them thoroughly.
→"Appliance door", Page25
Door cover ¡ Made of stainless
steel:
Stainless steel cleaner
¡ Made of plastic:
Hot soapy water
Do not use glass cleaner or a glass scraper.
Tip:Remove the door cover for thorough cleaning.
→"Appliance door", Page25
Door handle ¡ Hot soapy water To avoid permanent stains, remove descaling agents from the door
handle immediately.
Door seal ¡ Hot soapy water Do not remove or scrub.
Cooking compartment
Area Suitable cleaning agents Information
Enamel surfaces ¡ Hot soapy water
¡ Vinegar water
¡ Oven cleaner
Soak any heavily soiled areas and use a brush or steel wool.
Leave the appliance door open to dry the cooking compartment
after cleaning it.
Tip:It is best to use the cleaning function.
→"Pyrolytic self-cleaning ", Page22
Notes
¡ Enamel burns at very high temperatures, causing minor discol-
ouration. The functionality of your appliance is not affected by
this.
¡ The edges of thin trays cannot be completely enamelled and may
be rough. This does not impair corrosion protection.
¡ Food residues will leave a white coating on the enamel surfaces.
The coating does not pose a health risk. The functionality of your
appliance is not affected by this. You can remove residues with
lemon juice.
Glass cover for
the oven light
¡ Hot soapy water Use oven cleaner to remove very heavy soiling.
Rails ¡ Hot soapy water Soak any heavily soiled areas and use a brush or steel wool.
Tip:Remove the shelf supports for cleaning.
→"Shelf supports", Page25
AccessorIes ¡ Hot soapy water
¡ Oven cleaner
Soak any heavily soiled areas and use a brush or steel wool.
Enamelled accessories are dishwasher-safe.
Water tank ¡ Hot soapy water To remove residual detergent after cleaning, rinse thoroughly with
clean water.
To dry the water tank after cleaning, leave the water tank to dry with
the lid open. Dry the seal on the lid.
Do not clean in the dishwasher.