BUILT-IN OVEN [en] INSTRUCTION MANUAL B5ACM7H.
en Table of contents [ en] I NSTRUCTI ON MANUAL 8 Intended use . . . . . . . . . . . . . . . . . . . . . . . . . . . . . 4 ( Important safety information . . . . . . . . . . . . . . . 4 General information Halogen lamp. . . . . Meat thermometer . Cleaning function . . . . . . . . . . . . . . . . . . . . . . . . . . . . . . . . . . . . . . . . . . . . . . . . . . . . . . . . . . . . . . . . . . . . . . . . . . . . . . . . . . . . . . . . . . . . . . . . . . . . . . . . . . .4 .
en Intended use 8Intended use Read these instructions carefully. Only then will you be able to operate your appliance safely and correctly. Retain the instruction manual and installation instructions for future use or for subsequent owners. This appliance is only intended to be fully fitted in a kitchen. Observe the special installation instructions. Check the appliance for damage after unpacking it. Do not connect the appliance if it has been damaged in transport.
Important safety information : Warning – Risk of scalding! Halogen lamp ■ : Warning – Risk of burns! The accessible parts become hot during operation. Never touch the hot parts. Keep children at a safe distance. Risk of scalding! ■ When you open the appliance door, hot steam can escape. Steam may not be visible, depending on its temperature. When opening, do not stand too close to the appliance. Open the appliance door carefully. Keep children away.
en Causes of damage : Warning – Risk of serious harm to health! The appliance becomes very hot when the cleaning function is in progress. The non-stick coating on baking trays and tins is destroyed and noxious gases are released. Never clean non-stick baking trays or baking tins using the cleaning function. In general, you must not use the cleaning function for cleaning accessories.
Environmental protection 7Environmental protection ■ en Open the appliance door as infrequently as possible when the appliance is in use. Your new appliance is particularly energy-efficient. Here you can find tips on how to save even more energy when using the appliance, and how to dispose of your appliance properly. Envi r onment al pr ot ect i on Saving energy ■ ■ Only preheat the appliance if this is specified in the recipe or in the tables in the operating instructions.
en Getting to know your appliance *Getting to know your appliance Control panel You can set your appliance's various functions on the control panel. Below, you will see an overview of the control panel and the layout of the controls. In this section, we will explain the indicators and controls. You will also find out about the various functions of your appliance. Get i ng t o know your ap l i ance Note: Depending on the appliance model, individual details and colours may differ.
Getting to know your appliance en Types of heating and functions Use the function selector to set the types of heating and other functions.
en Accessories Cooking compartment Various functions in the cooking compartment make your appliance easier to use. For example, the cooking compartment is well lit and a cooling fan prevents the appliance from overheating. Opening the appliance door If you open the appliance door when the appliance is in operation, the appliance will continue to operate as before.
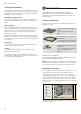
Accessories Accessories can be pulled out approximately halfway without tipping. You can use the pull-out rails to pull the accessories out further. Make sure that the accessory is placed behind the lug ‚ on the pull-out rail. Example in the picture: universal pan en When inserting the baking tray or the universal pan, ensure that the lug ƒ is at the rear and is facing downwards. The sloping edge of the accessory „ must be facing towards the appliance door.
en Before using for the first time Grill tray Ceramic brick Glass roasting dish, 5.1 litres Glass pan ComfortFlex rail (1 level)* 3 x fully extendable pull-out rack* *Accessory does not fit in every appliance, quote the E no. when ordering -------- KBefore using for the first time Before you can use your new appliance, you must make some settings. You must also clean the cooking compartment and accessories.
Operating the appliance en You have already learnt about the controls and how they work. Now we will explain how to apply settings on your appliance. Changing The heating function and temperature can be changed at any time using the relevant selector. If you change the heating function, the temperature will be changed to the corresponding default value.
en Time-setting options OTime-setting options Ti me- set i ng opt i ons Your appliance has different time-setting options. Time-setting option Use Q Timer The timer functions like an egg timer. It runs independently of the appliance when it is heating and of other time-setting options, and does not affect the appliance. x Cooking time Once the set cooking time has elapsed, the appliance automatically stops heating. y End time Enter a cooking time and the required end time.
Childproof lock Setting the time You can only change the time when no other timesetting option is active and the function selector is at the "Off" position. 1. Press the 0 button repeatedly until the 0 symbol is selected. 2. Use the ( or ) button to change the time. The appliance applies the time after a few seconds. Note: You can go to the basic settings to specify whether or not the time should be shown in the display. Checking, changing or deleting settings 1.
en Basic settings QBasic settings Changing the basic settings There are various settings available to you in order to help use your appliance effectively and simply. You can change these settings as required. 1. Press and hold the ! button for approx. Basi c set i ngs List of basic settings Depending on the features of your appliance, not all basic settings will be available. Basic setting ™‹‹ Automatic childproof lock Options ‹ = no* ‚ = yes ™‹‚ Audible signal duration upon ‚ = approx.
Meat thermometer @Meat thermometer The meat thermometer makes precise cooking possible. It measures the temperature inside the food. Once the set temperature has been reached, the appliance automatically switches itself off. Meat t her mo et er Types of heating Not all types of heating are suitable for operation with the meat probe.
en Sabbath mode 1. Insert the meat thermometer into the socket on the left-hand side of the cooking compartment. 2. Close the appliance door. Caution! When doing so, ensure that the meat thermometer's cable is not trapped in the appliance door. It may be damaged. 3. Use the function selector to set an appropriate type of heating. The / symbol is highlighted and "--/-- °C" appears in the display.
Cleaning agent DCleaning agent With good care and cleaning, your appliance will retain its appearance and remain fully functioning for a long time to come. We will explain here how you should correctly care for and clean your appliance. Door panels Cl eani ng agent Door handle Suitable cleaning agents To ensure that the different surfaces are not damaged by using the wrong cleaning agent, observe the information in the table.
en Cleaning function Meat thermometer Hot soapy water: Clean with a dish cloth or a brush. Do not clean in the dishwasher. .Cleaning function Your appliance is equipped with a self-cleaning function and EasyClean. You can use the self-cleaning function to clean the cooking compartment. Use the EasyClean cleaning aid for intermediate cleaning of the cooking compartment. Dirt is softened beforehand using EasyClean. It can then be removed more easily.
Cleaning function Before running the cleaning function The cooking compartment must be empty. Remove any accessories, cookware or shelf rails from the cooking compartment. Please see the relevant section for information on how to remove the rails. ~ "Rails" on page 22 Clean the appliance door and along the edges of the cooking compartment in the area around the seal. Do not scrub or remove the seal. Clean the inner door panel using hot soapy water and a dish cloth. Dry with a soft cloth.
en Rails Subsequent cleaning The remaining water in the cooking compartment must be removed promptly. Do not leave the remaining water in the cooking compartment for an extended period (e.g. overnight). The appliance must not be operated when the cooking compartment is still wet or damp. 1. Open the appliance door and remove the remaining water with an absorbent sponge cloth. 2. Clean the smooth surfaces in the cooking compartment with a dish cloth or a soft brush.
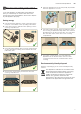
Rails Attaching the rails The rails only fit on the right or the left side. For both rails, ensure that the curved rods are at the front. 1. First, insert the rail in the middle of the rear socket ‚, until the rail rests against the cooking compartment wall, and push it back ƒ (figure !). 2. Then insert the rail into the front socket „, until the rail also rests against the cooking compartment wall here, and press it downwards … (figure "). 1 en Removing the pull-out rails 1.
Appliance door en Fitting the pull-out rails The rails are designed to fit on either the right- or the left-hand side (not both).Make sure when you fit them that you can pull them out towards you. 1. The rail must sit between the two bars (fig. !). 1 qAppliance door With good care and cleaning, your appliance will retain its appearance and remain fully functional for a long time to come. This will tell you how to remove the appliance door and clean it.
Appliance door 2. Open the appliance door approx. 45° (fig. %). en : Warning Risk of injury! The door handle may break off. Do not carry the appliance door by the door handle. To carry or remove the appliance door, take hold of it with both hands, one on the left and one on the right. 5. Take hold of the appliance door with both hands, one on the left and one on the right, and rotate the door handle upwards slightly ‚ until you are able to pull up the appliance door and remove it ƒ(fig.°*).
Appliance door en 4. Open the appliance door slightly until you hear a quiet click. Close the appliance door. : Warning Risk of injury if the door locks are not closed! The appliance door may become detached. You may be injured and the appliance door damaged. After refitting the door, always close the left- and right-hand door locks. 5. Close the left- and right-hand door locks (fig. %).
Appliance door en 5. Push down on the intermediate panel around ƒ, slide Fitting Note: When fitting the door panels, make sure that they are in the original order. 1. Insert the intermediate panel so that the ‚ arrow on the right-hand side is pointing upwards (Fig. !). the holder „ in at an angle and push down until it clicks into place (Fig. &). The holder has been inserted (Fig. '). E 1 D F 2.
en Trouble shooting 3Trouble shooting If a fault occurs, there is often a simple explanation. Before calling the after-sales service, please refer to the fault table and attempt to correct the fault yourself. Tr oubl e sho t i ng Rectifying faults yourself You can often easily rectify technical faults with the appliance yourself. If a dish does not turn out exactly as you wanted, you can find useful cooking tips and instructions at the end of this instruction manual.
Customer service : Warning – Risk of electric shock! When replacing the cooking compartment bulb, the bulb socket contacts are live. Before replacing the bulb, unplug the appliance from the mains or switch off the circuit breaker in the fuse box. : Warning – Risk of burns! The appliance becomes very hot. Never touch the interior surfaces of the cooking compartment or the heating elements. Always allow the appliance to cool down. Keep children at a safe distance. 1.
en Tested for you in our cooking studio JTested for you in our cooking studio Here, you can find a selection of dishes and the ideal settings for them. We will show you which type of heating and temperature are best suited to your dish. You will get information on suitable cooking accessories and the height at which they should be placed in the oven. You will also get tips about cookware and preparation methods.
Tested for you in our cooking studio Baking on 3 levels: ■ Baking tray: Level 4 Universal pan: Level 3 Baking tray: Level 1 You can cut energy use by up to 45% by preparing items at the same time. Position baking tins/dishes either next to one another or offset on different shelves so that they are not directly one above the other in the cooking compartment. en Baking tins For optimal cooking results, we recommend using darkcoloured metal baking tins.
en Tested for you in our cooking studio Baking on two or more levels Food Dish Victoria sponge cake, 2 levels 4x Ø20cm tins Scones, 2 levels 2 baking sheets on 2 wire racks Biscuits, 2 levels 2 baking sheets on 2 wire racks Biscuits, 3 levels 3 baking sheets on 3 wire racks Small Cakes, 2 levels 2x 12-cup-tins Puff pastry slices, 2 levels Universal pan + baking tray Puff pastry slices, 3 levels Baking trays + universal pan Jam tarts, 2 levels 2x 12-cup-tins Meringue, 2 levels 2 baking sheets on 2 wire r
Tested for you in our cooking studio en Roasting, braising and grilling Here, you will find information on roasting, braising and grilling poultry, meat and fish. The settings tables list the optimal settings for a wide range of dishes. Poultry When cooking duck or goose, pierce the skin on the underside of the wings. This allows the fat to run out. If using duck breast, score the skin. Do not turn duck breasts. Add some liquid to the poultry in the dish. Cover the base of the ovenware with approx.
en Tested for you in our cooking studio Place the food to be grilled on the wire rack. In addition, slide the universal pan in at least one shelf position lower, with the slanted edge facing the appliance door. Any dripping fat will be caught. When grilling, try wherever possible to use pieces of food which are of a similar thickness and weight. This will allow them to brown evenly and remain succulent and juicy. Place the food to be grilled directly onto the wire rack.
Tested for you in our cooking studio Food Dish Chicken portion, bone-in, 200-250 g each Duck, 2-3 kg Turkey, crown Turkey, thighs Turkey, whole, 4-8 kg Fish, braised, whole 300 g, e.g. trout Fish, braised, whole 1,5 kg, e.g.
en Tested for you in our cooking studio Food Dish Beef, top side / top rump Cookware, uncovered Lamb, leg (bone-in) Cookware, uncovered Lamb, shoulder (bone-in) Cookware, uncovered Lamb, shoulder (boned and rolled) Cookware, uncovered Rack of lamb** Cookware, uncovered Pork, roast joint Cookware, uncovered Pork, loin joint Cookware, uncovered Pork, belly Cookware, uncovered Pork, gammon joint Cookware, uncovered Chicken drumstick, 150 g each Cookware, uncovered Chicken portion, bone-in, 200-250 g Cookwa
Tested for you in our cooking studio Food Dish Oven chips, Croquettes, frozen Oven chips, frozen, 2 levels Hash browns, frozen Fish fingers, frozen Chicken nuggets, frozen Lasagna, chilled, 500g Lasagna, chilled, 1,5kg Lasagna, frozen, 500g Lasagna, frozen, 1,5kg Universal pan Universal pan + baking tray Universal pan Universal pan Universal pan Ovenproof dish on wire rack Ovenproof dish on wire rack Ovenproof dish on wire rack Ovenproof dish on wire rack Desserts You can make your own soufflés and yogu
en Tested for you in our cooking studio Dry herbs on the stem. Position the herbs evenly and slightly heaped on the wire rack. Use the following shelf positions for drying: ■ 1 wire rack: Level 3 ■ 2 wire racks: Levels 3 + 1 Turn very juicy fruit and vegetables several times. After drying, remove the dried fruit and vegetables from the paper immediately. In the table, you will find settings for drying various foodstuffs.
Tested for you in our cooking studio Meal Accessory/cookware Vegetables, e.g. carrots 1-litre preserving jars Vegetables, e.g. cucumbers 1-litre preserving jars Shelf posi- Type of tion heating 1 ‚ 1 Step 1. Temperature in °C 160-170 2. 120 ‚ 3. 1. 160-170 160-170 Stone fruit, e.g. cherries, damsons 1-litre preserving jars 1 ‚ 2. 1. Pomes, e.g. apples, strawberries 1 ‚ 2. 1. 160-170 2.
en Tested for you in our cooking studio Test dishes These tables have been produced for test institutes to facilitate appliance testing. As per EN 60350-1. 1 2 Baking Items that are placed in the oven on baking trays or in baking tins/dishes at the same time will not necessarily be ready at the same time.
6
6
6
*9001282751* 9001282751 990218 en