
Installation Instruction


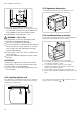
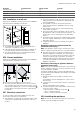
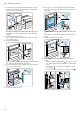
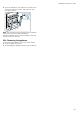
Table Of Contents
- Oven
- en
- Table of contents
- 1 Safety
- 2 Preventing material damage
- 3 Environmental protection and saving energy
- 4 Familiarising yourself with your appliance
- 5 Accessories
- 6 Before using for the first time
- 7 Basic operation
- 8 Time-setting options
- 9 Childproof lock
- 10 Rapid heating
- 11 Sabbath mode
- 12 Basic settings
- 13 Home Connect
- 14 Cleaning and servicing
- 15 Cleaning functions
- 16 Shelf supports
- 17 Appliance door
- 18 Troubleshooting
- 19 Disposal
- 20 Customer Service
- 21 Declaration of Conformity
- 22 How it works
- 23 Installation instructions

en Installation instructions
34
1.
If required, you can adjust the gap between the ap-
pliance door and the panels using the adjustment
screws on the left and right.
Turning the screws clockwise makes the gap larger
Turning the screws anti-clockwise makes the gap
smaller
2.
Push the appliance in fully.
Do not kink or trap the connection cable, or route it
over sharp edges.
3.
Centre the appliance.
There must be an air gap of at least 4mm between
the appliance and adjacent unit fronts.
4.
Open the appliance door slightly and unscrew pan-
els on the left and right.
5.
Close the appliance door.
6.
If required, you can adjust the height of the appli-
ance door using the adjustment screws on the left
and right.
Turning the screws clockwise makes the gap smal-
ler
Turning the screws anti-clockwise makes the gap
larger
7.
Screw the appliance into place.
8.
For handleless kitchens with vertical bar handle
strips:
‒ Attach a suitable filling piece in order to cover
any sharp edges and to guarantee a safe install-
ation.
‒ Pre-drill aluminium profiles to establish a screw
connection .
‒ Secure the appliance using a suitable screw .