
Assembly & Installation Instructions


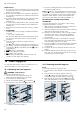
Table Of Contents
- Oven
- en
- Table of contents
- 1 Safety
- 2 Preventing material damage
- 3 Environmental protection and saving energy
- 4 Familiarising yourself with your appliance
- 5 Accessories
- 6 Before using for the first time
- 7 Basic operation
- 8 Time-setting options
- 9 Childproof lock
- 10 Rapid heating
- 11 Sabbath mode
- 12 Basic settings
- 13 Home Connect
- 14 Cleaning and servicing
- 15 Cleaning functions
- 16 Shelf supports
- 17 Appliance door
- 18 Troubleshooting
- 19 Disposal
- 20 Customer Service
- 21 Declaration of Conformity
- 22 How it works
- 23 Installation instructions
- 23.1 General installation instructions
- 23.2 Appliance dimensions
- 23.3 Installation below a worktop
- 23.4 Installing below a hob
- 23.5 Installation in a tall unit
- 23.6 Installing two appliances on top of each other
- 23.7 Corner installation
- 23.8 Electrical connection
- 23.9 Installing the appliance
- 23.10 Removing the appliance

en Shelf supports
20
Requirements
¡ You can only start the cleaning aid once the cooking
compartment is cold (room temperature) and the ap-
pliance door is closed.
¡ Do not open the appliance door while the appliance
is in operation. Otherwise, the appliance will stop the
cleaning aid.
¡ To remove particularly stubborn dirt, leave the soapy
water to work for some time before starting the
cleaning aid.
¡ To remove particularly stubborn dirt, rub soapy water
onto the dirt on smooth surfaces before starting the
cleaning aid.
1.
Remove the accessories from the cooking compart-
ment.
2.
ATTENTION!
Distilled water in the cooking compartment leads to
corrosion.
▶ Do not use distilled water.
Mix 0.4litres water with a drop of washing-up liquid
and pour into the centre of the cooking compart-
ment floor.
3.
Use the function selector to set the cleaning
functions .
a The symbol and the cleaning functions appear in
the display. The first cleaning function is highlighted.
4.
Press the or button repeatedly until the symbol
is highlighted.
a appears in the display.
5.
Turn the temperature selector.
a appears in the display.
a The cleaning aid starts after a few seconds. The
duration counts down in the display.
a Once the cleaning aid has run through to the end,
an audible signal sounds.
Note:If flashes in the display when the cleaning aid
is switched on, this indicates that the cooking compart-
ment has not completely cooled down. Switch off the
appliance. Wait until the cooking compartment has
cooled down and switch the cleaning aid back on.
Recleaning the cooking compartment
ATTENTION!
The prolonged presence of moisture in the cooking
compartment leads to corrosion.
▶ After using the cleaning aid, wipe the cooking com-
partment clean and allow it to dry fully.
1.
Open the appliance door and remove the remaining
water with an absorbent sponge cloth.
2.
Clean the smooth surfaces in the cooking compart-
ment with a dish cloth or a soft brush. Stubborn
residues can be removed using a stainless steel
scouring pad.
3.
Remove limescale with a cloth soaked in vinegar.
Then wipe with clean water and rub dry with a soft
cloth (including under the door seal).
4.
If you are unable to remove stubborn dirt, repeat the
cleaning aid after the cooking compartment has
cooled down.
5.
To switch off, turn the function selector to the zero
setting.
6.
Lower the appliance door and leave it open for ap-
prox. one hour to allow the surfaces in the cooking
compartment to dry thoroughly.
16 Shelf supports
To clean the rails and the cooking compartment, or to
replace the rails, you can remove these.
16.1 Detaching the shelf supports
WARNING‒Risk of burns!
The shelf supports get very hot
▶ Never touch the shelf supports when hot.
▶ Always allow the appliance to cool down.
▶ Keep children at a safe distance.
1.
Lift the rail forwards slightly and detach it .
2.
Pull the whole rail to the front and remove it.
3.
Clean the rail.
→"Cleaning products", Page17
16.2 Attaching the shelf supports
Notes
¡ The rails only fit on the right or left.
¡ For both rails, ensure that the curved rods are at the
front.
1.
First, push the rail into the middle of the rear
socket until the rail rests against the cooking
compartment wall, and then push this back .
2.
Push the rail into the front socket until the rail
also rests against the cooking compartment wall,
and then press this downwards .