Oven [en] User manual and installation instructions B5ACH7AH0B 2
en Safety Table of contents USER MANUAL 1 Safety .................................................................... 2 2 Preventing material damage ............................... 4 3 Environmental protection and saving energy ....................................................................... 5 4 Familiarising yourself with your appliance ........ 6 5 Accessories.......................................................... 9 6 Before using for the first time ...........................
Safety Opening the appliance door creates a draught. Greaseproof paper may come into contact with the heating element and catch fire. ▶ Never place greaseproof paper loosely over accessories when preheating the appliance and while cooking. ▶ Always cut greaseproof paper to size and use a plate or baking tin to hold it down. WARNING ‒ Risk of burns! The appliance and its parts that can be touched become hot during use. ▶ Caution should be exercised here in order to avoid touching heating elements.
en Preventing material damage Children may breathe in or swallow small parts, causing them to suffocate. ▶ Keep small parts away from children. ▶ Do not let children play with small parts. 1.5 Halogen bulb WARNING ‒ Risk of burns! The bulbs in the cooking compartment get very hot. There is still a risk of burning for some time after they have been switched off. ▶ Do not touch the glass cover. ▶ Avoid contact with your skin when cleaning.
Environmental protection and saving energy Leaving the appliance to cool down with the door open will damage the front of neighbouring kitchen units over time. ▶ Always allow the cooking compartment to cool down with the door closed after cooking at high temperatures. ▶ Take care not to trap anything in the appliance door. ▶ Only leave the cooking compartment to dry with the door open if a lot of moisture was produced during operation.
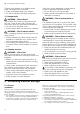
en Familiarising yourself with your appliance 4 Familiarising yourself with your appliance 4.1 Controls 1 You can use the control panel to configure all functions of your appliance and to obtain information about the operating status. On certain models, specific details such as colour and shape may differ from those pictured. 2 3 2 3 4 4 Buttons → "Buttons", Page 6 Function selector You can turn the function selector clockwise or anti-clockwise from the zero setting.
Familiarising yourself with your appliance Symbol en Name Use Temperature too high The temperature in the cooking compartment is too high for the operating mode; leave the appliance to cool down → "Residual heat", Page 8 Sabbath mode Sabbath mode activated → "Sabbath mode", Page 13 Childproof lock activ- The childproof lock is activated ated → "Childproof lock", Page 12 Door lock Appliance door is locked → "Childproof lock", Page 12 Temperature display → "Pyrolytic self-cleaning ", P
en Familiarising yourself with your appliance Symbol Name Oven light Remote start Cleaning functions Use Illuminate the cooking compartment without heating. → "Lighting", Page 8 Start and operate the appliance via the Home Connect app. → Page 15 ¡ EasyClean removes light dirt from the cooking compartment. → "Cleaning aid EasyClean ", Page 19 ¡ Pyrolytic self-cleaning cleans the cooking compartment almost by itself. → "Pyrolytic self-cleaning ", Page 18 4.6 Temperature and setting levels 4.
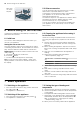
Accessories en 5 Accessories Use original accessories. These have been made especially for your appliance. Note: Accessories may become deformed if they get hot. Deformation has no effect on function. As the accessory cools down, it will regain its original shape. Accessories Wire rack Universal pan 5.1 Locking function The locking function prevents the accessories from tilting when they are pulled out. You can pull out the accessories approximately halfway without them tipping.
en Before using for the first time Wire rack on universal pan 5.3 Other accessories You can purchase other accessories from our aftersales service, specialist retailers or online. You will find a comprehensive range of products for your appliance in our brochures and online: www.neff-international.com Accessories vary from one appliance to another. When purchasing accessories, always quote the exact product number (E no.) of your appliance.
Time-setting options Tips ¡ The most suitable type of heating for your food can be found in the description of the type of heating. → "Types of heating", Page 7 ¡ You can also set a cooking time and end time on the appliance. → "Time-setting options", Page 11 en Changing the type of heating You can change the type of heating at any time. ▶ Use the function selector to set the required type of heating. Changing the temperature You can change the temperature at any time.
en Childproof lock Cancelling the cooking time Changing the end time You can cancel the cooking time at any time. Requirement: is highlighted on the display. ▶ Reset the cooking time to zero using the button. a After a few seconds, the appliance applies the change and continues to heat without a cooking time. In order to achieve a good cooking result, you can only change the set end time before operation starts and the cooking time starts counting down.
Rapid heating en 9.2 Childproof lock If you activate the childproof lock, the appliance is locked until you deactivate the childproof lock. If you switch off the appliance after the next operation, the childproof lock is not activated automatically. Activating the childproof lock ▶ Press and hold the button until appears on the display. Deactivating the childproof lock ▶ Press and hold the button until goes out on the display.
en Basic settings 12 Basic settings You can configure the basic settings for your appliance to meet your needs. 12.1 Overview of the basic settings Here you can find an overview of the basic settings and factory settings. The basic settings depend on the features of your appliance.
Home Connect en 13 Home Connect This appliance is network-capable. Connecting your appliance to a mobile device lets you control its functions via the Home Connect app, adjust its basic settings and monitor its operating status. The Home Connect services are not available in every country. The availability of the Home Connect function depends on the availability of Home Connect services in your country. You can find information about this at: www.home-connect.com.
en Home Connect Setting Selection or display Remote start – Deactivated – Manual1 – Permanent Software update – Update available – Start update Remote Diagnostics – Not authorised1 – Authorised 1 Explanation When remote start is deactivated, you can only view the operating status of the appliance in the app. For manual remote start, you must activate the remote start each time before you can start the appliance via the app.
Cleaning and servicing en 14 Cleaning and servicing To keep your appliance working efficiently for a long time, it is important to clean and maintain it carefully. 14.1 Cleaning products In order to avoid damaging the various oven surfaces on the appliance, do not use unsuitable cleaning products. WARNING ‒ Risk of electric shock! An ingress of moisture can cause an electric shock. ▶ Do not use steam- or high-pressure cleaners to clean the appliance.
en Cleaning functions Cooking compartment Area Enamel surfaces Suitable cleaning agents ¡ Hot soapy water ¡ Vinegar water ¡ Oven cleaner Glass cover for the oven light Rails ¡ Hot soapy water AccessorIes ¡ Hot soapy water ¡ Oven cleaner ¡ Hot soapy water Information Soak any heavily soiled areas and use a brush or steel wool. Leave the appliance door open to dry the cooking compartment after cleaning it. Tip: It is best to use the cleaning function.
Cleaning functions The outside of the appliance gets very hot when the cleaning function is in progress. ▶ Never hang combustible objects, e.g. tea towels, on the door handle. ▶ Leave the front of the appliance clear. ▶ Keep children at a safe distance. If the door seal is damaged, a large amount of heat is generated around the door. ▶ Do not scrub or remove the seal. ▶ Never operate the appliance if the seal is damaged or missing. 2.
en Shelf supports Requirements ¡ You can only start the cleaning aid once the cooking compartment is cold (room temperature) and the appliance door is closed. ¡ Do not open the appliance door while the appliance is in operation. Otherwise, the appliance will stop the cleaning aid. ¡ To remove particularly stubborn dirt, leave the soapy water to work for some time before starting the cleaning aid.
Appliance door en 17 Appliance door To ensure that your appliance retains its appearance and remains fully functioning for a long time, you can detach the appliance door and clean it. 3. Open the appliance door approx. 45° wide. WARNING ‒ Risk of injury! If the hinges are not secured due to an incomplete lock, they can snap shut with great force. ▶ To detach or attach the appliance door, always turn the two locks as far as they will go.
en Appliance door 5. ATTENTION! Opening and closing the appliance door when it is in the lock position damages the door hinges. ▶ Never force the appliance door open or closed. ▶ If the door hinge has been damaged, call the after-sales service. Move the appliance door up and down until you hear a quiet click. You can still only move the appliance door slightly. 17.2 Attaching the appliance door 1. Tip: Ensure that the appliance door is not wedged at an angle and that it is properly fitted in place.
Appliance door 5. WARNING ‒ Risk of injury! If the door locks are unsecured, the appliance door may become detached. ▶ After attaching the appliance door, close the leftand right-hand door locks. Hold the screwdriver horizontally and use it to push the door lock (black component) on each side of the door downwards as far as it will go . en 4. Carefully lift the inner pane upwards at an angle and remove it in the direction of the arrow . 5.
en Appliance door 4. Insert the second intermediate pane without the 8. WARNING ‒ Risk of injury! Scratched glass in the appliance door may develop into a crack. ▶ Do not use any harsh or abrasive cleaners or sharp metal scrapers to clean the glass on the oven door, as they may scratch the surface. Clean the door panes on both sides with glass cleaner and a soft cloth. 9. Dry the door panes and refit them. spacers and seals, and slide it in the direction of the arrow until it is inserted in the frame .
Troubleshooting 7. Carefully lift the inner pane upwards at an angle and attach the holder . en 9. Screw both screws back in on the left and right of the appliance door. 8. Insert the inner pane with the holder into the opening. 18 Troubleshooting You can rectify minor faults on your appliance yourself. Read the troubleshooting information before contacting after-sales service. This will avoid unnecessary costs. WARNING ‒ Risk of injury! Improper repairs are dangerous.
en Troubleshooting Fault The appliance door cannot be opened; lights up in the display. The time flashes in the display. Cause and troubleshooting The cleaning function locks the appliance door. ▶ Allow the appliance to cool down until goes out in the display. → "Pyrolytic self-cleaning ", Page 18 There has been a power cut. ▶ Reset the time. → "Setting the time on the clock", Page 12 The time does not ap- The basic setting has been changed.
Disposal 3. Pull out the halogen bulb without turning it . en 4. Insert the new halogen lamp and press it firmly into 5. 6. 7. 8. the socket. Make sure the pins are positioned correctly. Depending on the appliance model, the glass cover may have a sealing ring. Put the sealing ring in position. Screw the glass cover on. Take the tea towel out of the cooking compartment. Connect the appliance to the power supply. 19 Disposal Find out here how to dispose of old appliances correctly. 19.
en Declaration of Conformity 21 Declaration of Conformity Constructa Neff Vertriebs-GmbH hereby declares that the appliance with Home Connect functionality conforms to the basic requirements and other relevant provisions of Directive 2014/53/EU. A detailed RED Declaration of Conformity can be found online at www.neff-international.com among the additional documents on the product page for your appliance.
How it works 22.3 Notes on roasting and grilling The setting values are based on the assumption that unstuffed, chilled, ready-to-roast poultry, meat or fish is placed into a cold cooking compartment. ¡ The larger the poultry, meat or fish, the lower the cooking temperature and the longer the cooking time. ¡ Turn the poultry, meat or fish after approx. 1/2 to 2/3 of the time listed. ¡ Add a little liquid to the poultry in the cookware. Cover the bottom of the cookware with approx. 1– 2 cm of liquid.
en How it works Food Accessories/cookware Scones Baking sheet on wire rack Baking sheet on wire rack 12-cup tin Baking sheet on wire rack 12-cup tin Baking tray Round pizza tray 4 pcs Ø 20 cm cake tin Baking sheet on wire rack Cookware without lid Cookware without lid Cookware without lid Biscuits Small cakes Pavlova Yorkshire pudding Pizza, home-made Pizza, home-made, thin base Victoria sponge cake, 2 levels Biscuits, 2 or 3 levels Beef, top side/top rump Lamb leg (on the bone) Pork belly Chicken, who
How it works en Recommended settings for yoghurt Food Accessories/cookware Shelf position Yoghurt Individual moulds Type of heating Cooking compartment floor 22.6 Test dishes These overviews have been produced for test institutes to facilitate appliance testing in accordance with EN 60350-1. Baking Observe this information when baking test dishes. General information ¡ The settings apply to food that is placed into a cold cooking compartment. ¡ Observe the notes about preheating in the tables.
en Installation instructions Food Accessories/cookware Shelf pos- Type of ition heating Hot water sponge cake Springform cake tin, 2 diameter 26 cm Hot water sponge cake, 2 levels Springform cake tin, 3+1 diameter 26 cm 1 Preheat the appliance for five minutes. Do not use the rapid heating function. 2 Preheat the appliance. Do not use the rapid heating function.
Installation instructions WARNING ‒ Risk of fire! It is dangerous to use an extended power cord and non-approved adapters. ▶ Do not use multiple socket strips. ▶ Only use extension cables that are certified, have a minimum cross section of 1.5 mm² and comply with the applicable national safety requirements. ▶ If the power cord is too short, contact customer service. ▶ Only use adapters approved by the manufacturer. ATTENTION! Carrying the appliance by the door handle could break it.
en Installation instructions Hob type Full-surface induction hob Gas hob Electric hob a raised in mm 47 30 27 23.5 Installation in a tall unit Observe the installation dimensions and the installation instructions when installing in a tall unit. ¡ To ventilate the appliance, the intermediate floors must have a ventilation cut-out. ¡ If the tall unit has another back panel in addition to the element back panels, this must be removed.
Installation instructions ¡ The power cable must be plugged in at the rear of the appliance until you hear a clicking sound. A 3 m power cable can be obtained from the after-sales service. ¡ The power cable must only be replaced with a cable from the original manufacturer. This is available from after-sales service. ¡ Contact protection must be guaranteed by the installation. en 1.
en Installation instructions 6. If required, you can adjust the height of the appli- ance door using the adjustment screws on the left and right. Turning the screws clockwise makes the gap smaller Turning the screws anti-clockwise makes the gap larger 7. Screw the appliance into place. 9. Open the appliance door slightly, then refit the pan- els and screw them in place, first at the top and then at the bottom. Note: The gap between the worktop and the appliance must not be closed by additional battens.
Valid within Great Britain: Imported to Great Britain by BSH Home Appliances Ltd.