
Installation instructions


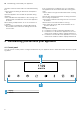

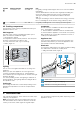
Table Of Contents
- Oven
- en
- Table of contents
- 1 Safety
- 2 Preventing material damage
- 3 Environmental protection and saving energy
- 4 Familiarising yourself with your appliance
- 5 Accessories
- 6 Before using for the first time
- 7 Basic operation
- 7.1 Switching on the appliance
- 7.2 Switching off the appliance
- 7.3 Residual heat indicator
- 7.4 Setting the type of heating and temperature
- 7.5 Changing the temperature
- 7.6 Changing the type of heating
- 7.7 Pausing operation
- 7.8 Cancelling operation
- 7.9 Viewing the current temperature
- 7.10 Displaying information
- 8 Steam
- 9 Time-setting options
- 10 Meat probe
- 11 Baking and roasting assistant
- 12 Steam programs
- 13 Childproof lock
- 14 Rapid heat-up
- 15 Sabbath mode
- 16 Basic settings
- 17 Home Connect
- 18 Cleaning and servicing
- 19 Cleaning functions
- 20 Rails
- 21 Appliance door
- 22 Troubleshooting
- 23 Disposal
- 24 Customer Service
- 25 Declaration of Conformity
- 26 How it works
- 26.1 General cooking tips
- 26.2 Baking tips
- 26.3 Roasting, braising and grilling tips
- 26.4 Cooking frozen products
- 26.5 Cooking ready meals
- 26.6 List of foods
- 26.7 Special cooking methods and other applications
- 26.8 Test dishes
- 27 Installation instructions
- 27.1 General installation instructions
- 27.2 Appliance dimensions
- 27.3 Installation below a worktop
- 27.4 Installation underneath a hob
- 27.5 Installation in a tall unit
- 27.6 Installing two appliances on top of each other
- 27.7 Corner installation
- 27.8 Electrical connection
- 27.9 Installing the appliance
- 27.10 Removing the appliance

Familiarising yourself with your appliance en
7
4.2 Buttons
The buttons are touch-sensitive areas. To select a function, press the corresponding button.
Symbol Name Use
On/off Switch the appliance on or off
Steam assistance Switch on steam assistance
Time-setting options/
childproof lock
¡ Set the "timer", "cooking time" or "Ready at" time for delayed starts
¡ Activate or deactivate the "childproof lock"
Main menu Select operating modes and settings
Rapid heat-up ¡ Activate or deactivate the "Rapid heat-up" function
¡ Activate or deactivate the "PowerBoost" function
Information ¡ View additional information
¡ View the current temperature
Open control panel Fill or empty the water tank
Start/stop Start or pause the appliance
4.3 Display
The display shows the current settings, options or rel-
evant information.
Control
You can configure all the functions on your appliance
via the display.
To adjust a setting, touch the appropriate place on the
display with your finger. The settings area will then be
displayed more brightly. Swipe left or right over this set-
tings area on the display with your finger until the re-
quired setting is magnified.
Direction Use
Navigate to the left Swipe right on the display
with your finger
Navigate to the right Swipe left on the display
with your finger
Navigate upwards Swipe down on the dis-
play with your finger
Navigate downwards Swipe up on the display
with your finger
Symbols
Different symbols may appear on the display.
Symbol Name Use
HomeConnect ¡ Home network and HomeConnect server connected
¡ The number of lines shows the signal strength of the home network
→"HomeConnect ", Page23
Home network Home network not connected
→"HomeConnect ", Page23
HomeConnect server HomeConnect server not connected
→"HomeConnect ", Page23
Remote start Remote start activated
→"HomeConnect ", Page23
Remote diagnostics Remote diagnostics activated
→"HomeConnect ", Page23
4.4 Main menu
The main menu provides an overview of your appliance's functions.
Press the button to open the main menu.
Function Name Use
Heating functions Select the required heating function and temperature for your food
Baking and roasting
assistant
Recommended settings for baking and roasting
Steam programs Cooking food with steam
MyProfile Individually adjust the appliance settings