
Installation instructions

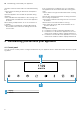

Table Of Contents
- Oven
- en
- Table of contents
- 1 Safety
- 2 Preventing material damage
- 3 Environmental protection and saving energy
- 4 Familiarising yourself with your appliance
- 5 Accessories
- 6 Before using for the first time
- 7 Basic operation
- 7.1 Switching on the appliance
- 7.2 Switching off the appliance
- 7.3 Residual heat indicator
- 7.4 Setting the type of heating and temperature
- 7.5 Changing the temperature
- 7.6 Changing the type of heating
- 7.7 Pausing operation
- 7.8 Cancelling operation
- 7.9 Viewing the current temperature
- 7.10 Displaying information
- 8 Steam
- 9 Time-setting options
- 10 Meat probe
- 11 Baking and roasting assistant
- 12 Steam programs
- 13 Childproof lock
- 14 Rapid heat-up
- 15 Sabbath mode
- 16 Basic settings
- 17 Home Connect
- 18 Cleaning and servicing
- 19 Cleaning functions
- 20 Rails
- 21 Appliance door
- 22 Troubleshooting
- 23 Disposal
- 24 Customer Service
- 25 Declaration of Conformity
- 26 How it works
- 26.1 General cooking tips
- 26.2 Baking tips
- 26.3 Roasting, braising and grilling tips
- 26.4 Cooking frozen products
- 26.5 Cooking ready meals
- 26.6 List of foods
- 26.7 Special cooking methods and other applications
- 26.8 Test dishes
- 27 Installation instructions
- 27.1 General installation instructions
- 27.2 Appliance dimensions
- 27.3 Installation below a worktop
- 27.4 Installation underneath a hob
- 27.5 Installation in a tall unit
- 27.6 Installing two appliances on top of each other
- 27.7 Corner installation
- 27.8 Electrical connection
- 27.9 Installing the appliance
- 27.10 Removing the appliance

en Familiarising yourself with your appliance
6
Use dark-coloured, black-coated or enamelled baking
tins.
¡
These types of baking tin absorb the heat particu-
larly well.
Open the appliance door as little as possible during
operation.
¡
This maintains the temperature in the cooking com-
partment and eliminates the need for the appliance
to reheat.
When baking multiple dishes, do so in succession or
in parallel.
¡
The cooking compartment is heated after baking
the first dish. This reduces the baking time for the
second cake.
If the cooking time is relatively long, you can switch
the appliance off 10minutes before the cooking time
ends.
¡
There will be enough residual heat to finish cooking
the dish.
Remove any accessories that are not being used from
the cooking compartment.
¡
Accessories that are not being used do not need to
be heated.
Allow frozen food to defrost before cooking.
¡
This saves the energy that would otherwise be re-
quired to defrost it.
Note:
The appliance requires:
¡ A maximum of2W in networked standby mode
¡ A maximum of 1W when the appliance is not con-
nected to the network, with the display switched on
¡ A maximum of 0.5W when the appliance is not con-
nected to the network, with the display switched off
4 Familiarising yourself with your appliance
4.1 Control panel
You can use the control panel to configure all functions of your appliance and to obtain information about the operat-
ing status.
1
2
1
Display
2
Buttons