
Installation instructions

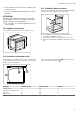
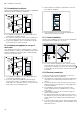
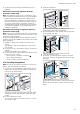
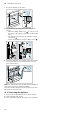
Table Of Contents
- Oven
- en
- Table of contents
- 1 Safety
- 2 Preventing material damage
- 3 Environmental protection and saving energy
- 4 Familiarising yourself with your appliance
- 5 Accessories
- 6 Before using for the first time
- 7 Basic operation
- 7.1 Switching on the appliance
- 7.2 Switching off the appliance
- 7.3 Residual heat indicator
- 7.4 Setting the type of heating and temperature
- 7.5 Changing the temperature
- 7.6 Changing the type of heating
- 7.7 Pausing operation
- 7.8 Cancelling operation
- 7.9 Viewing the current temperature
- 7.10 Displaying information
- 8 Steam
- 9 Time-setting options
- 10 Meat probe
- 11 Baking and roasting assistant
- 12 Steam programs
- 13 Childproof lock
- 14 Rapid heat-up
- 15 Sabbath mode
- 16 Basic settings
- 17 Home Connect
- 18 Cleaning and servicing
- 19 Cleaning functions
- 20 Rails
- 21 Appliance door
- 22 Troubleshooting
- 23 Disposal
- 24 Customer Service
- 25 Declaration of Conformity
- 26 How it works
- 26.1 General cooking tips
- 26.2 Baking tips
- 26.3 Roasting, braising and grilling tips
- 26.4 Cooking frozen products
- 26.5 Cooking ready meals
- 26.6 List of foods
- 26.7 Special cooking methods and other applications
- 26.8 Test dishes
- 27 Installation instructions
- 27.1 General installation instructions
- 27.2 Appliance dimensions
- 27.3 Installation below a worktop
- 27.4 Installation underneath a hob
- 27.5 Installation in a tall unit
- 27.6 Installing two appliances on top of each other
- 27.7 Corner installation
- 27.8 Electrical connection
- 27.9 Installing the appliance
- 27.10 Removing the appliance

en Installation instructions
48
27.5 Installation in a tall unit
Observe the installation dimensions and the installation
instructions when installing in a tall unit.
¡ To ventilate the appliance, the intermediate floors
must have a ventilation cut-out.
¡ If the tall unit has another back panel in addition to
the element back panels, this must be removed.
¡ Only fit the appliance up to a height which allows
accessories to be easily removed.
27.6 Installing two appliances on top of
each other
Your appliance can also be installed above or below
another appliance. Observe the installation dimensions
and the installation instructions when installing appli-
ances on top of each other.
¡ To ventilate the appliances, the intermediate floor
must have a ventilation cut-out.
¡ To ensure sufficient ventilation of the two appli-
ances, there must be a ventilation opening of at
least 200cm² in the base area. To do this, trim the
base panel or fit a ventilation grille.
¡ Ensure that air exchange is guaranteed in accord-
ance with the diagram.
¡ Only fit appliances up to a height that allows ac-
cessories to be easily removed.
27.7 Corner installation
Observe the installation dimensions and the installation
instructions when installing in a corner.
¡ To ensure that the appliance door can be opened,
you must take the minimum dimensions into consid-
eration when installing in a corner. The dimension
is dependent on the thickness of the unit front and
the handle.
27.8 Electrical connection
In order to safely connect the appliance to the elec-
trical system, follow these instructions.
¡ The appliance corresponds to protection class I and
must only be operated with a protective earth con-
nection.
¡ The fuse protection must correspond to the power
rating specified on the appliance's rating plate and
to local regulations.
¡ The appliance must be disconnected from the
power supply whenever installation work is being
carried out.
¡ The appliance must only be connected using the
power cable provided.
¡ The power cable must be plugged in at the rear of
the appliance until you hear a clicking sound. A 3 m
power cable can be obtained from the after-sales
service.
¡ The power cable must only be replaced with a cable
from the original manufacturer. This is available from
after-sales service.