
Installation instructions
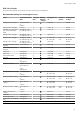
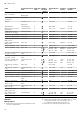

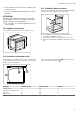
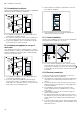
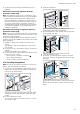
Table Of Contents
- Oven
- en
- Table of contents
- 1 Safety
- 2 Preventing material damage
- 3 Environmental protection and saving energy
- 4 Familiarising yourself with your appliance
- 5 Accessories
- 6 Before using for the first time
- 7 Basic operation
- 7.1 Switching on the appliance
- 7.2 Switching off the appliance
- 7.3 Residual heat indicator
- 7.4 Setting the type of heating and temperature
- 7.5 Changing the temperature
- 7.6 Changing the type of heating
- 7.7 Pausing operation
- 7.8 Cancelling operation
- 7.9 Viewing the current temperature
- 7.10 Displaying information
- 8 Steam
- 9 Time-setting options
- 10 Meat probe
- 11 Baking and roasting assistant
- 12 Steam programs
- 13 Childproof lock
- 14 Rapid heat-up
- 15 Sabbath mode
- 16 Basic settings
- 17 Home Connect
- 18 Cleaning and servicing
- 19 Cleaning functions
- 20 Rails
- 21 Appliance door
- 22 Troubleshooting
- 23 Disposal
- 24 Customer Service
- 25 Declaration of Conformity
- 26 How it works
- 26.1 General cooking tips
- 26.2 Baking tips
- 26.3 Roasting, braising and grilling tips
- 26.4 Cooking frozen products
- 26.5 Cooking ready meals
- 26.6 List of foods
- 26.7 Special cooking methods and other applications
- 26.8 Test dishes
- 27 Installation instructions
- 27.1 General installation instructions
- 27.2 Appliance dimensions
- 27.3 Installation below a worktop
- 27.4 Installation underneath a hob
- 27.5 Installation in a tall unit
- 27.6 Installing two appliances on top of each other
- 27.7 Corner installation
- 27.8 Electrical connection
- 27.9 Installing the appliance
- 27.10 Removing the appliance

How it works en
45
26.8 Test dishes
The information in this section is provided for test institutes to facilitate testing of the appliance in accordance with
EN 60350‑1.
Baking
¡ The setting values apply to food that is placed into a
cold cooking compartment.
¡ Please take note of the information on preheating in
the recommended settings tables. These setting val-
ues assume that the rapid heat-up function is not
being used.
¡ For baking, use the lower of the specified temperat-
ures to start with.
¡ Items that are placed in the appliance on baking
trays or in baking tins/dishes at the same time will
not necessarily be ready at the same time.
¡ Shelf positions when baking on 2levels:
– Universal pan: Shelf position3
Baking tray: Shelf position1
– Baking tins/dishes on the wire rack:
First wire rack: Shelf position3
Second wire rack: Shelf position1
¡ Shelf positions when baking on 3levels:
– Baking tray: Shelf position4
– Universal pan: Shelf position3
– Baking tray: Shelf position1
¡ Hot water sponge cake
– When baking on two levels, place the springform
tins at diagonally opposite corners of the wire
racks.
Recommended settings for baking
Food Accessories/cook-
ware
Shelf pos-
ition
Heating
function
→Page7
Temperature in
°C
Steam intens-
ity
Cooking
time in
mins
Viennese whirls Baking tray 3 140 - 150
1
- 25 - 40
Viennese whirls Baking tray 3 140 - 150
1
- 25 - 40
Viennese whirls, on
2levels
Universal pan
+
Baking tray
3+1 140 - 150
1
- 30 - 40
Viennese whirls, on
3levels
x2
Baking tray
+
x1
Universal pan
4+3+1 130 - 140
1
- 35 - 55
Small cakes Baking tray 3 160
1
- 20 - 30
Small cakes Baking tray 3 150
1
- 25 - 35
Small cakes, on 2levels Universal pan
+
Baking tray
3+1 150
1
- 25 - 35
Small cakes, on 3levels x2
Baking tray
+
x1
Universal pan
4+3+1 140
1
- 35 - 45
Hot water sponge cake Springform cake
tin, diameter 26 cm
2 160 - 170
2
- 25 - 35
Hot water sponge cake Springform cake
tin, diameter 26 cm
2 160 - 170
2
- 30 - 40
Hot water sponge cake Springform cake
tin, diameter 26 cm
2 1. 150 - 160
2. 150 - 160
Low
Off
1. 10
2. 20 - 25
Hot water sponge cake,
on 2levels
Springform cake
tin, diameter 26 cm
3+1 150 - 170
2
- 30 - 50
1
Preheat the appliance for five minutes. Do not use the rapid heating function.
2
Preheat the appliance. Do not use the rapid heating function.