
Installation instructions

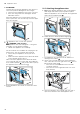

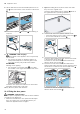

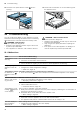

Table Of Contents
- Oven
- en
- Table of contents
- 1 Safety
- 2 Preventing material damage
- 3 Environmental protection and saving energy
- 4 Familiarising yourself with your appliance
- 5 Accessories
- 6 Before using for the first time
- 7 Basic operation
- 7.1 Switching on the appliance
- 7.2 Switching off the appliance
- 7.3 Residual heat indicator
- 7.4 Setting the type of heating and temperature
- 7.5 Changing the temperature
- 7.6 Changing the type of heating
- 7.7 Pausing operation
- 7.8 Cancelling operation
- 7.9 Viewing the current temperature
- 7.10 Displaying information
- 8 Steam
- 9 Time-setting options
- 10 Meat probe
- 11 Baking and roasting assistant
- 12 Steam programs
- 13 Childproof lock
- 14 Rapid heat-up
- 15 Sabbath mode
- 16 Basic settings
- 17 Home Connect
- 18 Cleaning and servicing
- 19 Cleaning functions
- 20 Rails
- 21 Appliance door
- 22 Troubleshooting
- 23 Disposal
- 24 Customer Service
- 25 Declaration of Conformity
- 26 How it works
- 26.1 General cooking tips
- 26.2 Baking tips
- 26.3 Roasting, braising and grilling tips
- 26.4 Cooking frozen products
- 26.5 Cooking ready meals
- 26.6 List of foods
- 26.7 Special cooking methods and other applications
- 26.8 Test dishes
- 27 Installation instructions
- 27.1 General installation instructions
- 27.2 Appliance dimensions
- 27.3 Installation below a worktop
- 27.4 Installation underneath a hob
- 27.5 Installation in a tall unit
- 27.6 Installing two appliances on top of each other
- 27.7 Corner installation
- 27.8 Electrical connection
- 27.9 Installing the appliance
- 27.10 Removing the appliance

Appliance door en
35
5.
Push down lightly on the first intermediate pane
around , slide the retainer in at an angle and
push down until it clicks into place.
a The retainer has been inserted.
6.
ATTENTION!
The light transmission is lower due to the glass rod
being held.
▶ Do not touch the glass rod with your bare hands.
▶ Clean the glass rod with glass cleaner before in-
serting it.
Select the left-hand reflector and insert it at the
top.
7.
Insert the reflector and click it into place in the
gap .
8.
Insert the second reflector in the same way as the
first.
9.
Use glass cleaner to remove any finger marks from
the reflectors if necessary.
10.
Place the inner pane onto the appliance door so
that the number is legible at the bottom right. In-
sert the inner pane into the fixing rail at an angle
towards the back.
11.
Carefully lift the inner pane upwards at an angle and
attach the holder .