
Installation instructions

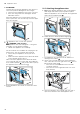

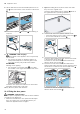

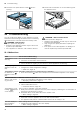

Table Of Contents
- Oven
- en
- Table of contents
- 1 Safety
- 2 Preventing material damage
- 3 Environmental protection and saving energy
- 4 Familiarising yourself with your appliance
- 5 Accessories
- 6 Before using for the first time
- 7 Basic operation
- 7.1 Switching on the appliance
- 7.2 Switching off the appliance
- 7.3 Residual heat indicator
- 7.4 Setting the type of heating and temperature
- 7.5 Changing the temperature
- 7.6 Changing the type of heating
- 7.7 Pausing operation
- 7.8 Cancelling operation
- 7.9 Viewing the current temperature
- 7.10 Displaying information
- 8 Steam
- 9 Time-setting options
- 10 Meat probe
- 11 Baking and roasting assistant
- 12 Steam programs
- 13 Childproof lock
- 14 Rapid heat-up
- 15 Sabbath mode
- 16 Basic settings
- 17 Home Connect
- 18 Cleaning and servicing
- 19 Cleaning functions
- 20 Rails
- 21 Appliance door
- 22 Troubleshooting
- 23 Disposal
- 24 Customer Service
- 25 Declaration of Conformity
- 26 How it works
- 26.1 General cooking tips
- 26.2 Baking tips
- 26.3 Roasting, braising and grilling tips
- 26.4 Cooking frozen products
- 26.5 Cooking ready meals
- 26.6 List of foods
- 26.7 Special cooking methods and other applications
- 26.8 Test dishes
- 27 Installation instructions
- 27.1 General installation instructions
- 27.2 Appliance dimensions
- 27.3 Installation below a worktop
- 27.4 Installation underneath a hob
- 27.5 Installation in a tall unit
- 27.6 Installing two appliances on top of each other
- 27.7 Corner installation
- 27.8 Electrical connection
- 27.9 Installing the appliance
- 27.10 Removing the appliance

en Appliance door
32
5.
ATTENTION!
Opening and closing the appliance door when it is
in the lock position damages the door hinges.
▶ Never force the appliance door open or closed.
▶ If the door hinge has been damaged, call the
after-sales service.
Move the appliance door up and down until you
hear a quiet click. You can still only move the appli-
ance door slightly.
a The appliance door is in the lock position.
6.
WARNING‒Risk of injury!
The appliance door has a weight of 7–10 kg and
may fall if it is not handled carefully.
▶ Handle the appliance door carefully.
The door handle is not suitable for carrying the ap-
pliance door. The door handle may break off.
▶ Never carry the appliance door by the door
handle.
▶ Grab hold of the appliance door with both hands
on the left and right to carry it.
Take hold of the appliance door with both hands,
one on the left and one on the right, and rotate the
door handle upwards until you are able to pull up
the appliance door and remove it .
7.
Set the appliance door down on a flat, soft, clean
surface.
21.2 Attaching the appliance door
1.
Tip:Ensure that the appliance door is not wedged
at an angle and that it is properly fitted in place.
Attach the appliance door via the left- and right-hand
guide rollers simultaneously .
2.
Rotate the door handle upwards slightly .
a The appliance door slides the short distance re-
maining to the bottom .
3.
Use a coin to release both locks on the appliance
door. Insert the coin in the gap in the lock and ro-
tate as far as it will go .
‒ Turn the lock on the left-hand side in an anti-
clockwise direction.
‒ Turn the lock on the right-hand side in a clock-
wise direction.
4.
Open the appliance door slightly until you hear a
quiet click, and then close the appliance door.