
Installation instructions
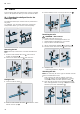
Table Of Contents
- Oven
- en
- Table of contents
- 1 Safety
- 2 Preventing material damage
- 3 Environmental protection and saving energy
- 4 Familiarising yourself with your appliance
- 5 Accessories
- 6 Before using for the first time
- 7 Basic operation
- 7.1 Switching on the appliance
- 7.2 Switching off the appliance
- 7.3 Residual heat indicator
- 7.4 Setting the type of heating and temperature
- 7.5 Changing the temperature
- 7.6 Changing the type of heating
- 7.7 Pausing operation
- 7.8 Cancelling operation
- 7.9 Viewing the current temperature
- 7.10 Displaying information
- 8 Steam
- 9 Time-setting options
- 10 Meat probe
- 11 Baking and roasting assistant
- 12 Steam programs
- 13 Childproof lock
- 14 Rapid heat-up
- 15 Sabbath mode
- 16 Basic settings
- 17 Home Connect
- 18 Cleaning and servicing
- 19 Cleaning functions
- 20 Rails
- 21 Appliance door
- 22 Troubleshooting
- 23 Disposal
- 24 Customer Service
- 25 Declaration of Conformity
- 26 How it works
- 26.1 General cooking tips
- 26.2 Baking tips
- 26.3 Roasting, braising and grilling tips
- 26.4 Cooking frozen products
- 26.5 Cooking ready meals
- 26.6 List of foods
- 26.7 Special cooking methods and other applications
- 26.8 Test dishes
- 27 Installation instructions
- 27.1 General installation instructions
- 27.2 Appliance dimensions
- 27.3 Installation below a worktop
- 27.4 Installation underneath a hob
- 27.5 Installation in a tall unit
- 27.6 Installing two appliances on top of each other
- 27.7 Corner installation
- 27.8 Electrical connection
- 27.9 Installing the appliance
- 27.10 Removing the appliance

HomeConnect en
23
Basic setting Selection
Volume 5 settings
Button tone ¡ Off (except for )
¡ On
Display brightness 5 settings
Clock display ¡ Off
¡ Digital
¡ Analogue
Lighting ¡ On during operation
¡ Off during operation
Childproof lock ¡ Button lock only
¡ Door lock and button lock
Automatic childproof
lock
¡ Deactivated
¡ Activated
Operation after
switch-on
¡ Main menu
¡ Types of heating
¡ Baking and roasting assist-
ant
¡ Steam programs
Night-time dimming ¡ Switched off
¡ On (display dimmed
between 10 p.m. and 5.59
a.m.)
Brand logo ¡ Indicators/symbols
¡ Do not display
Fan run-on time ¡ Recommended
¡ Minimum
Pull-out rail system
1
¡ Not retrofitted (rack or
single set of pull-out rails)
¡ Retrofitted (two or three sets
of pull-out rails)
Home Connect HomeConnect Settings
→"HomeConnect ", Page23
Factory settings Restore
1
Depending on the appliance specifications
16.2 Changing MyProfile
1.
Press to switch the appliance on.
2.
Press .
3.
Swipe left or right to select "MyProfile" .
4.
Press the bottom row.
5.
Swipe left or right to select a setting.
6.
Press the bottom row.
7.
Swipe left or right to change the setting.
8.
Press .
9.
To save your settings, press "Save".
‒ To discard your settings, press "Discard".
16.3 Changing your favourites
In Favourites, you can set the heating functions that
you want to appear in the heating functions menu.
Note:
Some heating functions cannot be deactivated:
¡ CircoTherm hot air
¡ Circo-roasting
¡ Full-surface grill
1.
Press to switch the appliance on.
2.
Press .
3.
Swipe left or right to select "MyProfile" .
4.
Press the bottom row.
5.
Swipe left or right to select "Favourites".
6.
Press the bottom row.
7.
Swipe left or right to select a heating function.
8.
Press the required setting.
Setting Display in the heating func-
tions menu?
Activated Yes
Deactivated No
9.
Press .
10.
To save your settings, press "Save".
‒ To discard your settings, press "Discard".
17 HomeConnect
This appliance is network-capable. Connecting your ap-
pliance to a mobile device lets you control its functions
via the HomeConnect app, adjust its basic settings
and monitor its operating status.
The HomeConnect services are not available in every
country. The availability of the HomeConnect function
depends on the availability of HomeConnect services
in your country. You can find information about this at:
www.home-connect.com.
The HomeConnect app guides you through the entire
login process. Follow the instructions in the HomeCon-
nect app to configure the settings.
Tips
¡ Please consult the documents supplied by
HomeConnect.
¡ Please also follow the instructions in the HomeCon-
nect app.
Notes
¡ Please note the safety precautions in this instruction
manual and make sure that they are also observed
when operating the appliance via the HomeCon-
nect app.
→"Safety", Page2
¡ Operating the appliance on the appliance itself al-
ways takes priority. During this time it is not possible
to operate the appliance using the HomeConnect
app.
¡ In networked standby mode, the appliance requires
a maximum of2W.