
Installation instructions
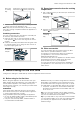
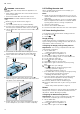
Table Of Contents
- Oven
- en
- Table of contents
- 1 Safety
- 2 Preventing material damage
- 3 Environmental protection and saving energy
- 4 Familiarising yourself with your appliance
- 5 Accessories
- 6 Before using for the first time
- 7 Basic operation
- 7.1 Switching on the appliance
- 7.2 Switching off the appliance
- 7.3 Residual heat indicator
- 7.4 Setting the type of heating and temperature
- 7.5 Changing the temperature
- 7.6 Changing the type of heating
- 7.7 Pausing operation
- 7.8 Cancelling operation
- 7.9 Viewing the current temperature
- 7.10 Displaying information
- 8 Steam
- 9 Time-setting options
- 10 Meat probe
- 11 Baking and roasting assistant
- 12 Steam programs
- 13 Childproof lock
- 14 Rapid heat-up
- 15 Sabbath mode
- 16 Basic settings
- 17 Home Connect
- 18 Cleaning and servicing
- 19 Cleaning functions
- 20 Rails
- 21 Appliance door
- 22 Troubleshooting
- 23 Disposal
- 24 Customer Service
- 25 Declaration of Conformity
- 26 How it works
- 26.1 General cooking tips
- 26.2 Baking tips
- 26.3 Roasting, braising and grilling tips
- 26.4 Cooking frozen products
- 26.5 Cooking ready meals
- 26.6 List of foods
- 26.7 Special cooking methods and other applications
- 26.8 Test dishes
- 27 Installation instructions
- 27.1 General installation instructions
- 27.2 Appliance dimensions
- 27.3 Installation below a worktop
- 27.4 Installation underneath a hob
- 27.5 Installation in a tall unit
- 27.6 Installing two appliances on top of each other
- 27.7 Corner installation
- 27.8 Electrical connection
- 27.9 Installing the appliance
- 27.10 Removing the appliance

en Time-setting options
16
ATTENTION!
If there is water on the cooking compartment floor
when operating the appliance at temperatures above
120°C, this will damage the enamel.
▶ Do not use the appliance if there is water on the
cooking compartment floor.
▶ Wipe away any water on the cooking compartment
floor before operation.
Requirement:The cooking compartment must have
cooled down.
1.
Remove any food remnants from the cooking com-
partment.
2.
Dry the cooking compartment with a sponge.
3.
Press to switch the appliance on.
4.
Press .
5.
Swipe left or right to select "Dry" .
6.
Press the bottom row.
a The duration will appear on the display. The duration
cannot be changed.
7.
Press the bottom row.
8.
Press to start drying the appliance.
a Once the duration has elapsed, an audible signal
will sound and the appliance will stop heating.
9.
Press to switch the appliance off.
10.
Remove limescale marks with a cloth soaked in vin-
egar, then wipe with clean water and dry with a soft
cloth.
11.
Leave the appliance door open for 1-2minutes so
that the cooking compartment dries completely.
Drying the cooking compartment manually
WARNING‒Risk of burns!
The appliance becomes hot during operation.
▶ Allow the appliance to cool down before cleaning.
ATTENTION!
If there is water on the cooking compartment floor
when operating the appliance at temperatures above
120°C, this will damage the enamel.
▶ Do not use the appliance if there is water on the
cooking compartment floor.
▶ Wipe away any water on the cooking compartment
floor before operation.
Requirement:The cooking compartment must have
cooled down.
1.
Remove any food remnants from the cooking com-
partment.
2.
Dry the cooking compartment with a sponge.
3.
Leave the cooking compartment to dry with the ap-
pliance door open for 1hour.
4.
Remove limescale marks with a cloth soaked in vin-
egar, then wipe with clean water and dry with a soft
cloth.
5.
Leave the appliance door open for 1-2minutes so
that the cooking compartment dries completely.
9 Time-setting options
Your appliance has different time-setting options, with
which you can control its operation.
9.1 Overview of the time-setting options
When you are setting a time, the time values will in-
crease by greater increments as you scroll through the
higher values. The cooking time, for example, can be
set in 1-minute increments up to 1 hour, and then in 5-
minute increments thereafter.
Time-setting
option
Use
Timer When you set a time on the timer,
the timer will run independently of
the appliance and will not intervene
in its operation. The timer does not
affect the appliance.
Cooking
time
Once the cooking time has elapsed,
the appliance automatically stops
heating.
Ready at Along with the cooking time (dura-
tion), you can set the time at which
you want cooking to end. The appli-
ance will start up automatically so
that it finishes cooking at the re-
quired time.
9.2 Timer
You can set the timer regardless of whether the appli-
ance is on or off.
Setting the timer
1.
Press .
2.
Once the appliance is switched on, press "Timer" .
3.
Swipe left or right to select the required timer dura-
tion.
4.
Press to start the timer.
a will appear on the display. The timer duration will
then count down.
a Once the timer duration has elapsed, an audible sig-
nal will sound.
5.
Press any button to end the audible signal.
Changing the timer
1.
Press .
2.
Swipe left or right to change the timer duration.
a The setting will then be applied.
Cancelling the timer
1.
Press .
2.
Swipe right to set the timer duration to "00:00".
a This cancels the current timer duration.