
Installation instructions
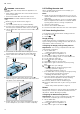
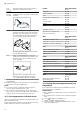
Table Of Contents
- Oven
- en
- Table of contents
- 1 Safety
- 2 Preventing material damage
- 3 Environmental protection and saving energy
- 4 Familiarising yourself with your appliance
- 5 Accessories
- 6 Before using for the first time
- 7 Basic operation
- 7.1 Switching on the appliance
- 7.2 Switching off the appliance
- 7.3 Residual heat indicator
- 7.4 Setting the type of heating and temperature
- 7.5 Changing the temperature
- 7.6 Changing the type of heating
- 7.7 Pausing operation
- 7.8 Cancelling operation
- 7.9 Viewing the current temperature
- 7.10 Displaying information
- 8 Steam
- 9 Time-setting options
- 10 Meat probe
- 11 Baking and roasting assistant
- 12 Steam programs
- 13 Childproof lock
- 14 Rapid heat-up
- 15 Sabbath mode
- 16 Basic settings
- 17 Home Connect
- 18 Cleaning and servicing
- 19 Cleaning functions
- 20 Rails
- 21 Appliance door
- 22 Troubleshooting
- 23 Disposal
- 24 Customer Service
- 25 Declaration of Conformity
- 26 How it works
- 26.1 General cooking tips
- 26.2 Baking tips
- 26.3 Roasting, braising and grilling tips
- 26.4 Cooking frozen products
- 26.5 Cooking ready meals
- 26.6 List of foods
- 26.7 Special cooking methods and other applications
- 26.8 Test dishes
- 27 Installation instructions
- 27.1 General installation instructions
- 27.2 Appliance dimensions
- 27.3 Installation below a worktop
- 27.4 Installation underneath a hob
- 27.5 Installation in a tall unit
- 27.6 Installing two appliances on top of each other
- 27.7 Corner installation
- 27.8 Electrical connection
- 27.9 Installing the appliance
- 27.10 Removing the appliance

Steam en
15
4.
Press the temperature to select it.
5.
Swipe left or right to select the required temperat-
ure.
6.
Press to save your settings.
7.
Press to select the reheating time.
8.
Swipe left or right to select the required reheating
time.
9.
Press to save your settings.
10.
Press to start the reheating process.
→"Pausing operation", Page13
→"Cancelling operation", Page13
a If the water tank runs dry during the reheating pro-
cess, reheating will be paused.
→"Refilling the water tank", Page14
a Once the duration has elapsed, an audible signal
will sound and the appliance will stop heating.
→"Switching off the appliance", Page13
11.
Press any button to end the audible signal.
12.
Empty the water tank and dry the cooking compart-
ment.
→"After every steam operation", Page15
8.4 Steam-assisted cooking
When you cook with steam assistance, the appliance
introduces steam into the cooking compartment at vari-
ous intervals. This gives your food a crispy crust and a
shiny surface. Meat stays juicy, tender and only under-
goes a minimum reduction in volume.
Heating functions compatible with steam
assistance
You can switch on steam assistance for the following
heating functions:
¡ "CircoTherm hot air"
¡ "Top/bottom heating"
¡ "Circo-roasting"
¡ "Bread-baking setting"
¡ "Keep warm"
Switching on steam assistance
1.
Fill the water tank.
→"Filling the water tank", Page13
2.
Press to switch the appliance on.
3.
Set a suitable heating function.
→"Heating functions compatible with steam assist-
ance", Page15
4.
Set the required temperature.
5.
Use the button to switch on steam assistance.
6.
Swipe left or right to select the required steam
intensity :
– Low
– Medium
– High
7.
Press to save your settings.
8.
Press to start steam-assisted heating.
a If the water tank runs dry during steam-assisted
heating, "Fill water tank" will appear on the display.
The appliance will continue to heat but without in-
jecting steam into the cooking compartment.
→"Refilling the water tank", Page14
Cancelling steam-assisted cooking
1.
Press .
2.
Press the bottom row featuring the steam intensity.
3.
Swipe right to set the steam intensity to "Off".
a The appliance will continue to heat but without in-
jecting steam into the cooking compartment.
Ending steam-assisted heating
1.
Press to switch the appliance off.
2.
Empty the water tank and dry the cooking compart-
ment.
→"After every steam operation", Page15
8.5 After every steam operation
The remaining water is pumped back into the water
tank after every operation with steam. Then empty and
dry the water tank and the cooking compartment.
Emptying the water tank
WARNING‒Risk of burns!
The water tank may heat up while the appliance is in
operation.
▶ Wait until the water tank has cooled down from the
previous operation.
▶ Remove the water tank from the tank recess.
ATTENTION!
Drying the water tank in the hot cooking compartment
leads to damage to the water tank.
▶ Do not dry the water tank in the hot cooking com-
partment.
Cleaning the water tank in the dishwasher will damage
it.
▶ Do not clean the water tank in the dishwasher.
▶ Clean the water tank with a soft cloth and standard
washing-up liquid.
Note:Once the appliance has been switched off, the
button remains lit for a little longer to remind you to
empty the water tank.
1.
Use to open the control panel.
2.
Remove the water tank.
3.
Carefully remove the lid of the water tank.
4.
Empty the water tank, clean it with detergent and
then rinse it thoroughly with clean water.
5.
Dry all parts with a soft cloth.
6.
Rub the seal on the lid until dry.
7.
Leave the water tank to dry with the lid open.
8.
Place the lid on the water tank and push down on it.
9.
Insert the water tank and close the control panel.
Drying the cooking compartment
To dry the cooking compartment, you can either use
the "Dry" function or you can dry the cooking compart-
ment manually.
Drying the cooking compartment with the Dry
function
The "Dry" function heats up the cooking compartment
so that the moisture in the cooking compartment evap-
orates. You will then need to open the appliance door
to allow the steam to escape.
WARNING‒Risk of burns!
The appliance becomes hot during operation.
▶ Allow the appliance to cool down before cleaning.