
Assembly & Installation Instructions
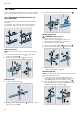
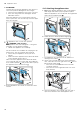
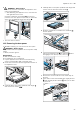
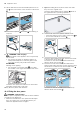
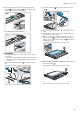
Table Of Contents
- Oven
- en
- Table of contents
- 1 Safety
- 2 Preventing material damage
- 3 Environmental protection and saving energy
- 4 Familiarising yourself with your appliance
- 5 Accessories
- 6 Before using for the first time
- 7 Basic operation
- 7.1 Switching on the appliance
- 7.2 Switching off the appliance
- 7.3 Residual heat indicator
- 7.4 Setting the type of heating and temperature
- 7.5 Changing the temperature
- 7.6 Changing the type of heating
- 7.7 Pausing operation
- 7.8 Cancelling operation
- 7.9 Viewing the current temperature
- 7.10 Displaying information
- 8 Time-setting options
- 9 Meat probe
- 10 Baking and roasting assistant
- 11 Childproof lock
- 12 Rapid heat-up
- 13 Sabbath mode
- 14 Basic settings
- 15 Home Connect
- 16 Cleaning and servicing
- 17 Cleaning functions
- 18 Rails
- 19 Appliance door
- 20 Troubleshooting
- 21 Disposal
- 22 Customer Service
- 23 Declaration of Conformity
- 24 How it works
- 25 Installation instructions
- 25.1 General installation instructions
- 25.2 Appliance dimensions
- 25.3 Installation below a worktop
- 25.4 Installation underneath a hob
- 25.5 Installation in a tall unit
- 25.6 Installing two appliances on top of each other
- 25.7 Corner installation
- 25.8 Electrical connection
- 25.9 Installing the appliance
- 25.10 Removing the appliance

en Rails
24
18 Rails
To thoroughly clean the rails and the cooking compart-
ment, or to replace the rails, you can remove the rails.
18.1 Changing the shelf position for the
telescopic shelf
The bars and telescopic shelves can be positioned in
any order.
For example, you can fit the telescopic shelf to the
shelf position which you use the most frequently.
Removing the bar
Note:Telescopic shelves are removed and fitted like
bars.
1.
Push the bar towards the rear until it can be
pulled out upwards .
2.
Unhook the bar at the rear and remove it.
Fitting the bar
1.
Fit the bar at the back .
2.
Slide the bar towards the back and hook it down-
wards onto the pin .
3.
Ensure that the hook is hooked onto the pin .
Detaching the rails
WARNING‒Risk of burns!
The shelf supports get very hot
▶ Never touch the shelf supports when hot.
▶ Always allow the appliance to cool down.
▶ Keep children at a safe distance.
1.
Lift the rail forwards slightly and detach it .
2.
Pull the whole rail to the front and remove it.
3.
Clean the rail.
→"Cleaning products", Page20
Attaching the rails
Note:The rails only fit on the right or left and must be
pulled out towards the front.
1.
First, push the rail into the middle of the rear
socket until the rail rests against the cooking
compartment wall, and then push this back .
2.
Push the rail into the front socket until the rail
also rests against the cooking compartment wall,
and then press this downwards .