Oven [en] User manual and installation instructions B57VS24.
en Safety Table of contents USER MANUAL 1 Safety .................................................................... 2 2 Preventing material damage ............................... 5 3 Environmental protection and saving energy ....................................................................... 5 4 Familiarising yourself with your appliance ........ 6 5 Accessories.......................................................... 9 6 Before using for the first time ...........................
Safety Loose food remnants, fat and meat juices may catch fire. ▶ Before using the appliance, remove the worst of the food residues and remnants from the cooking compartment, heating elements and accessories. Opening the appliance door creates a draught. Greaseproof paper may come into contact with the heating element and catch fire. ▶ Never place greaseproof paper loosely over accessories when preheating the appliance and while cooking.
en Safety WARNING ‒ Risk of suffocation! Children may put packaging material over their heads or wrap themselves up in it and suffocate. ▶ Keep packaging material away from children. ▶ Do not let children play with packaging material. Children may breathe in or swallow small parts, causing them to suffocate. ▶ Keep small parts away from children. ▶ Do not let children play with small parts. 1.5 Steam Follow these instructions when using a steam function.
Preventing material damage en 2 Preventing material damage 2.1 General ATTENTION! Objects on the cooking compartment floor at over 50 °C will cause heat to build up. The baking and roasting times will no longer be correct and the enamel will be damaged. ▶ Do not place any accessories, greaseproof paper or foil of any kind on the cooking compartment floor. ▶ Only place cookware on the cooking compartment floor if a temperature above 50 °C has been set.
en Familiarising yourself with your appliance Use dark-coloured, black-coated or enamelled baking tins. ¡ These types of baking tin absorb the heat particularly well. Open the appliance door as little as possible during operation. ¡ This maintains the temperature in the cooking compartment and eliminates the need for the appliance to reheat. When baking multiple dishes, do so in succession or in parallel. ¡ The cooking compartment is heated after baking the first dish.
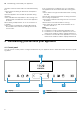
Familiarising yourself with your appliance en 4.2 Buttons The buttons are touch-sensitive areas. To select a function, press the corresponding button.
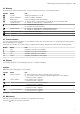
en Familiarising yourself with your appliance Function Name Heating functions Use Select the required heating function and temperature for your food Baking and roasting assistant Steam programs Recommended settings for baking and roasting MyProfile Individually adjust the appliance settings Home Connect Descale Connect the oven to a mobile end device and remotely control it.
Accessories Symbol Heating function CircoTherm eco Temperature 40 - 200 °C Reheat 80 - 180 °C en Use For gently cooking selected types of food on one level without preheating. The fan distributes the heat from the ring-shaped heating element in the back wall around the cooking compartment. This type of heating is most effective between 125 and 200 °C. This type of heating is used to determine the energy consumption in circulating-air mode and the energy efficiency class.
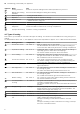
en Accessories Accessories Wire rack Universal pan Accessory support 5.1 Locking function The locking function prevents the accessories from tilting when they are pulled out. You can pull out the accessories approximately halfway without them tipping. The accessories must be inserted into the cooking compartment correctly for the tilt protection to work properly. 5.2 Sliding accessories into the cooking compartment Always slide the accessory into the cooking compartment the right way round.
Before using for the first time en 2. Hold the accessory on both sides in the area Wire rack on universal pan marked and remove it. Wire rack or baking tray 5.3 Removing accessories from the cooking compartment 1. Pull out the accessory on the telescopic shelf as far as the notch . Wire rack or baking tray 5.4 Other accessories You can purchase other accessories from our aftersales service, specialist retailers or online.
en Basic operation 6.2 Initial use When the appliance is connected to the power supply for the first time or following a lengthy power failure, the settings that you will need to configure before you can use it will appear. Notes ¡ You can change these settings at any time by going to the basic settings. → "Basic settings", Page 20 ¡ You can also use Home Connect to configure the settings. If your appliance is connected, follow the instructions in the app. Setting the language 1.
Steam en 7.3 Residual heat indicator 7.6 Changing the type of heating After you have switched off the appliance, the residual heat indicator will appear on the display. If you switch to a different heating function, the appliance will reset all the settings. 1. Press to pause operation. 2. Use the or button to select the required heating function. 3. Use the button to navigate to the next row. 4. Use the or button to select the required temperature. 5. Press to start.
en Steam 3. Lift the water tank and remove it from the water tank recess . 8.3 Steam heating functions Your appliance has several steam heating functions: ¡ Dough proving ¡ Reheat Dough proving Yeast dough will prove considerably more quickly using the "Dough proving" heating function than at room temperature, and it will not dry out. 4. Press down on the water tank lid along the seal to prevent water from leaking out of the water tank. mark. 5.
Steam en 8.4 Steam-assisted cooking When you cook with steam assistance, the appliance introduces steam into the cooking compartment at various intervals. This gives your food a crispy crust and a shiny surface. Meat stays juicy, tender and only undergoes a minimum reduction in volume.
en Time-setting options 10. Remove limescale marks with a cloth soaked in vin- egar, then wipe with clean water and dry with a soft cloth. 11. Leave the appliance door open for 1-2 minutes so that the cooking compartment dries completely. Drying the cooking compartment manually WARNING ‒ Risk of burns! The appliance becomes hot during operation. ▶ Allow the appliance to cool down before cleaning.
Baking and roasting assistant en 3. To continue without setting a cooking time, press . 9.4 Delayed start/"Ready at" time With this function, the appliance automatically switches itself on, and then switches itself off at the preselected end time. To enable it to do this, you set the cooking time (duration) and specify when you want your food to be ready. You can only use the delayed start function in conjunction with a heating function.
en Steam programs a Some food needs to be turned or stirred. An audible signal will sound and a notification will appear on the display to let you know when it is time to turn or stir your food. a Once the duration has elapsed, an audible signal will sound and the appliance will stop heating. 13. Note: Some programs allow you to extend the cooking time. → "Extending the cooking time", Page 18 If you are happy with the cooking result, use the button to select "End". 10.3 Extending the cooking time 1.
Childproof lock en 12 Childproof lock You can secure your appliance to prevent children from accidentally switching it on or changing the settings. 2. Press to switch the appliance on and then start it up. 12.1 Locks 12.4 Deactivating the automatic childproof lock Your appliance has two different locks: 1. Press and hold the Lock Automatic childproof lock One-time childproof lock Activate/deactivate Via the MyProfile menu Using the button 12.
en Sabbath mode 13.2 Activating the "Rapid heat-up" function 13.4 Activating the "PowerBoost" function 1. Set Top/bottom heating 1. Place the food on a single level in the cooking com- 2. 2. Set CircoTherm hot air a 3. a a 4. and a temperature of at least 100 °C. Press to start. The button will be lit. Use the button to activate the "Rapid heat-up" function. will appear on the display.
Home Connect Basic setting Button tone Selection ¡ Off (except for ) ¡ On Display brightness 5 settings Clock display ¡ Digital ¡ Off Lighting ¡ On during operation ¡ Off during operation Childproof lock ¡ Button lock only ¡ Door lock and button lock Automatic childproof ¡ Deactivated lock ¡ Activated Operation after ¡ Main menu switch-on ¡ Types of heating ¡ Baking and roasting assistant ¡ Steam programs Night-time dimming ¡ Switched off ¡ On (display dimmed between 10 p.m. and 5.59 a.m.
en Home Connect 2. Open the Home Connect app and scan the follow- 16.1 Setting up Home Connect Requirements ¡ The appliance is connected to the power supply and is switched on. ¡ You have a mobile device with a current version of the iOS or Android operating system, e.g. a smartphone. ¡ The mobile device and the appliance are within range of your home network's Wi-Fi signal. 1. Download the Home Connect app. ing QR code. 3. Follow the instructions in the Home Connect app. 16.
Cleaning and servicing en 16.4 Software update 16.6 Data protection Your appliance's software can be updated using the software update function, e.g. for the purposes of optimisation, troubleshooting or security updates. To do this, you must be a registered Home Connect user, have installed the app on your mobile device and be connected to the Home Connect server.
en Cleaning and servicing Appliance front Surface Stainless steel Plastic or painted surfaces E.g. control panel Suitable cleaning agents ¡ Hot soapy water ¡ Special stainless steel cleaning products suitable for hot surfaces ¡ Hot soapy water Information To prevent corrosion, remove any limescale, grease, starch or albumin (e.g. egg white) stains on stainless steel fronts immediately. Apply a thin layer of the stainless steel cleaning product with a soft cloth.
Cleaning functions 17.2 Cleaning the appliance In order to avoid damaging the appliance, you must clean your appliance only as specified, and with suitable cleaning products. WARNING ‒ Risk of burns! The appliance and its parts that can be touched become hot during use. ▶ Caution should be exercised here in order to avoid touching heating elements. ▶ Young children under 8 years of age must be kept away from the appliance.
en Cleaning functions Configuring the Self-cleaning function WARNING ‒ Risk of harm to health! The cleaning function heats up the cooking compartment to a very high temperature so that food left over from roasting, grilling and baking will burn off. This process releases vapours, which can irritate mucous membranes. ▶ Keep the kitchen well ventilated while the cleaning function is running. ▶ Do not remain in the room for long periods. ▶ Keep children and pets away.
Cleaning functions Wiping down the cooking compartment ATTENTION! The prolonged presence of moisture in the cooking compartment leads to corrosion. ▶ After using the cleaning aid, wipe the cooking compartment clean and allow it to dry fully. Requirement: The cooking compartment must have cooled down. 1. Open the appliance door and remove the remaining water with an absorbent sponge cloth. 2. Clean the smooth surfaces in the cooking compartment with a dish cloth or a soft brush.
en Rails 19 Rails To thoroughly clean the rails and the cooking compartment, or to replace the rails, you can remove the rails. 3. Ensure that the hook is hooked onto the pin . 19.1 Changing the shelf position for the telescopic shelf The bars and telescopic shelves can be positioned in any order. For example, you can fit the telescopic shelf to the shelf position which you use the most frequently.
Appliance door en 20 Appliance door To clean the appliance door thoroughly, you can disassemble the appliance door. 3. Open the appliance door approx. 45° wide. WARNING ‒ Risk of injury! If the hinges are not secured due to an incomplete lock, they can snap shut with great force. ▶ To detach or attach the appliance door, always turn the two locks as far as they will go. ▶ If the hinge snaps closed when detaching or attaching the appliance door, do not reach into the hinge – call the after-sales service.
en Appliance door 5. ATTENTION! Opening and closing the appliance door when it is in the lock position damages the door hinges. ▶ Never force the appliance door open or closed. ▶ If the door hinge has been damaged, call the after-sales service. Move the appliance door up and down until you hear a quiet click. You can still only move the appliance door slightly. 20.2 Attaching the appliance door 1. Tip: Ensure that the appliance door is not wedged at an angle and that it is properly fitted in place.
Appliance door 5. WARNING ‒ Risk of injury! If the door locks are unsecured, the appliance door may become detached. ▶ After attaching the appliance door, close the leftand right-hand door locks. Hold the screwdriver horizontally and use it to push the door lock (black component) on each side of the door downwards as far as it will go . en 4. Carefully lift the inner pane upwards at an angle and remove it in the direction of the arrow . 5.
en Appliance door 4. Insert the second intermediate pane without the 8. WARNING ‒ Risk of injury! Scratched glass in the appliance door may develop into a crack. ▶ Do not use any harsh or abrasive cleaners or sharp metal scrapers to clean the glass on the oven door, as they may scratch the surface. Clean the door panes on both sides with glass cleaner and a soft cloth. 9. Dry the door panes and refit them.
Troubleshooting 7. Carefully lift the inner pane upwards at an angle and attach the holder . 8. Insert the inner pane with the holder en 9. Screw both screws back in on the left and right of the appliance door. into the opening. 21 Troubleshooting You can rectify minor faults on your appliance yourself. Read the troubleshooting information before contacting after-sales service. This will avoid unnecessary costs. WARNING ‒ Risk of injury! Improper repairs are dangerous.
en Troubleshooting Fault Appliance will not start or cuts out during operation. Cause and troubleshooting Malfunction ▶ Call the after-sales service. → "Customer Service", Page 36 The appliance is not Demo mode is activated in the basic settings. heating; appears 1. Briefly disconnect the appliance from the power supply by switching the circuit breaker in on the display. the fuse box off and then on again. 2. Deactivate Demo mode within the next 3 minutes in the → "Basic settings", Page 20.
Disposal Fault "Fill water tank" appears in the display even though the water tank has been filled. Buttons are flashing. "Plopping" sounds can be heard when cooking with steam. The appliance hums during operation and after it is switched off. The appliance hums or clicks when the control panel is opened. The interior lighting does not work. Maximum operating time reached. A message with "D" or "E" appears in the display, e.g. D0111 or E0111. The cooking result is not satisfactory.
en Customer Service 23 Customer Service If you have any queries on use, are unable to rectify faults on the appliance yourself or if your appliance needs to be repaired, contact Customer Service. Function-relevant genuine spare parts according to the corresponding Ecodesign Order can be obtained from Customer Service for a period of at least 10 years from the date on which your appliance was placed on the market within the European Economic Area.
How it works en 25 How it works Here, you can find the ideal settings for various types of food as well as the best accessories and cookware. We have perfectly tailored these recommendations to your appliance. 25.1 General cooking tips Please take note of the following information when cooking all types of food. ¡ The temperature and cooking time depend on the amount of food and the recipe. Settings ranges are specified for this reason. Try using the lower values to start with.
en How it works General information about roasting in cookware ¡ Use heat-resistant, ovenproof cookware. ¡ Place the cookware on the wire rack. ¡ Glass cookware is best. ¡ Follow the manufacturer's instructions for your roasting dishes. Roasting in uncovered cookware ¡ Use a deep roasting dish. ¡ If you do not have any suitable cookware, you can use the universal pan. Roasting in covered cookware ¡ Use a suitable lid that seals well.
How it works Food en Accessories/cook- Shelf pos- Heating ware ition function → Page 7 Plate Ø 20 cm 2 or Pie tin Dark coated 3 quiche tin Loaf tin, 1 x 900 g 2 or 2 x 450 g Loaf tin, 1 x 900 g 2 or 2 x 450 g Temperature in °C Steam in- Cooking time tensity in mins 170–190 - 60–75 190–210 - 35–45 - 20–30 30–40 Loaf tin, 1 x 900 g or 2 x 450 g Baking tray Baking tray 12-cup-tin Baking tray 12-cup-tin Baking tray Pizza tray 2 190–200 Added steam, medium - 180–200 1 140–160 1 140–
en How it works Food Accessories/cook- Shelf pos- Heating ware ition function → Page 7 Covered cookware 2 Temperature in °C Steam in- Cooking time tensity in mins 140 - 100–120 Wire rack + Wire rack 4+1 180 - Complete meal with chicken, 1.
How it works Issue You want to slow cook a duck breast. Tip ¡ Place the cold duck breast into a pan. ¡ Sear the skin side first. ¡ Slow cook the duck breast. ¡ After slow cooking, grill the duck breast for 3 to 5 minutes until crispy. Issue You want to serve your slow-cooked meat as hot as possible. en Tip ¡ Preheat the serving plate. ¡ Make sure that the sauces that accompany the duck breast are very hot when you serve them.
en How it works ¡ When defrosting food, use the following shelf positions: – 1 wire rack: Shelf position 2 – 2 wire racks: Shelf positions 3 + 1 ¡ Stir or turn the food 1-2 times during defrosting. Turn large items several times. Split the food into smaller pieces as it defrosts. Remove pieces that have already defrosted from the cooking compartment. ¡ Once the food has defrosted, switch off the appliance and leave the food in the appliance for another 10 to 30 minutes to allow the temperature to equalise.
Installation instructions Food Viennese whirls, on 3 levels Small cakes Small cakes Small cakes, on 2 levels Small cakes, on 3 levels Hot water sponge cake Hot water sponge cake Hot water sponge cake Accessories/cook- Shelf pos- Heating ware ition function → Page 7 x2 4+3+1 Baking tray + x1 Universal pan Baking tray 3 Baking tray 3 Universal pan 3+1 + Baking tray x2 4+3+1 Baking tray + x1 Universal pan Springform cake 2 tin, diameter 26 cm Springform cake 2 tin, diameter 26 cm Spr
en Installation instructions ¡ Fitted units must be heat-resistant up to 95 °C, and adjacent unit fronts up to 70 °C. ¡ Do not install the appliance behind a decorative door or the door of a kitchen unit. There is a risk of overheating. ¡ Cut-out work on the units should be carried out before installing the appliance. Remove any shavings. Otherwise, the correct operation of electrical components may be adversely affected.
Installation instructions en 26.4 Installation underneath a hob If the appliance is installed under a hob, the following minimum dimensions must be adhered to (including substructure, if applicable). Hob type Induction hob Full-surface induction hob Gas hob Electric hob a raised in mm 37 47 27 27 26.5 Installation in a tall unit Observe the installation dimensions and the installation instructions when installing in a tall unit.
en Installation instructions ¡ Ensure that air exchange is guaranteed in accordance with the diagram. ¡ Contact protection must be guaranteed by the installation. Electrically connect the appliance with the protective contact plug Note: The appliance must only be connected to a protective contact socket that has been correctly installed. ▶ Insert the plug into the protective contact socket. When the appliance is installed, the mains plug of the power cord must be freely accessible.
Installation instructions 3. Centre the appliance. 7. Screw the appliance into place. There must be an air gap of at least 4 mm between the appliance and adjacent unit fronts. 4. Open the appliance door slightly and unscrew panels on the left and right. 8. For handleless kitchens with vertical bar handle en strips: ‒ Attach a suitable filling piece in order to cover any sharp edges and to guarantee a safe installation. ‒ Pre-drill aluminium profiles to establish a screw connection .
Valid within Great Britain: Imported to Great Britain by BSH Home Appliances Ltd.