
Assembly & Installation Instructions
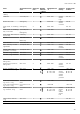
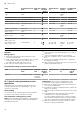

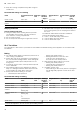
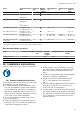
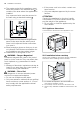
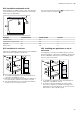
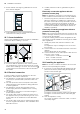
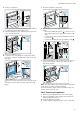
Table Of Contents
- Oven
- en
- Table of contents
- 1 Safety
- 2 Preventing material damage
- 3 Environmental protection and saving energy
- 4 Familiarising yourself with your appliance
- 5 Accessories
- 6 Before using for the first time
- 7 Basic operation
- 7.1 Switching on the appliance
- 7.2 Switching off the appliance
- 7.3 Residual heat indicator
- 7.4 Setting the type of heating and temperature
- 7.5 Changing the temperature
- 7.6 Changing the type of heating
- 7.7 Pausing operation
- 7.8 Cancelling operation
- 7.9 Viewing the current temperature
- 7.10 Displaying information
- 8 Steam
- 9 Time-setting options
- 10 Baking and roasting assistant
- 11 Steam programs
- 12 Childproof lock
- 13 Rapid heat-up
- 14 Sabbath mode
- 15 Basic settings
- 16 Home Connect
- 17 Cleaning and servicing
- 18 Cleaning functions
- 19 Rails
- 20 Appliance door
- 21 Troubleshooting
- 22 Disposal
- 23 Customer Service
- 24 Declaration of Conformity
- 25 How it works
- 25.1 General cooking tips
- 25.2 Baking tips
- 25.3 Roasting, braising and grilling tips
- 25.4 Cooking frozen products
- 25.5 Cooking ready meals
- 25.6 List of foods
- 25.7 Special cooking methods and other applications
- 25.8 Test dishes
- 26 Installation instructions
- 26.1 General installation instructions
- 26.2 Appliance dimensions
- 26.3 Installation below a worktop
- 26.4 Installation underneath a hob
- 26.5 Installation in a tall unit
- 26.6 Installing two appliances on top of each other
- 26.7 Corner installation
- 26.8 Electrical connection
- 26.9 Installing the appliance
- 26.10 Removing the appliance

en Installation instructions
46
¡ Ensure that air exchange is guaranteed in accord-
ance with the diagram.
¡ Only fit appliances up to a height that allows ac-
cessories to be easily removed.
26.7 Corner installation
Observe the installation dimensions and the installation
instructions when installing in a corner.
¡ To ensure that the appliance door can be opened,
you must take the minimum dimensions into consid-
eration when installing in a corner. The dimension
is dependent on the thickness of the unit front and
the handle.
26.8 Electrical connection
In order to safely connect the appliance to the elec-
trical system, follow these instructions.
¡ The appliance corresponds to protection class I and
must only be operated with a protective earth con-
nection.
¡ The fuse protection must correspond to the power
rating specified on the appliance's rating plate and
to local regulations.
¡ The appliance must be disconnected from the
power supply whenever installation work is being
carried out.
¡ The appliance must only be connected using the
power cable provided.
¡ The power cable must be plugged in at the rear of
the appliance until you hear a clicking sound. A 3 m
power cable can be obtained from the after-sales
service.
¡ The power cable must only be replaced with a cable
from the original manufacturer. This is available from
after-sales service.
¡ Contact protection must be guaranteed by the in-
stallation.
Electrically connect the appliance with the
protective contact plug
Note:The appliance must only be connected to a pro-
tective contact socket that has been correctly installed.
▶
Insert the plug into the protective contact socket.
When the appliance is installed, the mains plug of
the power cord must be freely accessible. If free ac-
cess to the mains plug is impossible, an all-pole
isolating switch must be integrated into the perman-
ent electrical installation in accordance with the in-
stallation regulations.
Electrically connecting an appliance without a
protective contact plug
Note:Only a licensed professional may connect the ap-
pliance. Damage caused by incorrect connection is not
covered under the warranty.
An all-pole isolating switch must be integrated into the
permanent electrical installation according to the install-
ation regulations.
1.
Identify the phase and neutral conductors in the
socket.
The appliance may be damaged if it is not connec-
ted correctly.
2.
Connect the hob in accordance with the connection
diagram.
See the rating plate for the voltage.
3.
Connect the wires of the mains power cable accord-
ing to the colour coding:
‒ Green/yellow = Protective conductor
‒ Blue = Neutral conductor
‒ Brown = Phase (external conductor)
26.9 Installing the appliance
Note:Do not use a cordless screwdriver to secure the
panels. This may damage the panels.
1.
If required, you can adjust the gap between the ap-
pliance door and the panels using the adjustment
screws on the left and right.
Turning the screws clockwise makes the gap larger
Turning the screws anti-clockwise makes the gap
smaller
2.
Push the appliance in fully.
Do not kink or trap the connection cable, or route it
over sharp edges.