
Assembly & Installation Instructions

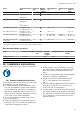
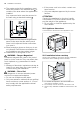
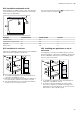
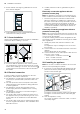
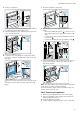
Table Of Contents
- Oven
- en
- Table of contents
- 1 Safety
- 2 Preventing material damage
- 3 Environmental protection and saving energy
- 4 Familiarising yourself with your appliance
- 5 Accessories
- 6 Before using for the first time
- 7 Basic operation
- 7.1 Switching on the appliance
- 7.2 Switching off the appliance
- 7.3 Residual heat indicator
- 7.4 Setting the type of heating and temperature
- 7.5 Changing the temperature
- 7.6 Changing the type of heating
- 7.7 Pausing operation
- 7.8 Cancelling operation
- 7.9 Viewing the current temperature
- 7.10 Displaying information
- 8 Steam
- 9 Time-setting options
- 10 Baking and roasting assistant
- 11 Steam programs
- 12 Childproof lock
- 13 Rapid heat-up
- 14 Sabbath mode
- 15 Basic settings
- 16 Home Connect
- 17 Cleaning and servicing
- 18 Cleaning functions
- 19 Rails
- 20 Appliance door
- 21 Troubleshooting
- 22 Disposal
- 23 Customer Service
- 24 Declaration of Conformity
- 25 How it works
- 25.1 General cooking tips
- 25.2 Baking tips
- 25.3 Roasting, braising and grilling tips
- 25.4 Cooking frozen products
- 25.5 Cooking ready meals
- 25.6 List of foods
- 25.7 Special cooking methods and other applications
- 25.8 Test dishes
- 26 Installation instructions
- 26.1 General installation instructions
- 26.2 Appliance dimensions
- 26.3 Installation below a worktop
- 26.4 Installation underneath a hob
- 26.5 Installation in a tall unit
- 26.6 Installing two appliances on top of each other
- 26.7 Corner installation
- 26.8 Electrical connection
- 26.9 Installing the appliance
- 26.10 Removing the appliance

en Installation instructions
44
¡ The mains socket for the appliance must
either be located in the hatched area or
outside of the area where the appliance is
installed.
Any unsecured units must be secured to
the wall using a standard bracket .
¡ For appliances that have a hinged switch
panel, make sure that the switch panel
does not hit adjacent kitchen units when
you open it.
¡ Wear protective gloves so that you do not
cut yourself. Parts that are accessible dur-
ing installation may have sharp edges.
¡ Dimensions of the figures in mm.
WARNING‒Danger: Magnetism!
Permanent magnets are used in the control
panel or in the controls. They may affect elec-
tronic implants, e.g. pacemakers or insulin
pumps.
▶ Wearers of electronic implants must stay at
least 10 cm away from the control panel or
controls during the installation.
WARNING‒Risk of fire!
It is dangerous to use an extended power
cord and non-approved adapters.
▶ Do not use multiple socket strips.
▶ Only use extension cables that are certified,
have a minimum cross section of 1.5mm²
and comply with the applicable national
safety requirements.
▶ If the power cord is too short, contact cus-
tomer service.
▶ Only use adapters approved by the manu-
facturer.
ATTENTION!
Carrying the appliance by the door handle
could break it. The door handle cannot sup-
port the weight of the appliance.
▶ Do not carry or hold the appliance by the
door handle.
26.2 Appliance dimensions
You will find the dimensions of the appliance here
26.3 Installation below a worktop
Observe the installation dimensions and the installation
instructions when installing below a worktop.
¡ To ventilate the appliance, the intermediate floor
must have a ventilation cut-out.
¡ The worktop must be secured to the built-in unit.
¡ Observe any available installation instructions for the
hob.